Plasticine paintings are a technique for performing planar, volumetric and flagella painting. Plasticineography for the development of children's creative abilities and its types Volumetric paintings from plasticine technique
Plasticine as a material for creativity involves a wide range of uses. Adults can use it to cope with stress, solve psychological problems, and just to engage in creative self-expression. For children, this is simply a vital element of game development! And how many variants of plasticine creativity exist - even ten fingers on children's hands are not enough to count. Let us turn to this type of stucco work, like plasticine painting.
Plasticine painting... What is it?
You can create paintings not only with the help of paints, which can perfectly replace ordinary plasticine. By experimenting with work techniques, you can create real plasticine masterpieces that are unlike each other. Plasticine painting can be embossed, can be done using the “scratching” or scratching technique, can evenly lie on the canvas, like a watercolor trace from a master’s brush, or can playfully show off flagella, curlicues and peas, creating a complete picture in the best traditions of pointillism.
Particular attention should be paid to plasticine painting for children, which, in addition to the noble goal of shaping the artistic and aesthetic perception of the world in children, also pursues the goal of a comprehensive development of the brain through training fine motor skills, activation of speech centers and mental processes such as memory, imagination, thinking. , attention.
Types of plasticine
For children's modeling, there are many different materials that have their pros and cons. So, you can sculpt from:
- salt dough;
- industrial production;
- sand (live, kinetic, smart, cosmic);
- cold porcelain;
- clay;
- modeling pastes;
- plasticine.

For the manufacture of stucco paintings on a rigid basis, not every material for modeling is suitable, plasticine is ideal. However, it should be borne in mind that plasticine also differs in types:
- domestic plasticine.
- Play doh.
- Wax plasticine.
- floating plasticine.
- Ball plasticine.
Floating plasticine can be the very first for the baby. It is inconvenient because it crumbles, crafts made from it do not have sufficient strength, but it is soft, does not stain pens and clothes, and also keeps well on water.
Plasticine painting from foreign plasticine takes place only on a glass basis in the "inside out" modeling technique, provided that the picture is pressed between two glasses. It is too soft, the parts do not fasten together well. It is better to leave this type of plasticine for acquaintance with modeling, for kids under three years old. It has rich colors, mixes easily with each other, and is suitable for experiments with molds, syringes, a rolling pin and stacks.
Domestic plasticine is good for modeling after three, because it perfectly connects the parts together, has sufficient strength to preserve the picture, but is too hard for small children's fingers and is difficult to wash in case of inaccurate use.
Plasticine painting in the second junior group can be carried out with the help of which has a pleasant to the touch structure, bright colors and sufficient plasticity to create the first children's masterpieces. It is all the more good that such plasticine dries in the air, and crafts from it, if properly stored, can remain for a long time.
An interesting idea is to create paintings by combining different types of plasticine and additional textures: sequins, foil, ice cream sticks, fabric. Such plasticine painting in dou! Senior group can already experiment with wax clay, which is characterized by too good adhesion of parts. But it has bright colors, is pleasant to work with and retains the quality of the finished work for a long time.

Basis for stucco painting
You can paint pictures with plasticine on completely different bases! Often, ordinary cardboard is used, which can endure all the options for the creative self-expression of the baby. For older children, glass is suitable as the basis for a plasticine picture, to which the plasticine is securely fixed and lasts a long time. Glass is especially good for "reverse paintings", when the plot is stuck from the bottom up, from light to dark tones, from the main elements to the background.
Kids will be interested in plasticine painting on improvised materials, for example, an old mp3 disc, a boring white cup or an ordinary plastic plate. Such a "picture" does not require additional decoration and can be an ideal gift for your favorite adults for any occasion.
Ideas for children's plasticine creativity
You can draw from everywhere! The first snow fell outside the window: the kid made the first snowman in the yard this year and then repeated it in miniature on a cardboard. Mom brought a bucket of garden strawberries, you can make a berry clearing on the glass. The family went to the sea in the summer and brought some beautiful shells, they will fit perfectly into the plasticine sea surf, created together with the baby as a keepsake.

Plasticine painting for children should have a number of properties:
- simple and understandable forms;
- the presence of the main element and a minimum of background details;
- clear and bright primary colors.
It follows that plot ideas can be found in ordinary children's coloring books. The main thing is to choose high-quality plasticine, a solid foundation and stock up good mood. Then the creation of a plasticine masterpiece is simply inevitable!
A little about color
As already mentioned, young children perceive the world in bright colors, so plasticine must be selected in pure primary colors. Closer to school, the child himself will want to experiment with colors, mixing them, choosing interesting shades.
Plasticine painting teaches the child the science of color, what colors are combined with each other, complement each other. It is necessary to highlight the main colors of the picture and a few additional ones. Then, in parallel with modeling, the child will acquire a sense of style and taste, feel beauty and harmony, which, of course, will be useful to him in adulthood.
Age restrictions or plasticine without borders!
Plasticine painting in kindergarten offered at the end of studies in the second early group, that is, after three and a half years. However, you can do modeling with kids much earlier, introducing them to the basics of stucco painting.
The work of little fingers allows you to develop fine motor skills, spatial-figurative thinking, and study cause-and-effect relationships. The child learns to create and enjoy the process of creation.

Features of modeling with children under three years old
The smallest creators learn simple actions with plasticine: pinching off a piece, rolling it into a ball or sausage, attaching a plasticine part to the base by pressing with a finger or by rubbing.
Painting with plasticine for toddlers may consist in filling in the missing small elements of the picture in the form of patches of the appropriate colors. The child pinches off a piece, rolls up a ball and closes the patch with it in the appropriate place of the finished picture. The kid learns to regulate the amount of plasticine taken, to understand the primary colors, and also to form a finished holistic view of the picture.
Beginnings of plasticine painting for children 4 - 5 years old
Plasticine painting for children 4-5 years old involves mastering the basic plasticine elements and the features of working with them. The techniques of rubbing plasticine on the basis, kneading with fingers, creating paintings in the techniques of peas, curls, tourniquets can be used.
Children can both invent a plot on their own, and fill in the contours proposed by adults with plasticine. Children of this age can already choose the color scheme of the picture themselves, not limited to the primary colors. Additional textures can be used to decorate the picture.
Plasticine masterpieces of children 6 - 7 years old
Plasticine painting for children aged 6-7 is distinguished by a wide variety of techniques. Children of this age can sculpt not only simple plots, but also detail the main element using the entire palette of colors. They can experiment with mixing colors, applying different textures.
Older preschoolers can already create two and three-level plots, relief plasticine paintings.
Basic techniques for working with plasticine by elements
The main plasticine element is a small indivisible piece of plasticine of a certain shape used to create a picture. The elements include:
- Ball - a piece of plasticine is plucked off and the ball is rolled up with a finger on the palm of the second hand or between two palms. The ball is attached to the base by pressing it in the center and rubbing it evenly in all directions.
- Drop - a plasticine ball is shaped like a drop. The drop is transferred to the base by pressing on the middle and rubbing towards the "tail" of the drop.
- The tourniquet is obtained by rubbing a piece of plasticine between the palms until a sausage is formed or with a syringe that draws the plasticine into a thin long voluminous strip. In the picture, the bundles are folded in the desired way and are attached to the base with a light even pressure of the fingers.
- A snail is a tourniquet folded in a spiral. With its help, you can create interesting paintings by evenly pressing the elements to the base in turn.
Basic techniques of plasticine painting
We list the main techniques for creating paintings from plasticine:
- Plasticine painting on glass reverse side. Modeling is carried out from light to dark, from the main element to the background.
- Plasticine painting with peas involves filling in the details of the picture with balls of the appropriate colors.
- Plasticine drawing with fingers or stack. The technique is based on rubbing plasticine over the base.
- Plasticine scraping. First, the background is formed by applying plasticine, then the main image is scratched with a stack.
- Plasticine painting from a syringe or harness paintings. The bundles are folded together, forming the details of the picture.
- Plasticine bas-relief suggests the presence of volumetric details of the picture.

Steps to create a simple plasticine painting
Now you have learned how diverse plasticine painting is! We will offer you a master class on creating a simple picture right now. For plasticine creativity, it is not necessary to have a solid knowledge base and practical skills in the stucco field. It is enough to have a little experience in modeling dumplings or pies, or maybe a burning desire to try your hand at this new kind of creativity is enough. Let's get started.
- Choice of a sketch of a future painting. You should start with simple children's coloring pages. For example, on the eve of the New Year, images of a cheerful snowman, a fluffy Christmas tree or a Christmas ball would be appropriate.
- Transferring the sketch to the selected base. For the first time, it is preferable to use ordinary cardboard.
- The choice of plasticine by type and color. You should prefer domestic plasticine with good stucco properties, pick up bright and pleasant colors. If the desired color is not available, you can mix the available colors to get the desired one.
- Selection of suitable elements, preparation, if necessary, of the stack for the smear technique. You should practice with the basic elements of plasticine modeling: a ball, a drop, a snail and a tourniquet.
- Filling the picture starting from the background and distant plans in the technique of a stroke, then moving to the central elements, using already relief techniques. It is preferable to work from dark tones to light, from top to bottom.
- Painting decoration.

How to store and display a painting
Best kept under glass. If the elements in the picture are embossed, then a passe-partout or a special substrate should be provided to save free space between the glass and the picture.
You need to hang a plasticine picture in a place where direct sunlight does not reach, away from heating appliances and on a flat surface to avoid deformation. You can store finished works in boxes under a transparent film. And longer-term storage will allow photographing of works and giving them away to the dearest and closest.
Enjoy your creativity!
Municipal preschool educational institution
"Kindergarten No. 000 combined type"
"Drawing with plasticine (plasticineography)"
Prepared by:
teacher of higher qualification categories
Saransk - 2014
When a person is born, he begins to learn the world, and he does it in the most effective and trouble-free way - everything needs to be seen, heard, touched and tasted. The child learns the world through manipulation, that is, actions with various objects that allow him to learn and study their properties, while learning his own creative abilities, change what he touches. One of the assistants of the child in this most important matter for his development is plasticine.
Before talking directly about plasticine, about drawing with this material, it must be said about which aspects of the child's emerging personality it has its beneficial effect. Tactile activity, especially pronounced by children, especially when playing with plasticine, directly affects the formation of fantasy. Psychologists point to a direct relationship between the degree of development of a child's fantasy and his evolving intellectual abilities. Thus, by stimulating the development of a child’s fantasy with the help of plasticine crafts, his ability to imagine images of objects that are not really in front of his eyes at the moment, we are laying the foundation for the development of the child’s intellect.
Scientists have found a connection between the active movement of the child's fingers and the formation of his speech apparatus. In fact, hands in this period of life are an additional speech organ for the baby. Functions motor activity and speeches are formed in parallel. If the development of the motor activity of the hands lags behind the normal course, then speech development is also delayed, although the general physical activity may be normal and even higher than normal. Therefore, drawing with plasticine will have a beneficial effect on the developing verbal apparatus of the child.
In the process of studying with plasticine, the baby begins to show creative abilities, the importance of which for the formation of a healthy and harmoniously developed personality can hardly be overestimated. In addition, one should not forget about such an aspect as preparing the hands for writing, which in our time often begins even before the child goes to school.
So, it became finally clear that classes with plasticine play an extremely important role in the full-fledged creative development of the baby.
There are no, and cannot be, trifles in raising a child, and such a funny and not serious, at first glance, thing as plasticine, with the right approach, can play a significant role in ensuring that the kids grow up comprehensively developed.
It is in childhood for the first time that we all learn about the existence of plasticine. But it turns out that this material can serve as an indispensable artistic tool for working in the pictorial genre. Yes, you can draw pictures with plasticine.
This is one of the youngest types of painting, which artists began to use quite recently.
The experience of working with children in kindergarten has shown that drawing in unusual ways and using the materials that surround us in everyday life cause great positive emotions in children. Drawing captivates children, and especially non-traditional ones, children draw, create and compose something new themselves with great desire. To instill in children the love of fine arts, to arouse interest in drawing, you must start with the game. By the way, non-traditional methods of drawing are suitable for this, which, accompanying traditional methods of drawing, work wonders and turn ordinary activities into a game, into a fairy tale. Drawing in these ways, children are not afraid to make mistakes, since everything can be easily corrected, and something new can be easily invented from a mistake, and the child gains self-confidence, overcomes the “fear of clean slate paper" and begins to feel like a little artist. He has an INTEREST, and at the same time a DESIRE to draw. You can draw with anything, anywhere, and however you want! A variety of materials poses new challenges and forces all the time to come up with something. And from these naive and uncomplicated children's drawings, as a result, a recognizable object emerges - I. The unclouded joy of satisfaction from the fact that "I did it - it's all mine!".

The concept of "plasticine" has two semantic roots: "graph" - to create, draw, and the first half of the word "plasticine" means the material with which the execution of the plan is carried out.
Plasticineography is one of the relatively recent emergence of a new genre (type) in visual activity, an unconventional technique for using plasticine.
This genre is the creation of stucco paintings depicting more or less convex, planar objects on a horizontal surface, using unconventional techniques.
Why paint with plasticine? - you ask. Very simple. Not everyone has learned to paint in oils. This is not taught in school. And I want to create a relief masterpiece today. Please, plasticine is at your service. Want to know what the painting will look like? - review "Plasticine Crow".
Plasticine can not only sculpt, but also draw with it.
Plasticine painting as part of a productive activity in preschool can become an unusual, exciting solution to the problems of creative development of children.
The main material is plasticine, and the main tool in plasticineography is the hand (or rather, both hands), therefore, the level of skill depends on the possession of one's own hands.
The color of plasticine is of great importance as a means of expressiveness.
Formation of skills in working with plasticine, awakening interest in modeling;
Mastering new techniques (rolling, pressing, smearing) and learning how to create an expressive and interesting plot in a semi-volume, using an unconventional plasticine drawing technique;
Teaching the ability to navigate on a sheet of paper;
Development of fine motor skills;
Acquaintance with the surrounding world;
Development of emotions and fantasy.
The use of techniques and materials of non-traditional technology allows us to achieve the following results:
Children work more confidently with plasticine, as a result, there are no identical works;
Become more attentive;
Improves the speech development of children;
Positive skills of communicative communication with peers are formed;
Willpower develops (children try to complete the work to the end, see their end result);
Gross and fine motor skills develop.
Scientists have proven that the development of the hand is closely related to the development of speech and intelligence of the child.
Plasticineography is a technique, the principle of which is to create a stucco picture on a paper, cardboard or other basis with plasticine, thanks to which the images are more or less convex, semi-volumetric.
Plasticine is a plastic and soft material for children's creativity, which has the property to take and hold a given shape.
So, not every plasticine suitable for modeling is suitable for drawing. Let's test it.

Plasticine floating fluorescent "Aquaform", company "Gamma" (Russia):
Plasticine is initially plastic, in the process of softening it begins to dry out a little. And this "little" - plays a role during drawing. At first, the plasticine sticks to the paper, but as it dries, it begins to crumble. It is better not to use it for drawing, otherwise the loss of coverage will occur already in the process of work.
Plasticine floating, "Luch" (Russia):
More elastic than other floating clays. You can safely connect the parts - they will not fall off the base in ten minutes, therefore, the integrity of the work can be maintained until it is placed in a frame and under glass. Plasticine - matte, if you would like to get an "oil effect", then it will not reflect the artist's intention.
Plasticine floating, Koh-I-Noor (Czech Republic):
Weakly fixed colors stain not only the fingers, but also the border elements. Therefore, when working with such plasticine, the work will look somewhat sloppy. Plasticine adheres well to paper, but does not hold a connection between individual elements. Thus, this is one of the most inconvenient types of plasticine for drawing.
Modeling paste Idigo (Italy):
The paste does not adhere to the paper base. Individual elements also cannot be connected. Already in the process of work, when the base is still lying on a horizontal surface, the coating dries up and begins to fall off in pieces. Thus, the paste is generally not suitable for drawing.
Plasticine "Cartoons", company "Gamma" (Russia):
It fits well on paper, but is difficult to work with: it requires good heating in the hands and prolonged softening. Thus, for drawing, you will not only have to make some effort, but also spend more time. Otherwise, it is very comfortable and gives a embossed glossy finish that does not crumble. A few let down in the set of shades, which is for many artists important point. Colors are rich but not pure.
Plant-based plasticine, Jovi (Spain)
Very soft plasticine, drawing with it is quite convenient. Although it is well suited only for application to the base by smearing. It is more difficult to create relief paintings with it: it easily loses its shape, and the quantity in the set is usually not enough for a relief painting. Plasticine gives a glossy finish.
Plasticine with gold "Prestige", company "Luch" (Russia):
This plasticine has everything in moderation: it is hard enough to keep the given shape (thereby it additionally strengthens the base) and soft enough to be applied to the base. In addition, it is moderately "sticky", but does not smear on the fingers. Plasticine is ideal for painting with plasticine.
Wax plasticine "Baby", the company "Gamma" (Russia):
It is convenient for drawing for small children, since the plasticine is soft, it sticks well to the base and to each other, it is easily distributed over the surface, while it does not stain hands a little.
Plasticine, Koh-I-Noor (Czech Republic):
It is very similar in characteristics to Koh-I-Noor floating plasticine, a little more elastic. In any case, it is better not to mess with him as a clay for drawing.
A few tips for beginners.
For the basis of the picture, it is better to use thick, non-glossy cardboard. You can also draw paper, but also thick, so that the picture keeps its shape and does not drop the finished elements. Plexiglas and plywood are suitable as a durable base.
When partially covering the surface, first check the quality of the connection of plasticine with the base. If the clay does not adhere well, it may fall off at any time during work.
The stack is used to draw contours on a plasticine surface or to give a surface texture.
Additional details can be made from beads, jewelry, buttons, acorns and other small items.
https://pandia.ru/text/79/152/images/image005_51.jpg" width="298" height="222 src=">
Apply plasticine from the top of the picture so as not to spoil the finished areas with your palm.
The finished work can be inserted into a frame with glass. Thus, it will be possible to preserve the integrity of the picture for a long time and protect it from dust sticking.

 https://pandia.ru/text/79/152/images/image009_33.jpg" width="158" height="209 src=">
Techniques for working with plasticine and the age of the child:
From a young age, children with the help of parents (adults) can master the following simple techniques for working with plasticine:
Roll out "sausages" and "balls",
Flatten "cakes"
Pull out plasticine
Blind pieces to each other.
Regular work with plasticine already by the senior preschool and primary school age allows the child to create more complex compositions (figures, plasticineography) using various and complex techniques:
Making decorative moldings of various shapes,
Topping,
flattening,
Pulling details from the general shape,
Tight connection of parts by gluing one part to another. IN
And even mixing different colors of plasticine to obtain intermediate shades is a technique of “pouring one color into another”.
Techniques for applying plasticine to the base.
You need to teach plasticineography in order of increasing difficulty: start at a younger age with simple techniques and create simple pictures, gradually move on to creating more complex pictures as you get older.
In order for children to better learn and consolidate their skills, training should be carried out in stages: first, it is important to teach how to press on the plasticine, then smear it from the center to the edges of the contour, and then combine both techniques.
The initial methods of learning to draw with plasticine are: rolling plasticine balls, very small sizes (no more than 3), pressing them, smearing them on the surface of the base (thick cardboard) to create a flat or semi-relief image.

While developing the skills of pressing and smearing, it is important to teach children to apply force with their fingers. The teacher shows the techniques, and if necessary, takes the child's index finger and helps to draw a plasticine line, turns the finger in the right direction.
Mixing plasticine.
To obtain the desired shade, you can combine plasticine of various colors and varieties. Mixing more than two colors at the same time is not recommended.
To obtain a variety of shades, children master the technique of infusing one color into another. You can use two methods:
The first is to mix the plasticine directly on the base, applying strokes alternately.
The second is to take a few pieces of multi-colored plasticine, knead, mix in one ball and draw.
Plasticine is applied to the picture not with a brush or roller, but with fingers. Not only an adult, but even a toddler will cope with such work. In addition, adjustments can always be made to the plasticine picture. BUT! There is one main requirement for plasticine - it must adhere well to the base. Plus a number of "minor" requirements: the material must be elastic (so as not to crack and fall off in pieces), smooth (so that the elements do not look like hippo skin), heat-resistant (so as not to lose the masterpiece one hot day).


We can say with confidence that a variety of techniques contributes to the expressiveness of images in children's works.
Our work experience has shown that mastering the technique of image gives children true joy if it is built taking into account the specifics of the activity and age of the children. They are happy to cover with spots, strokes, strokes one sheet of paper after another. Children boldly take on art materials, kids are not afraid of their diversity and the prospect of independent choice. They enjoy the process of doing it. Children are ready to repeat this or that action many times. And the better the movement is, the more pleasure they repeat it, as if demonstrating their success, and rejoice, drawing the attention of an adult to their achievements.
List of used literature
1., "Crafts from plasticine and salt dough", Moscow, ONIKS, 2009.
2., “We will make a fairy tale from clay, dough, snow, plasticine”, Yaroslavl, 1998.
3. "Sculpt with mom", Moscow, 2005
4. , "Technology", Moscow, 2005.
5. From work experience.
Perhaps it is impossible to find a child who would not like to sculpt from plasticine. Soft and pliable, it can take any shape, unlike other types of creativity (drawing, appliqués), a failed plasticine craft is easy to fix. Such qualities attract children, so they are happy to sculpt. On sale you can find any kind of plastic material for home creativity and organize self-study for your child. Both adults and children are satisfied! Meanwhile, not all parents know that plasticine can also be painted, creating three-dimensional paintings. This type of activity is called plasticineography.
What does the concept of plasticineography include? This non-traditional drawing technique is a new direction in children's creativity, when a stucco three-dimensional picture is created on a plane. Unusual way of drawing - an exciting activity not only for children, but also for adults. Teachers advise parents to learn unusual visual techniques themselves and teach their child, since plasticineography aims not only to develop children's creative abilities, but also to expand knowledge about the world around them, form intelligence, develop mental processes, actively influence the development of fine motor skills. Such creative activities with children are easy to organize at home. The main thing is that parents themselves should be interested in plasticineography, then the child will also be carried away by this type of creativity.
We get acquainted with the secrets of plasticine technology
 What are the secrets of plasticineography, is it possible to teach them to children? Teachers confidently say that this technique is quite accessible to preschool children, and with the right approach, plasticineography as a means of developing children's creative abilities can become a serious support for family education. In order not to miss the moment, it would be nice for parents to know when they start creating stucco paintings with kids. According to experts, such classes can be carried out already with three-year-old children. The main thing when creating pictures from plasticine is to take into account the age of the child and his technical skills, since due to the complexity of the image, interest in creativity may be lost. Therefore, the kids are first introduced to the simplest techniques of the "ABC of modeling":
- smearing
- the most simplified way of plasticineography, accessible even to the smallest child. Plasticine is smeared with fingers on a finished smooth base.
- rolling - Increasing complexity of work. It requires certain muscular efforts, since the plasticine is rolled out with direct hand movements in the form of a cylinder or in circular motions in the form of a ball.
- Flatten and stretch - most milestones in the creation of stucco paintings. They are necessary for the image of various decorative and applied forms, for example, cakes, a heart, an oval or an elongated cylinder, a flagellum. To do this, first roll out a ball or sausage, and then squeeze it with your palms, transferring various bends, indentations or an elongated tip with your fingers.
The plots of paintings for preschoolers at this age can be well-known autumn and summer motifs, for example, "The Sun" (on a blue background, we flatten the yellow ball, and smear the rays around); "Flowers on the Grass" (we smear green plasticine on a smooth base, put flattened multi-colored balls on top). In a similar way, "Autumn leaves on the ground", "Falling snow", "Hedgehog", "Colorful fireworks", "Christmas tree garlands" are decoratively depicted. Teachers are advised to use rhymes, riddles and short stories about a stucco picture to maintain interest in creativity and encourage a child, for example:
 I mold the sky, the sun, a stream from plasticine,
I'll stick flowers everywhere, I'll draw a cornflower.
And daisies, forget-me-nots, baby buttercups
They will smile at the sun, enjoy the warm summer!
We made koloboks
Flattened them from the sides.
It turned out to be a pancake,
Very soft (plasticine).
Important: working with plasticine is a rather difficult task for fragile children's fingers. Therefore, firstly, plasticine for plasticineography must meet the necessary requirements (heat the solid mass in warm water); secondly, during the creation of a stucco picture, it is necessary to change the types of activities, making pauses to prevent the baby from overworking.
Technique for older preschoolers
When the simplest methods are mastered by children, they move on to a more complex stage of learning, show new techniques and a variety of plasticineography. Thus, a certain system of work on the picture is created. What techniques of plasticineography are typical for this particular technique?
- smoothing down - reception is necessary to prepare the basis of the future picture. To get a smooth surface, you need to gently smooth the plasticine layer with your fingertips. You can moisten your fingers with water, then things will go faster. Work requires certain muscular efforts, therefore it is available only to older preschoolers.
- Topping - used to create new details in the picture and give it a decorative effect. The preschooler pinches the plasticine with his fingers where it is necessary to decorate the image.
- Lubrication, pressing - techniques are necessary for tight attachment of the elements of the picture.
- Sticking- connects one part of the image to another or helps to apply the necessary details to an already finished drawing, photograph.
- Mixing different colors of plasticine to get shades - necessary for the decoration of the picture. Children are taught to knead colored balls in one piece or to mix different colors right in the outline of the drawing in the form of a neat overlay of one colored piece on another.
To give greater expressiveness to plasticine paintings, it is good to use elements natural material: leaves, shells, nuts, seeds, small pebbles, bean seeds, etc. Beads, beads, small buttons will look beautiful in decorating images.
Important: plasticineography as a means of developing fine motor skills of the hands involves a gradual transition from simple ways work to more complex ones. Then the preschooler will be able to prepare the composition for a long time without getting tired. And the system of methods of working with plastic materials learned by the child will help to create new ideas and creative discoveries.
For older preschoolers, the plots of the paintings can be more complex than for kids, compositions on the themes of the seasons, for example, "It's snowing", "Butterflies in the meadow", "Basket with mushrooms", "Still life of fruit", "Vase with wild flowers ", "Rainbow and rain". Children like to create pictures from the life of animals ("Inhabitants of the zoo", "Hedgehog with mushrooms", "Dog plays with a ball", "Kitten and ball"), from the life of people ("Holiday", "Space", "Children sculpt a snowman ") or fairy-tale characters. They can compose small funny rhymes and stories themselves to beat their crafts:
I sculpt from plasticine
Balloon, ball and penguin.
And here is the hippo
He has a big belly.
Plasticine ears
wiggle at the crown
Important: Parents! Do not forget to rejoice with your children for each of their creative finds. Try to save crafts for a long time, give them to relatives, friends, to give significance to children's creations.
Plasticine method
To make it easy for parents to organize the education of children at home, experts have developed a plasticineography technique for children, which involves the following step-by-step work:

- First, we teach younger preschoolers to knead plasticine until it becomes pliable.
- For kids, we offer a ready-made base or ask for a little help in preparing it, for example, create a contour together with an adult.
- We teach older children who already have the skill of working with stucco material to prepare the basis of the paintings. We correct the movements of the hand when smearing plasticine from the center to the edges.
- For small children, we offer no more than two techniques for making simple images. The elders perform paintings that are complex in terms of decoration, using a whole range of techniques.
- To get a new color shade for a drawing, even young children are taught to combine different colors of plasticine, for example: yellow and red for orange, blue and yellow for emerald, blue and white for cyan.
- We show older preschoolers that strokes can look like silk, glass or ceramics, be rough or embossed.
- To roughen parts, we use various ways using a stack: we apply relief points, strokes, stripes, curly lines. To depict thin plasticine threads, plastic syringes without needles will be indispensable.
- We teach children that in drawing it is best to use bright, soft material to give the image an interesting shape.
How to properly prepare materials for creating plasticine paintings
- To give the picture stability and avoid deformation, use only thick cardboard for the base of the picture.
- To avoid the appearance of untidy plasticine spots on the basis of the pattern, cover it with adhesive film.
- To avoid mistakes in the sculpting process, pre-apply the outline of the pattern on the cardboard under the film.
- To prevent the picture from spoiling for a long time, cover it with a colorless varnish.
- To work on the picture quickly, prepare in advance necessary materials: cardboard, outlines of drawings, plasticine, napkins for hands, stacks, toothpicks, a set of natural material, a modeling board.
What is plasticineography
 Teachers, teaching preschool children, use different kinds plasticineography, which are easy to organize at home. Parents need to know what and how is used in different age periods. All preschoolers will have access to direct plasticineography
, in which the stucco image is built on a flat surface. When making a picture, you must first roll up three-dimensional forms, for example, koloboks, sausages, then arrange them along the contour and flatten them in accordance with the plan, attaching the details well.
Teachers, teaching preschool children, use different kinds plasticineography, which are easy to organize at home. Parents need to know what and how is used in different age periods. All preschoolers will have access to direct plasticineography
, in which the stucco image is built on a flat surface. When making a picture, you must first roll up three-dimensional forms, for example, koloboks, sausages, then arrange them along the contour and flatten them in accordance with the plan, attaching the details well.
Kids easily master this technique already at the age of two or three. They are offered a simple drawing without small details, on initial stage with the finished base. Older children create more complex compositions. They independently prepare the base, perform a contour, which is gradually filled with softened plasticine.
Reverse plasticineography (stained glass) involves drawing from the back of the base. To do this, it must be transparent, for example, plastic or plexiglass. The drawing is made on the basis of a marker, and then its elements are filled with plasticine. Pieces of plasticine of the required size and color are selected into the image, softened, and then smeared over a transparent base. To get a thin, neat layer, you can smear it with your fingers or a stack, carefully pressing the plasticine to the surface.
Modular plasticineography belongs to a complex technique and requires preschoolers to master all the techniques of modeling. Then a stucco picture is obtained, consisting of various decorating elements: balls, cakes, cylinders, braids and other technical elements.
Mosaic plasticineography - a technique loved by children, since the image is made only of plasticine balls. A fairly simple technique is available to children of all ages. The main thing is to select the appropriate colors and carefully fill the contour space with elements without going beyond it. The method of work consists of rolling small balls, placing them on the base and pressing against it.
Contour plasticineography - involves sculpting the object along the contour. The step-by-step steps of the action will be as follows: first, a drawing is applied to the base with a marker, then a contour is laid out using thin rolled flagella, the image is filled with flagella of the corresponding color. Teachers advise using a large syringe without a needle, into which plasticine is placed, then the syringe is placed in hot water to soften. Thus, you can get beautiful even flagella.
Multilayer plasticineography - represents sequentially applied layers of plasticine on the base. A similar technique is necessary for landscapes: images of forests, water, fields, when you need to choose not only the primary colors, but also their shades. Such work is quite difficult for small preschool children, and it is appropriate to carry it out only with older children. The method of work is as follows: different colors of plasticine are selected, from which thin cakes are made. Then the blanks are superimposed on each other in the form of a multilayer cake in accordance with the pattern.
 Textured plasticineography
- the most difficult technique, as it involves the manufacture of a three-dimensional image. It can be distinguished bas-relief
(French bas-relief - low relief, the volume of the picture is less than half), high relief
(more than half protruding) and counter-relief
(lat. contra - against and relief, in-depth drawing). To get such paintings, you can use a special roller with an image printed on it. In stores, you can buy ready-made templates for this technique.
Textured plasticineography
- the most difficult technique, as it involves the manufacture of a three-dimensional image. It can be distinguished bas-relief
(French bas-relief - low relief, the volume of the picture is less than half), high relief
(more than half protruding) and counter-relief
(lat. contra - against and relief, in-depth drawing). To get such paintings, you can use a special roller with an image printed on it. In stores, you can buy ready-made templates for this technique.
Caring parents will always find an opportunity to influence the development of children's creative abilities through plasticineography. This is perhaps the most accessible and exciting way to solve many issues of development and education, thereby preparing preschoolers for schooling and enriching family leisure.
Modeling pictures from plasticine is a great way to develop fine motor skills in a child.
This article will help your child develop the initial skills of modeling from plasticine: rolling balls and flattening them, rolling sausages and working with a stack. The child will learn how to make colorful pictures from plasticine.
A few simple and useful tips before you get started. Take plasticine in your palms and warm it, then the plasticine will become soft, pliable, and it will be easy and simple to sculpt from it.
If you sculpt from multi-colored plasticine, be sure to wash your hands before working with white plasticine. Otherwise, particles of other colors that stick to the hands will mix with white plasticine and color it.
Plasticine picture Fly agaric.
To work, you need cardboard, on which we will sculpt a plasticine picture, the plasticine itself and a board for rolling out the plasticine.

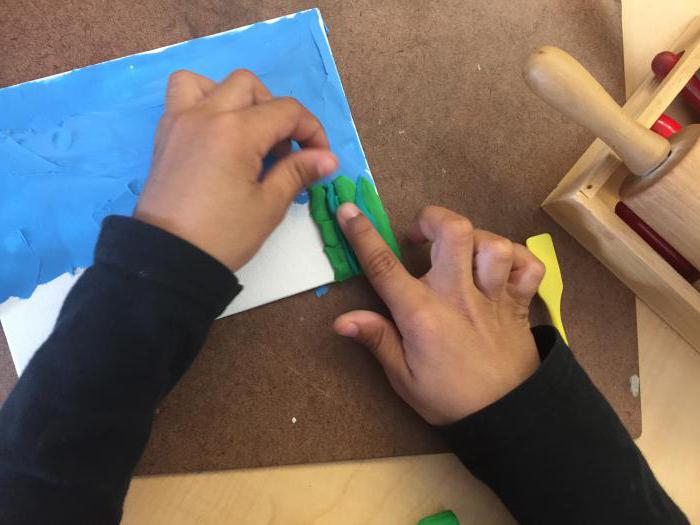
First, we will make a suitable background and learn how to work with plasticine. We pinch off small pieces of plasticine from plasticine and smear them on cardboard with a finger. We make a frame along the edge, roll out plasticine of a different color with a sausage and slightly flatten it. The beginning of our picture is laid.

Next we make fly agarics. Roll up two short sausages from white plasticine, flatten them and stick them on the workpiece - these are the legs of the fly agaric. To make a mushroom cap, first roll out a sausage from red plasticine, make an outline of the mushroom cap, and then fill in the entire interior space. Don't forget to make a mushroom skirt.

Roll small balls from white plasticine, carefully stick them on the fly agaric hats. Roll up droplets from dark green plasticine, flatten them, make veins in a stack.

We roll balls from blue plasticine, flatten them, cut out bells with a stack.

From yellow plasticine, make the body of a bee by first rolling it up and flattening it. Stick the head and strips of black plasticine.

Make the wings of a bee from gray or blue plasticine rolled up in the form of droplets.

The plasticine picture is ready. You can come up with and add something of your own.

Plasticine picture Butterfly.
We select the appropriate color of plasticine and apply it with our fingers to the base of the picture, smearing it over the entire surface.

We start making a butterfly with wings. We roll two identical balls, make droplets from the balls, pressing down on one side with a finger and flatten them. This is how wings are made. We also do the lower wings, but we take a little less plasticine.

We will fold the wings in the middle, we are already making the head and body of the butterfly, do not forget about the antennae.

We decorate the wings with multi-colored plasticine. We cut out the clouds in a stack from flattened white or cream plasticine.

At the bottom of the butterfly we make grass from two shades of green plasticine. Plasticine delin into several identical pieces, roll up long droplets, flatten them. We put them on the picture slightly tilting them to the side.

We make daisies in the familiar way, from plasticine droplets.

Finished works they look amazing and will decorate any wall in the house.

Plasticine picture Ladybug.
As in the first two cases, we completely cover the base for the application with plasticine.


Plasticine picture Caterpillar.
In the classroom in kindergarten or at school, working with plasticine, you can feel yourself not only as a sculptor, but also as an artist, if you mold a picture from plasticine. This is also a kind of painting. Drawing pictures with plasticine on the surface.

With a pencil, horizontally divide the cardboard into two parts. We cover the upper part with blue plasticine - the sky, and the bottom with green - grass. We make flowers around the edges. In the middle we make a caterpillar.

Painting from plasticine "Raspberry"
Looking at this picture of plasticine and remember the words from the song
"The raspberry beckoned us to itself,
Raspberry in the summer called for a visit.
How those sparks sparkled at dawn,
Ah, what a sweet raspberry they were."
Continuing the theme of plasticine paintings, I want to show how to mold a raspberry sprig with children. The raspberry bush looks almost realistic, like a real one.

In the application we use yellow, raspberry, green and white plasticine, cardboard from a candy box. Having cut off the cardboard of a suitable size, we coat it with yellow plasticine. You can use colored cardboard, but clay holds worse on paper. From raspberry plasticine we sculpt a shape resembling a bucket, with a stack we divide it into two parts. Roll up small balls.

We stick the base of the raspberry on the yellow base, and put the balls on top with slight pressure. To the berries we make twigs and sepals. We roll a small ball from green plasticine, flatten it into a cake, make a sepal in a stack, stick it to a raspberry.

For raspberry leaves, you need to make droplets, flatten them, and make incisions along the edges and veins with a stack.

Raspberry flowers are more inconspicuous than ours, but nothing prevents us from making them pretty. From white plasticine we make five small cakes and one from yellow. We fold the cakes into a flower. We make a few more of these flowers and add them to the bush.

Master class on working with plasticine. The painting "Morning tea"
I offer my work for classes with children of preschool and primary school age.
Target:
Develop a sense of form, texture, tactile sensations. Strengthen the fingers and hands, i.e. useful in teaching writing and drawing, as well as in the treatment of dyslexia, a severe reading disorder.
Tasks:
Develop children's creativity, imagination, taste;
Cultivating perseverance and accuracy in work
From early childhood, we have known this wonderful material - plasticine. It is malleable, multi-colored, able to take any shape, in addition, it is affordable and inexpensive.
Necessary materials:
1. Plasticine
4. Black marker
5. Clear nail polish
7. Fantasy and smile

Step by step workflow:
We choose an image. You can take it anywhere: from a book, magazines. I took last year's calendar.
We take a frame with glass, disassemble the frame. We put glass on the calendar, and carefully trace the drawing with a marker. Then I sealed the finished picture with adhesive tape, because. My marker was washed off.
This is the picture we got

We turn the glass with a pattern on the wrong side and begin work
We start with the smallest details. We first sculpt the middle of the flowers

Then you can the flowers themselves