Marine knots. The main knots used in mountaineering How to tie a double bowline on the system
Arbor node. Bowline, Good knot, king of knots. People not familiar with nautical terminology may think that the name "arbor knot" comes from the verb "to chat" or from the noun "arbor". In our maritime language, the name of this node comes from the "gazebo", but not from the usual, but from the marine arbor, which is a small wooden board - a platform that serves to lift a person onto the mast or lower the ship overboard during painting or other work. This board with the help of cables is attached to the lifting cable with a special knot, which is called the gazebo knot. Its second name is bowline. It comes from the English term "bowline", denoting tackle, which is used to pull the windward leech of the lower straight sail. This tackle is knitted to the leech of the sail with a "booline knot", or simply a "booline". It makes sense to dwell on this node in more detail. Indeed, he is admired by all who deal with cables and viscous knots. This is one of the oldest and most amazing knots ever invented by man. Archaeologists testify that the gazebo was known to the ancient Egyptians and Phoenicians for 3000 years BC. Not every sea knot can be compared with it in the number of positive properties that it possesses. Given the scope of its application and excellent qualities, the gazebo is rightfully awarded the royal title in a huge dynasty of marine and non-marine knots. In appearance, it looks like a weaving knot, but its running end does not go into the loop of the other end, but into the loop of its root end. The arbor knot, despite its amazing compactness, simultaneously contains elements of a simple knot, half-bayonet, weaving and straight knots. The elements of all these nodes in a certain combination give the gazebo node the right to be called universal. It is surprisingly easy to knit, even with strong traction it never tightens "tightly", does not spoil the cable, never slides along the cable, does not untie itself and is easily untied when necessary. The main purpose of the gazebo is to tie a person with a cable under the armpits as a means of insurance when climbing to a height, lowering overboard or in a smoky room during a fire on board a ship. You can insert a gazebo into the non-tightening loop of this knot. A loop tied with a gazebo knot on the mooring line reliably serves as a fire. This knot can be successfully used to tie two cables of any diameter or to tie a thick vegetable cable with a steel one (in this case, the cables are connected by loops, and the knots are knitted at their root ends). Of all the ways of tying two cables of different materials (for example, hemp and steel, dacron and manila), connecting with two arbor knots with loops will be the most reliable. It can be used for mooring and for attaching the cable to the hook. The reader is offered the most rational and simplest way of knitting. Always in life. the ability to quickly tie a bow knot around your waist can come in handy. You need to be able to do this with one hand with one continuous movement of the brush, in the dark, in 2 - 3 seconds. It's not hard to learn this at all. Take the root end of the cable in your left hand, with your right hand encircle the running end behind you around your waist. Take the running end in your right hand and, stepping back about 10 centimeters from its end, hold it in your fist. Take the root end in the left hand and stretch the left hand forward. Now, having the root end of the cable slightly taut, with the right brush with the running end clamped in it, go around the root end of the cable from top to bottom towards you and up away from you. Try to make such a movement with the brush so that it does not completely fall into the loop. Next, wrap the running end around the stretched root end to the left, intercept it with the thumb and forefinger of the right hand. Pulling the right hand out of the loop, simultaneously push the running end into the small loop. Holding the running end with the right hand, pull the root end with the tape. After doing this several times in a row, you will learn how to tie a bow knot on yourself, in the dark or with your eyes closed. Imagine the following situation: you find yourself over the side of the ship in the water, they throw you a line from the deck, along which you cannot climb up, because it is slippery. By tying a harness knot around your waist and moving the resulting armpit loop, you can ensure that you are safely pulled out of the water onto the deck. This magnificent knot has saved the lives of sailors more than once. To untie the gazebo knot, it is enough to slightly move the loop of the running end along the weakened root of the cable.
Portuguese bowline (double arbor?).
Works just like a regular bowline. It is used in cases where it is necessary to tie two loops at one end at once. For example, lifting an injured person. Then the victim's legs are threaded into loops, and a half-bayonet is knitted around the chest under the armpits with the root end. then the person will not fall out anywhere, even if he is unconscious.
Eight. 
This knot is considered a classic. It forms the basis of a dozen other, more complex nodes for various purposes. In the form in which it is shown here, this knot in maritime affairs serves as an excellent stopper at the end of the cable so that the latter does not splash out of the block pulley. Unlike a simple knot, even with strong traction, it does not spoil the cable and can always be easily untied. To tie the figure eight, it is necessary to encircle the running end of the cable around the main one and then pass it into the loop formed, but not immediately, as in a simple knot, but first winding it for yourself. This knot can be applied to the rope handles of a wooden pail or bucket if the rope passes through the two holes on the protruding ends of the wooden staves. In this case, after threading the rope through both holes, at its ends, on the outer sides, the rivets are tied in a figure-eight. With two figure eights, you can securely attach the rope to the children's sled. To prevent the hand from slipping off the end of the dog leash, we advise you to tie a figure eight. In addition, it serves well for attaching strings to the tuning pegs of violins, guitars, mandolins, balalaikas and other musical instruments.


Improved dagger knot. 
In foreign rigging practice, this knot is considered one of the best knots for tying two large diameter cables. It is not very complicated in its scheme and is quite compact when tightened. It is most convenient to tie it if you first lay the running end of the cable in the form of a figure of the number 8 on top of the main one. After that, thread the elongated running end of the second cable into loops, pass it under the middle intersection of the figure-eight and bring it out over the second intersection of the first cable. Next, the running end of the second cable must be passed under the root end of the first cable and inserted into the figure-eight loop, as the arrow indicates. When the knot is tightened, the two running ends of both cables stick out in different directions. The dagger knot is easy to untie if one of the extreme loops is loosened.


Straight knot. 
Archaeological finds indicate that the Egyptians used it about three thousand years before our era. The ancient Greeks and Romans called it Nodus Hercules - the Hercules or Hercules knot, because the mythical hero Hercules tied the front paws of the skin of the lion he had killed on his chest with it. The Romans used the straight knot to stitch wounds and heal broken bones. It consists of two half-knots, sequentially tied one on top of the other in different directions. This is the usual easiest way to knit it. Sailors, who have been using this knot since ancient times to tie cables, use a different knitting method. Weavers who use a straight knot to bind broken threads of yarn tie it in their own way, in a special, convenient way for them. With heavy loads on the tied cables, as well as when the cables get wet, the straight knot is strongly tightened. How can a straight (reef) knot be untied, which "is so tightened that it cannot be untied and will have to be cut." A straight knot, even wet and tightly tightened, is untied very simply, in 1 - 2 seconds. Tie a straight knot. Take ends A and B in your left hand, and ends C and D in your right hand. Pull them strongly in different directions and tighten the knot as tight as possible. After that, take the root end A in your left hand (so that it does not slip out of the hand, make a couple of hoses around the palm). Take the running end B in your right hand (you can also wrap it around your palm.). Pull the ends sharply and strongly in different directions. Without releasing end A from your left hand, hold the rest of the knot in your fist with your right hand, holding it with your thumb and forefinger. Pull root end A to the left side - the knot is untied. The whole secret lies in the fact that when the ends of A and B are jerked in different directions, the straight knot turns into two half-bayonets and completely loses all its properties. It is also easily untied if you take the root end D in your right hand and pull the running end B strongly to the left. Only in this case, the end of G must then be pulled to the right, and the rest of the knot (half bayonets) to the left. When untying a straight knot in this way, remember that if you pulled the running end to the right, pull the root to the left and vice versa. When untying a straight knot, one should not forget that with what force it was tightened, it is necessary to pull one of its running ends with the same force.

Flat knot. 
It has long been considered one of the most reliable knots for tying cables of different thicknesses. They even tied anchor hemp ropes and mooring lines. Having eight weaves, the flat knot never tightens too much, does not creep and does not spoil the cable, since it does not have sharp bends, and the load on the cables is evenly distributed over the knot. After removing the load on the cable, this knot is easy to untie. The principle of a flat knot lies in its shape: it is really flat, and this makes it possible to choose the cables connected by it on the drums of capstans and windlasses, on the welps of which its shape does not interfere with the even overlap of subsequent hoses. In marine practice, there are two options for knitting this knot: a loose knot with tacking of its free running ends to the root or half-bayonets at their ends and without such a tack when the knot is tightened. A flat knot tied in the first way (in this form it is called a Josephine knot) on two cables of different thicknesses almost does not change its shape even with very high traction and is easily untied when the load is removed. The second knitting method is used for tying thinner than anchor ropes and mooring lines, cables, with the same or almost the same thickness. At the same time, it is recommended to first tighten the tied flat knot with your hands so that it does not twist with a sharp pull. After that, when a load is given to the connected cable, the knot crawls and twists for some time, but, having stopped, it holds firmly. It is untied without much effort by shifting the loops covering the root ends. As already mentioned, a flat knot has eight intersections of cables and, it would seem that it can be tied in different ways, there are 256 different options for tying it. But practice shows that not every knot from this number, tied according to the principle of a flat knot (alternating intersection of opposite ends from under and over), will hold securely. Ninety percent of them are unreliable, and some are even dangerous for tying cables designed for strong traction. Its principle depends on changing the sequence of intersection of the connected cables in a flat knot, and it is enough to slightly change this order, as the knot receives other negative qualities. Before putting this knot into practice for any important business, you must first remember exactly its scheme and tie the cables exactly along it without any, even the most insignificant deviations. Only in this case, the flat knot will serve you faithfully and will not let you down. This marine knot is indispensable for tying two cables (even steel ones, on which a significant effort will be applied, for example, when pulling a heavy truck stuck in mud on half a wheel with a tractor).

Flemish loop (figure eight fire). ![]()
Knotted in a figure-eight on a cable folded in half, it is a strong and easily untied loop at the end of the cable. The Flemish loop is suitable for knitting on both thick and thin cables. It almost does not weaken the strength of the cable. It is used for fastening the strings of musical instruments and other purposes.
Flemish knot (  counter eight).
This is one of the oldest marine knots, which was used on ships to connect two cables, both thin and thick. In fact, this is the same figure eight, tied with two ends. There are two ways to knit this knot. First, make a figure eight at the end of one of the cables tied together. Towards the exit of the running end from it, enter the running end of the second cable and repeat figure 8, tied on the first cable. After that, grasping each two ends, left and right, evenly begin to tighten the knot, trying to keep its shape. For the final tightening of the knot, pull on the root ends of the cables (see figure). To connect two cables with a Flemish knot in the second way, put the running ends of the connected cables parallel to one another so that they touch each other approximately along the length of one meter. At this point, tie a figure eight with two cables folded together. In this case, you will have to carry around and thread into the loop along with the short running end of one of the cables and the long root. This is precisely the inconvenience of the second method of knitting the Flemish knot. The connection of two cables with a Flemish knot is considered very strong. This knot, even when tightly tightened, does not damage the cable, and is relatively easy to untie. In addition, it has excellent quality - does not slip and holds securely on synthetic fishing line.
Fail knot. 
On a sailing ship, straight sails, which were placed between the mars-ray and the lower yard, were called marseilles. Depending on which mast the sail belonged to, it took the name "main topsail" on the main mast, or "fore topsail" on the fore mast. The tackle with which the yards of these sails were raised was called the main-marsa-fal and the fore-marsa-fal. These tackles were attached to the yard with a halyard knot. Like the fox knot, the halyard knot is considered a reliable maritime knot. It can do a good job in our everyday life.
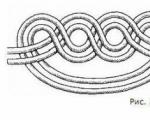
double bowline
This is a good way to make a loop in the middle of a rope, or to make a quick rope rescue cradle. It is not very comfortable to sit in it, but if necessary, it saves.
To tie a double bowline, make a coil on the cable, bring it to the main part and twist it as you usually do with this type of knot. As a result, a rope is inserted into the lug protruding forward, which is put on the main part and remains there. The end result is a knot that looks like a Double Knot, but without the usual end of the rope inside the loop.

How I got a double gift. Arsenal v Newcastle 17/04/71 A little later in the year things began to change. My favorite team was still missing the stars and playing without much heat, but suddenly it became difficult to beat them. In 1970, the dismal
From the book Billiards author Ostanin Evgeny AnatolievichRolling on a side ball with a double rolling from Mengo Balls "10" and "15" are not far from the corner pocket, "eight" - in the opening of the corner pocket. It is necessary to put all three balls into the pocket with one free stroke. Reel on the side ball with double rolling from MengoFor a successful
From the book Hapkido for beginners the author Master ChoiMcCleary's Double-Rolled Side Ball Roll Fours, sevens and twelfths are set up along the short side close to the corner pocket. In order to play the “twelfth” into the pocket, it is necessary to hit the cue ball with a strong coasting blow with the left side. IN
From the book Selected Games author Romanovsky Petr ArsenievichDouble carom on the move In order to perform this trick, it is necessary to hit the white in such a way as to drive the red into the upper left corner. After that, you need to direct the white ball along the sides of the table so that, after bouncing off them three times, it would go to the corner and
From the book The Way of the Invisible [The True History of Ninjutsu] author Gorbylev Alexey MikhailovichDouble (simultaneous) blow with the fists of both hands The opponent grabbed you by the hair with his left hand. Take a step forward with the right foot behind the left leg of the opponent. At the same time, deliver a direct blow with the fist of the left hand to the chin and a blow from below with the fist of the right hand to the torso
From the book Dirty Football author Dreikopf MarseilleDouble blow In conclusion, I would like to cite one of the last serious games I played.
From the book Sea knots in everyday life by Jarman ColinKato Danzo - a double spy In the history of the Japanese art of espionage, there was, perhaps, not a single ninja whose name would be surrounded by a greater halo of mystery and mysticism than Kato Danzo. His outlandish skill was so incredible that the people's rumor called him a magician,
From the book Fundamentals of Personal Security author Samoilov Dmitry From the book The Central Axis of the Path of the Fist (Yiquan, Yiquan) author Xiangzhai WangBowline, or Arbor Knot Perhaps one of the most needed and used knots on a ship, it is a fixed loop at the end of a rope (3). Easy to tie, it also unties just as easily, even if it has been under a lot of pressure before. There are many
From the author's bookDouble clew and double sling knot Double clew knotFor extra safety the clew and sling knot (see previous page) can be quickly converted into double clews. It is done like this: you circle the working end of the rope around
From the author's bookSpanish Bowline (Arbor Knot) The Spanish Bowline, like the Double Bowline, consists of two loops, which make it possible to use it as a replacement for a rope cradle or, if possible, to climb aboard a ladder. The design of the Spanish bowline is not
Of all known to mankind, the bowline knot is one of the most reliable. It is also called gazebo, universal or the king of all knots. Hearing one of these formulations, you can be sure - we are talking about him. Today we will figure out how to knit bowline knots.
Node Features and Benefits
- The loop is never tight.
- The knot does not slip along the rope.
- Such a loop will never untie itself, but it is easy to untie it manually.
- When connecting two cables using a gazebo, it is possible to achieve a reliable connection.
How to make a bowline knot
The diagram shows how to knit bowline knots. Thanks to this method, it is possible to make the most reliable connection. Therefore, it is used in the connection of ropes and cables for the transport of goods, in the maritime industry and is popular among tourists.
How to tie a bowline knot?
Many are interested in: "How to knit bowline knots?". Most of our readers do not even suspect that making such a loop is much easier than it seems.
- First, make a loop with a cross in the center.
- After that, with the fingers of your right hand, grab the intersection of the ropes.
- Turn the palm with the loop down from you.
- Pass the running end of the rope through the small hole in the center, located above the large loop.
- We pull out the running end over the loop, draw the ropes behind and put it into the hole of the small loop.
- The free part of the thread should be in the loop in a position parallel to itself.
Important! To give the knot reliability, sometimes another, safety loop is formed above it.

Knowing how to knit bowline knots, and putting this knowledge into practice, do not forget that an improperly formed knot can stretch or untie at any time. Therefore, carefully monitor the progress of mating. Remember that the more practice you have, the better and faster you will be able to create a strong and reliable connection called the double bowline knot.
Stages of knitting a knot around the waist
Every tourist should be able to knit a bowline knot. Therefore, use the instructions if you have to go hiking.
- Take the root end of the rope in your left hand.
- Encircle the running part of the rope around your axis with your right hand.
- Stepping back about 10 cm from the edge, pinch the right, running end of the rope with your hand.
- Extend your left hand with the rope to a forward position in front of you.
- With the right hand with the running end of the rope clamped in it, wrap the stretched root end from top to bottom towards you and up away from you. Make sure that the loop does not wrap around the brush and does not capture it completely, in which case the knot will not be tied correctly.
- Encircle the running end of the rope around the stretched root to the left, then intercept it with the fingers of your right hand.
- Pull the right hand out of the loop, at the same time pushing the running end of the rope into the base of the small loop.
- While holding the running end with your right hand, pull the root end of the rope with your left hand to tighten and secure the loop.
The design of the knot consists of two non-tightening loops. The use of such a scheme allows the climber to sit in one loop, while the second one covers the human torso under the armpits. It is easy to climb rocks, cross obstacles using a belay line, and just work at height using a bowline (knot) structure. The diagram clearly illustrates the knitting sequence of the connection.

Such a knot is knitted on a rope or cable folded in half.
How to tighten the loop?
Entering the running end of the rope into the small loop of the knot, pull it out and, wrapping it around the large loop, place it in the upper part of the knot. While holding the root of the cable with one hand, pull on the right side of the large double loop with the other. Having done this manipulation, you can tighten the loop to the required level.

Disadvantages of Bowline Knot Design
The disadvantages are manifested in the need for additional fastening of the nodal connection. It is noted that sometimes a connection controlled by a node is able to untie. Such cases were noted when knitting a structure on a slippery fishing line or exceeding the permissible load rate.
Fishermen, sailors and tourists actively use a variety of knots. Bowline knot has gained particular popularity because of its strength and reliability. Using this design, you can be sure of the safety of insurance.
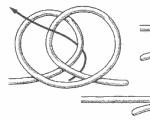
Application: The Double Arbor Knot (ABOK p. 161) forms a secure loop in the middle of a piece of rope. It doesn't slip or drag. It is worth starting with a simple rope and finishing with a secure safety loop in the middle (fig. right). Pay attention also to the driving loop or.Features of the Double Arbor
How to tie it: In theory, the knot is easy to tie, but since the pattern for tying it is difficult to visualize, you can get confused. This node is proof of that, which is why we prepared these images.
Tying a double bow knot
1. Form an open loop in the middle of a piece of rope.
2. Fold it into a closed loop and thread the end of the open (first) loop through the closed one.
3. Remove the loop and loop it around the entire knot until the loop completely wraps the knot to the root ends.
4. Tighten the completed knot.
Several applications:
Leg support: The knot can be used as a secure foothold in the middle of the rope.
Hanging scaffold / gazebo: It is believed that two loops create a reliable hanging platform, which is much more comfortable than using one loop. The loop can go around each thigh, while the free end of the rope can support the back for insurance. It is also possible that one loop holds the back, and the other goes around the hips. However, apart from the case where the rope is a couple of inches or more in diameter, it is only in very adversity that a person will truly appreciate the comfort of such a chair.
Emergency lifting mechanism: The Double Bow Knot is also used to lift something, for this, make a Double Bow Knot on the rope. Wrap the free end of the pin, then pass it through the loops again, and finally bring it back to the pin. So we get a lifting mechanism, but we must take into account that the friction force in this case will be large. Pay attention also to
Living most of the year on KSS, communicating with visiting climbers who want to walk alpine routes on the Sokol, I regularly hear the same phrase: For mountaineering, it is enough to know “X + 1” sea knots, if you know and be able to use them with your eyes closed .
Where X varies from 4 to 7. I will add that these phrases are usually spoken by quite experienced, one might say, honored people, who are listened to by beginners and just novice climbers. They unconsciously make mistakes, in fact, they use much more knots on the “machine”. But beginners perceive the number of nodes indicated by them as a guide, and take them into service. Without claiming to be the ultimate truth, I decided to write a small essay in which I give examples of the use of knots during ascent (very roughly according to the list). Actually, a small comment was written to the article (a request to critics, plz try to master everything written, and then press the buttons. Aktush)
Let's look at the order of actions of the bundle going to the route:

One participant carries a backpack with equipment and a snack. The second participant carries the ropes. The ropes are somehow assembled into a portable object, a ring, a “backpack”. To secure the ropes from spreading, it is used "marker" knot (1). They can also tie telescopic sticks or ice axes, if you need to knit something like a stretcher. The third one also carries something. Well, at least bivouac gear and water.
Tactics are: the first climbs, the second also climbs, the third honestly zhumarit. The first two are tied to a rope. The safest and most convenient for this are: "Double bowline"(2) and "Flemish Loop"(3, we call her "eight"). The efficiency of both is almost the same, but the first knot is easier to untie after the load is removed.
|
|
"Double bowline" (2) - Double gazebo. The knot serves as a temporary replacement for the gazebo. Two right loops are designed for legs, one left instead of a belt |
|


|
Station interlocked with Double Bowline (2) |
|
|


Both do not require a control knot, but if the edge of the rope peeks out of the knot a little more than 10 diameters, you can not tie the knot, but tie a control, "weaving"(4) or "semi-grapevine"(5). Both nodes are used in a variety of cases.
|
|
|
|


Before the start, the leader hung equipment, bookmarks, friends, hooks, local loops on the shelves of the gazebo. There were not enough ready-made loops, but I have with me a cord with a diameter of 7.0-8.0 long enough to make additional local loops. Which node is best suited for this case: "Counter Flemish"(6, eight) or "grapevine"(7)?. efficiency is the same, but "grapevine"(7) takes up less space. Less space - less clinging - therefore preferable "grapevine"(7). There is a large bookmark of the “hexa” type with a damaged sling, we pull out the damaged sling, but there is no other sling. How can we get out of the situation? We replace the damaged line with a 7.0-8.0 diameter cord or main rope (if the hole in the hex allows). What node? "Grapevine"(7). Because the knot can be knitted so that after tightening it is located in the body of the hex.
|
|
|
|


|
|
|
|


We were lucky, we took with us a lot of flat tapes for organizing extensions, for blocking stations and other needs. We can use this tape to replace the damaged one. What node? Only .
We've finally started. In the process of climbing in a particular place, it suddenly turned out that we did not have a suitable belay element. The bookmarks are too small and the friends are too big. Hooks fall through. You can forget about the lack of insurance, console yourself with the phrase "I'm happy" and move on. Close to a place where you can arrange insurance. But grief does not care about your confidence in your happiness, as a result - a flight to great depths.
You can avoid trouble by using the same rap cord with a diameter of 7.0-8.0. We take a cord about one and a half meters long, on one side we knit a knot "simple"(9), leaving 15 cm free, and on the other side the knot "Flemish Loop"(3). The result was a primitive bookmark, with a head 1.25-1.3 times larger than the cord diameter. If the gap is wider, then to increase the size of the head we knit, "semi-grapevine" or even "triple semi-grapevine" (Barrel), on the other side of the cord is still the same "Flemish Loop". If this is not enough, you can tie. "Monkey Fist"(10), sometimes it is called "ball", but this is not entirely true). Anyway, this is not enough, then we can fold the rope in half and tie a knot with both ends "simple"(9), in fact, it is no longer "simple", but "Oak"(eleven). Or knit with two ends "semi-grapevine". The knot turns out to be large, it will withstand a large load (knitting in this embodiment is quite difficult), but the loop is rather weak. Need to be amplified. How to strengthen? Knot "Double Flemish Loop"(12) does just that. You object. How to hold on to the minuscule with one hand, tie any of the above with the other? Holding on to the minuscule, this is almost impossible to do. So think one step ahead!
|
|
|
|


Insured. We climb further, along the way there are trees and stumps (the tree was cut down by a rockfall), on which we organize insurance. It’s clear with trees, we throw a local loop with a “yoke” and then fasten a carabiner or even a quickdraw into a double loop. On a stump, such a trick would be unsafe. You need to apply some kind of restraint. Either make a "rocker" with additional turns (coverage), or put a knot on a stump "stirrup"(13), or "with a reef through a knot"(14, but in this case its application is worse than the previous two). Sometimes you have to be sophisticated at all when you need to fix the rope (tape) rigidly at the base of the hemp: knot "Constrictor"(15). You may not use it, but it knits quickly, and then does not hang on the stump. Finally, the leader reached the station and here, after some torment, he manages to create a masterpiece. The masterpiece is crowned with a node that collects loads from insurance points. What node? "Compensation Loop"(16)! But this node works well on two points, worse on three and not at all on four. The leader, after some deliberation, decided to do without "compensatory"(16). By uniting all the points with one common loop with a common central node. Node either "Oak"(11), or "Flemish Loop"(3). Moreover, in the first variant it is easier to adjust the “sameness of loads”. Just do not forget to insert carabiners into the knots so that they can be easily untied later. Nodes suitable for other station variants "Flemish Loop" (3) "double Flemish loop" (12), "double bowline" (2).
|
|
|
|


|
|
|
|


So, the station is made, the insurance is organized. The leader insures the bottom with a knot UIAA(17). Carabiner with a knot in the station's collecting carabiner. Insurance with UIAA it doesn’t bother, the knot charges quickly and it’s convenient to work with it, you can always fix the bottom one, or give the rope back. The second participant climbs with the collection of equipment installed by the leader and at the same time lays a fixed rope for the third. There are options here, but consider this case. The second, in order to remove unnecessary dangerous friction on the railing, it is necessary to fix the railing rope in the middle on some tree. Let's take into account that there are not enough local loops, they will be required on the next rope, and there are not enough carabiners. A single node comes to the rescue "bowline"(18). You can’t use it without control knots, the controls will be made from the same rope.
|
|
|
|


Our third member, not a very good climber, but a big adventurous one. From the very beginning he decided to cheat. In order not to spend on himself, he ties a safety loop from the jumar to the gazebo or knot "Flemish Loop"(3), or "double bowline"(2) his lanyard is also tied either in a knot "Flemish Loop"(3), or "double bowline". By the way, the jumar itself can also be tied if there are not enough carbines. Due to the lack of a second jumar (the second was decided not to take, because the route has one short vertical section, and the rest are positive), he decided to use some kind of grasping knot. The node is of little use for these purposes, most likely, he will use either the node "Bachman"(19), or knot "Austrian grasping"(20), it all depends on the weather, and the icing of the rope.
|
|
|
"Austrian grasping", Klemheist (20) - in detail |


|
|
|
|


|
|
|
|


And in this way they climbed a few more ropes. Then they changed tactics. All three climbed. To do this, they all needed to be tied to a rope, or a knot "Flemish Loop"(3) either "double bowline"(2). The average was content with two "Flemish loops" (3), "two bowlines"(2) arbors were not placed nearby in the knitting loop. Everything became more interesting, and so much so that at some point the last participant was seriously injured - he could not climb on his own. In order to pull him to the station, it was necessary to organize a chain hoist. Working together on a chain hoist is a pleasure when compared with working in one person.
The chain hoist collected qualities 3 to 1. The grasping nodes used in the construction of the chain hoist were: "French grasping"(21, aka autoblock) at the bottom and "three-turn prusik"(22) near the top roller. They lifted the victim, examined, felt and understood: he could not go down by himself. The victim must be escorted. During the descent, one local loop was used for the escort and one for the victim, both were simultaneously fastened into a belay device, for example, into the "eight". The loops were made from ready-made stitched ones, and a knot was used to adjust the size of the local loops. "Oak"(eleven). Descent on two ropes with the victim was insured "French grasping"(21, aka autoblock). The last participant went down, leaving a descent loop made of a piece of rope at the station. The load was distributed over two points of the tested launching station using a node "double bowline"(2) transformed from "oak"(eleven). Each of the branches of the launch station was tied to hooks with a knot. "semi-grapevine" (5).
The tests of the launching station were carried out by the total weight of the escort with the victim. At the same time, the descending station was secured from the collecting carabiner of the main station, which also included the descending station. The safety net was carried out with the main rope knots "stirrup"(13). The last participant went down two ropes with safety net. "autoblock"(21). Both rappel ropes were tied "grapevine"(7). If no accompaniment was required, one could use "oak"(eleven). Basically, you can use "oak"(11), since it floats at 900 kg, and such a load is difficult to develop with a careful descent. But in this case, you can screw up, so we chose "grapevine" (7).
|
|
|


Perhaps somewhere you will have to increase the rope with a thinner 8.0 mm cord to the top 10.0 mm. Apply Node "bramshkotovy"(23), with control knots. In order not to move off the rope during the descent, a knot was used "eight"(24), although one could use "semi-grapevine" or "triple semi-grape wine" (27).
|
|
|
|


Knot "Stirrup"(13) in addition to these options, it is used to block reliable points of insurance of stations (points that can withstand a load of up to 1000 kg), to block two opposite tabs, to equip stations with anti-tilt, and also as a real stirrup for the foot in an impromptu pedal.
Knot "micropolyspast"(24) it is very desirable to know, it is performed with a 7.0-8.0 mm cord, 5-6 meters long. It needs large carbines. Let's use it when stretching stations, in order to provide anti-tipping, when building ropes, and other rescue work.
Knot "Austrian guide"(25) - for untying a broken place on a rope, like an ordinary conductor, working in all directions, like a middle knot.
|
|
|
|


|
|
|
|


Rope tying Austrian guide(26) with safety net, or "counter Flemish"(6), or "grapevine" (7).
It is necessary to know the stoppages (stops for a long time) of the main belay devices and the knot UIAA "reef" nodes (26).
I have described the main actions of the average climber going to the ascent as a leader. Try to replace the nodes used in this staged ascent with the nodes from the list of Alexei M, without loss of time and reliability. Time on mountain parameter, -general safety parameter.
I do not urge anyone to learn all the knots given above. I know them, I use them, I teach those people who come to schools to use them.
Special thanks for the help in writing the article to Shurochka Mikhailova.
This article is subject to the law on. Reprinting of material on other resources is possible only with the permission of the site administration!