Relief woodcarving animals. Flat-relief wood carving - how to create beautiful patterns on wooden surfaces in order to decorate the interior around you. How to choose and prepare wood for carving
All photos from the article
Wood carving was mastered by man hundreds of years ago. Moreover, a variety of types of its techniques have survived to this day. Below we will consider the most common types of wood carving, as well as get acquainted with the tools that are used for it.

carving techniques
Currently, woodcarving is distinguished into several types:
- Openwork;
- Geometric;
- flat-relief;
- Embossed;
- sculptural;
- Invoice.
Below we will take a closer look at all these types of it.

In the photo - an example of decorating the facade with openwork carvings
Openwork
Openwork or, as I also call it, sawn carving began to be widely used in the 19th century. Moreover, it was popular both in village houses and city apartments.
It is used to decorate the following elements of buildings:
- Inputs
- platbands,
- Gables of houses, etc.
This technique is based on sawing curly holes. Wood carving looks very impressive and resembles wooden lace.
As for the picture, it may contain various motifs:
- Embossed carving;
- Ornamental and decorative patterns;
- Geometrical images reminiscent of patterns in lace and folk embroidery.
Nowadays, openwork carving enjoys a certain popularity in the design of country houses, arbors, etc.

To make a saw thread, a simple tool is usually used:
- Rotary, for making holes - it should be noted that for holes with a diameter of more than 10 mm, special flat drills - perks are used.
- Saw for cutting out parts along the outer contour - special circular (rotary) saws are used. The width of their canvas is in the range of 4-15 mm. Narrow canvases are used to obtain sharp bends, and wide canvases are used to cut smooth shapes.
A distinctive feature of the bow saw for carving is that the blade can turn in different directions.Thanks to this, you can cut in different directions without changing the position of the saw machine.
relief carving
Of the presented varieties, relief carving is the most expressive, therefore, in former times, wall panels, furniture, doors and ceilings were covered with it. It is still relevant when decorating the interior. There are 2 types of relief carving - bas-relief and high relief. The first is a type of relief sculpture, which is characterized by such a feature: the convex part of the image rises above the plane by no more than half of its volume, in contrast to the high relief, in which the image rises above the plane by more than half of its volume. These types are also different in scope: if the high relief is used mainly in architecture, then the bas-relief is more wide application: it can be found not only in architecture, but also as a decor for monuments, on coins, medals, gems, etc.
Secrets between the lines
How to find the golden mean between large form and details?
It is important for the carver not to overload the products with excessive detailing, but it is also impossible not to pay due attention to them. Owning this side of the carving shows how skilled the craftsman is. This helps photography, painting and graphics. The carver must collect material in order to look at analogues if necessary, which is especially important if some details, such as the position of dynamic folds on clothes, cannot be checked on the model. The execution of folds requires great experience and skill, since it is necessary to depict them in such a way that a figure is felt under them. Then it will be convincing.
Since the main advantage of relief carving is the play of chiaroscuro, all lines and intersections are performed as clearly and accurately as possible. Relief carving refers to labor-intensive types of carving, as it requires the carver to have experience, the ability to work with both hands and the possession of a variety of carving tools. The sequence of embossed carving is as follows: drawing a picture, cutting and trimming the contour of a picture or ornament, rough selection of the background, identifying the relief forms of the ornament, finishing the background, making a small relief of the ornament, chasing the background. Since we have already talked about drawing a picture, it makes no sense to dwell on this again. As for the threading itself, this is clearly shown in Fig. 89.
Rice. 89. The sequence of the relief carving: a- notching along the contour; b- cutting to the base of the incision; in– draft background selection; G- curling up the ornament and finishing the background; d– development of relief
For incising, the tool (to make a straight line, use a jamb knife, for a curved line, a chisel of the required profile) is held vertically along the contour of the pattern, tilting slightly towards it (this will help to avoid “undercutting” the ornament in high relief).
Secrets between the lines
When can I start cutting parts?
Beginning carvers, having outlined the general contours of the head, proceed to the detailing of the face. This should not be allowed under any circumstances. Specific details can be dealt with only when the form is revealed, the silhouette is processed, and the details themselves are thought out to the smallest detail. Out-of-sequence threading leads to serious and often uncorrectable errors.
Cutting is carried out with sloping, medium and steep chisels, as well as a poke (the tool is held at an angle of approximately 45 ° to the plane of the workpiece and the end of the handle is pressed with the palm of your hand). The cutting depth is maintained at the same level.
In complex ornaments, elements can overlap each other. Then cutting and cutting start from the top lines and make them less deep, cutting and cutting elements in the background - deeper.
On solid wood, incisions are not always obtained at once, so their repetition is allowed. At the same time, at the first cut, the tool is pressed quite lightly, since the main thing here is that the cut falls exactly on the line of the drawing and turns out to be clean and smooth. The cut is deepened during cutting.
The background begins to be drafted first of all from large areas, using wide chisels that are moved in different directions. This is determined both by the area of the background and by the direction of the wood layers. The chisel is held with both hands at a slight angle to the background plane. The result of the work should be the same depth background.
The shape of the relief is revealed by ovalization (in this case, it is important to ensure that the convex element does not have sharp outlines, but at the same time it does not give the impression of being flat) or rounding the convex elements (after notching and trimming are completed, they are removed from the main chamfer at an angle 45 °, then alternately upper and lower, in conclusion they are cleaned with a sloping chisel).
Secrets between the lines
In what sequence are the head and face of the wooden sculpture carved?
Having specified the tilt or turn of the head, setting the direction of gaze, you can proceed to the details of the face. The work goes from the general to the particular: the oval of the face, the hair, the profile line. Then outline the lines of the eyes, ears, mouth. If the proportions are not violated, the details are clarified, and the eyes and ears are performed at the final stage.
The fine cleaning of the background begins with the processing of large areas, using a straight wide chisel, which is held almost horizontally. in the corners and bottlenecks you need to work especially carefully so as not to damage the ornament, so narrow chisels or cranberries are used, cleaning the background in the direction from the edge to the center.
Often the background is covered with chasing, which is carried out with the help of chasings (punches), on which short blows are applied with a hammer. But it should be noted that in relief carving this technique is rarely resorted to.
This text is an introductory piece. From the book Stylish DIY Jewelry. Beads, bracelets, earrings, belts, headbands and hairpins author Khvorostukhina Svetlana AlexandrovnaCarving Carving is one of the most difficult types of decoration, because it requires a certain amount of experience and precise hand movements. For this work you will need very sharp knives with thin blades. Carving is best done on thick leather, then carved patterns can
From the book Secrets of Woodcarving author Serikova Galina AlekseevnaFlat thread As follows from the name of the thread, its background is a flat surface (both the workpiece and the object being decorated), and the pattern is made up of recesses (recesses) of various shapes. Flat serrated threads are subdivided into contour and
From the book Wood burning [Techniques, techniques, products] author Podolsky Yuriy FedorovichFlat-relief carving When performing flat-relief carving, the image is located in one plane, while the relief, which is diverse in pattern and composition, is revealed in a peculiar way. To do this, the background surrounding the element or ornament is selected or deepened. AT
From the book Wood carving [Techniques, techniques, products] author Podolsky Yuriy FedorovichRelief carving Of the presented varieties, relief carving is the most expressive, therefore, in the old days, wall panels, furniture, doors and ceilings were covered with it. It is still relevant when decorating the interior. There are 2 types of relief carving -
From the author's bookSlotted carving The name of this type of carving means that with this method of processing wood, the background is removed. Therefore, such a thread is called a sawn or through thread in a different way.
From the author's bookSculptural carving Sculptural carving is the most ancient and dates back to the time when people carved figures of pagan gods from wood, whom they worshiped and from whom they sought help and protection.
From the author's bookHouse carving The name of this type of carving speaks for itself: house carving designed for outdoor decoration of the dwelling and the execution of its interior decoration. By the nature and technique of execution, house carving is heterogeneous and can be embossed, slotted and
From the author's book From the author's bookFlat serrated threads various shapes recesses - notches. The lowest points of the relief are located below the level of the decorated
From the author's bookRelief carving The essence of relief carving is that a pattern (drawing) is formed by sampling the background around it. Such a sample can be uniform in depth. In this case, the formed pattern (drawing) will have the same height (usually 5–7 mm) throughout
From the author's bookSlotted carving Slotted carving can be made both in the technique of flat-relief (with a flat ornament) and embossed carving. The background in the slotted thread is removed with a chisel or saw. In the latter case, the thread is called sawn. The slotted thread has received a wide
From the author's bookSculptural carving Sculptural or three-dimensional carving is characterized by the fact that in it the relief image is partially or completely separated from the background, turning into a sculpture. Unlike a one-sided image of an object in other types of threads, volumetric threads can be
From the author's bookHouse carving House carving is characterized by the fact that it is large-scale, it is performed mainly on coniferous wood with an ax, saw, chisel and is used to decorate wooden buildings. Although house carving was already popular in the 16th century, before us
From the author's bookcontour thread According to the execution technique, contour carving as a variety of geometric is the simplest. Images made in this way resemble a clear graphic drawing. Applying different kinds cuts and combinations of straight lines, curves,
From the author's bookGeometric thread All geometric thread elements are the simplest geometric figures, formed by straight and curved lines or a combination of tetrahedral or semicircular notches. The main elements of geometric carving are dihedral,
From the author's bookStaple, or nail-like, thread Staple carving is performed with semicircular chisels, using a joint knife as an auxiliary tool. As a result of the use of a semicircular chisel, a trace remains on the surface of the wood, similar to a bracket or a mark from a nail, hence
Wood is the most practical material. From ancient times, household items were made from it, houses were built, toys for children were made. And today this material is gaining popularity, especially handmade products from it. Today we’ll talk about what flat-relief wood carving is, what species diversity it has.
This needlework has come to us since ancient times, when people decorated household items, houses, furniture, fences. For a while, its popularity declined, and now it has regained it again. There are many types of woodcarving. But today we will talk about what subspecies flat-relief carving is divided into:
- A thread in which the contour has an oval appearance. When using this type, a certain chiaroscuro is obtained, which looks original on the entire composition;
- A carving whose background has already been selected. The meaning of this type is that the background itself is not flat, sometimes even located below the pattern itself. The ornament seems to be superimposed on the plane.

Consider a few master classes with step by step photos for a more detailed study of flat-relief carving.
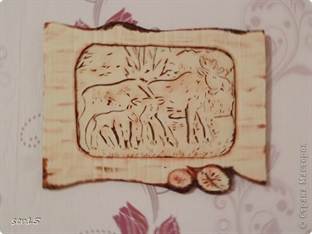
amazing animals
To work, you will need the following tools and materials:
- Wood;
- Sandpaper;
- Sketch on which the carving will take place;
- Carving tools;
- Paint brush;
- Copy paper;
- Black pencil.
Step by step instructions for making a painting.
First of all, we level the wood. To do this, take sandpaper and start sanding. After the wood is completely ready, we redraw the drawing. To do this, we find the necessary picture on the Internet and print it. We translate with a black simple pencil.
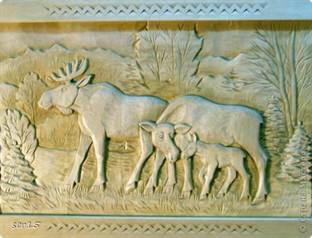
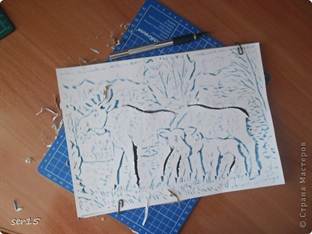
We start carving. In this case, three layers are removed, thereby the picture acquires a three-dimensional appearance.

Here's what should happen.
To make the picture more expressive, paint it in the places of cutting with a contrasting paint.

In order for the picture to acquire an interesting appearance, we suggest making a frame for it, also made of wood. After the frame is ready, we insert our picture and can be hung on the wall.

This type of work is also suitable for beginner carvers. When working, do not forget to follow safety precautions.
For work you will need:
- Wood or product that you want to decorate;
- Carving tool set;
- Simple ruler;
- Black simple pencil;
- Sandpaper.
Step by step instructions for doing the job:
Harvested wood must be sanded for complete alignment. Now let's move on to drawing. To do this, take a pencil and a ruler, draw a rectangle, inside which there will be squares in the amount of 2 pieces, and draw diagonals in them.

Next, you need to connect the midpoints of each of the sides of the squares so that the lines intersect with the intersection of the diagonal at one common point. As a result, it should turn out like this: each of the squares should have 8 triangles.

Now let's start carving. We take the jamb in our hands, set its angular part in the middle of one of the obtained triangles so that the tool blade connects the center with the right angle of the triangle itself. Thus, we make a cut. Here's how it should turn out for you:


After we connect the middle with the second corner in the triangle.

The next line connects the last corner and the center point. This time one action is not enough, because the line itself is very long. Be sure to watch your movements and how your hands are positioned. When working, the elbow of the hand should stand on the table and in no case come off. Otherwise, you can harm yourself or ruin your work.

After we make an incision, the angle, which will consist of 45 degrees. This action connects all the corners of the triangle and the middle.
Pay close attention to the depth of the cut. In the central part, it should be larger than at the edges, but in no case vice versa.
Depending on which master, what technique he has, what plan the carving can be done in different types. It can be both simple and complex. There are various types of woodcarving: relief carving, flat-relief, volumetric, as well as flat-cutting and slotted thread. Now we will characterize these types of threads separately.
flat washing divided into two types, the first type - geometric ornament, second view - planimetric contour, which is sometimes also called a floral ornament. By the name of this type, you can guess in what technique the work will be performed. This carving will consist of notches, which together will make up the contour lines, cut to a certain depth.
geometric carving or geometric ornament, it is so called because it is made of circles, triangles, almond-shaped recesses, rosettes, stars, the so-called geometric elements. Depending on how many excavation elements you take, this will be the ornament.
There is another ornament - contour. I also call it in our literature as vegetable. But, in my opinion, we need to delve into this concept, since contour drawing is often performed in the technique with contour carving. This carving technique is a bit similar to metal engraving, the difference is that the grooves made that make up the contour lines on the wood have a greater width and depth and the tools have a different sharpening. The contour carving in execution is very simple. This carving can be done on any wood and on plywood with a semicircular chisel or an ordinary joint knife.
relief carving
One of the most distinguishing features of this type is that we select the background around the ornament to the same depth. The edges of this ornament can be rolled up. There is also another type in which the ornament can be deepened into the wood, and the background on the surface will remain intact. It is not difficult to perform this type of carving, but you are tormented by cleaning and choosing a plane or background of an in-depth ornament on your own. This process can be facilitated with a manual milling machine. The background of your ornament can be minted. With the help of embossing, you can smooth out the bumps that form during manual processing, and improve the visual effect of your creation. You can also apply various deepenings to the background: cells, grooves, grooves, using small incisors.
slotted thread
This wood carving has no background. If we remove the background in a flat-relief ornament, then we get a slotted carving. In products like a box, for expressiveness and delicacy, colored paper or fabric is placed underneath.
relief carving
The main goal of our study guide- this will share experience with the masters, and help novice carvers to master this carving. Without taking into account other types of thread, we will dwell on relief carving, as it is complicated in execution and development. If we make ornamental products using the technique of relief carving, then they will be very decorative and expressive.
Relief woodcarving has long been used by the Russian people in Orthodox churches. And in our time, some monuments of Russian architecture and art have been preserved, for example: the Kiev-Pechersk Lavra. relief carving with painting and gilding is unusually and solemnly beautiful.
Now let's decipher the relief. Relief is a bulge or convex ornament on a plane, or a combination of various irregularities on the surface of our earth's crust.
bas-relief(low relief) - a sculptural ornament or image, convex above a flat surface of wood less than one second of its thickness.
High relief this is a sculptural ornament or image that can protrude above some plane by at least half the thickness of the entire sculpture. These definitions clearly show that relief carving is divided into two types: 1) high relief - with high relief, 2) bas-relief - with low relief.
Volumetric thread, it is also called sculptural. Unlike the previous types, voluminous objects are trimmed with this carving from several sides or even from all. In architecture, these are columns of balconies, wooden columns, carved balusters, etc. Furniture legs are often trimmed with volumetric carvings. These details may well be considered sculptural images.
Artistic wood carving is one of the oldest and most common types of artistic wood processing, in which a pattern is applied to a product using an ax, knife, chisels, chisels, chisels and other similar tools. With the improvement of technology, wood turning and milling appeared, which greatly simplified the work of the carver. Carving is used in home decor, when decorating household utensils and furniture, for making small wooden plastic and toys. The carving differs in types - flat-relief carving, openwork carving, three-dimensional carving and root plastic.
Flat-relief woodcarving
Flat-relief woodcarving is one of the most common types of carving. Relatively shallow relief (5-20 mm) retains the same height with equal depth of the main background. The main motives of flat-relief carving are floral ornaments, stylized images of figures of people and animals. Her technique is relatively simple. Carved decorations are applied to a pre-prepared product. Initially, the contour of the drawing is drawn with a sharp object, then the master cuts the drawing along the contour with a chisel and selects the background with chisels. The relief is often processed with additional cuts that model the image - leaf veins, horse manes, small details. The set of tools depends on the complexity of the drawing; in some cases, carvers use up to 60 cutters and chisels of various profiles and sizes.
Flat-relief carving is divided into varieties: carving with an oval contour - the edges of the pattern cut along the contour are slightly rounded, and the background is usually not chosen at all; carving with a pillow background - the background is cut very gently, forming a semicircular bulge, resembling a whipped pillow; carving with a selected background - around the outlined pattern, the background is selected to an equal depth, which makes the image more embossed.
Flat-relief carving was used primarily in home decor and was known in Russia since the pre-Petrine time, having become widespread in the Volga region, in the Russian North, in the Urals. The development of the Volga carving was greatly influenced by the "ship carving", on the basis of which a special baroque type of carving was developed. At the end of the 19th century in Abramtsevo near Moscow, through the efforts of artists and collectors, the craft of Abramtsevo-Kudrin carving arose, continuing the ancient Russian traditions of relief carving.
relief carving
Relief carving has almost no flat surface. The forms of the ornament are revealed by the relief of different heights. Distinguish between bas-relief and high-relief carving. Bas-relief carving - This is a carving, the relief figures of which protrude above the background plane or adjacent ornamental elements up to half of their own volume. High relief carving - This is a carving, the relief figures of which protrude above the background plane or adjacent ornamental elements by more than half of their own volume.
Relief carving is characterized by a deep selection of the background in comparison with other types of carving and a detailed study of elements to sculptural forms. Carving and background sampling can be done with the usual set of tools, which requires additional physical effort.
After selecting the background, you should work out the main plans within the drawing, model and work out the figures of people, birds, animals, the interweaving of floral ornaments, the shape of twigs and leaves, their height above the background and in relation to each other. All this must be done before the final surface finishing with strokes, veins, notches, etc.
Relief carving is very expressive and decorative. In the past, it was widely used to decorate interiors - wall panels, door portals, as well as in furniture. Currently, relief carving is also used to decorate the interiors of public buildings in the form of wall panels.