How does a gas barbecue grill work? Do-it-yourself gas grill: step-by-step instructions for building a homemade product. Preparatory work before installation
Holidays in the country are always associated with a pleasant pastime, a noisy company of friends and cooking in the fresh air. Food in nature seems tastier, and its smell, mixed with smoke, causes a strong appetite. This atmosphere can be created by grilling meat and vegetables. A similar brazier can be purchased at the store, but this pleasure will require a significant investment. In order not to spend extra money, you can build a grill for a summer residence with your own hands.
General design device
The grill is a special portable or stationary installation for cooking various culinary specialties on open fire. Classic shape of this design is a deep metal container in which different levels grates are installed: the lower one is for arranging coals, the second one is for cooking.
The grill is equipped with a lid, but some models are made without it. The first option is more functional, as it allows you to cook in three ways:
- direct;
- indirect;
- combined.
There are three types of grill:
- Classical.
- Connected to the mains. Grills of this type are used as additional equipment for professional and home kitchens.
- Operating on gas.
Options that run on gas and electricity are more functional, but for a summer vacation, many prefer a charcoal grill.
Photo: different types of grills
Classic grill involves the use of coal  For a gas grill, a small cylinder is enough
  Electric grill is convenient to use at home
Table: advantages and disadvantages of a classic grill
Not only coal can be used as a furnace material. Currently, he has an alternative - special briquettes. The use of this solid fuel provides fast ignition, maintaining a constant temperature for a long time. Briquettes are compressed blocks of different breeds wood.
What is the difference between a grill and a barbecue
Quite often, people do not find differences between a grill, barbecue and barbecue. Each of the braziers has individual characteristics, despite the fact that they are used for cooking on coals.
The brazier has the simplest design. This device is a metal box. Food is cooked on metal skewers. Hot coals are located at the bottom of the box.
In order for the heat to be uniform, several small holes are drilled in the sides of the brazier.
The difference between a grill and a barbecue is only that the first one does not have a lid, while the second one is equipped with a skewer and lockable hatches for air supply.
Preparation: drafting drawings, material selection
For the manufacture of a country street grill, improvised materials are suitable. You can use a metal barrel, an empty gas bottle or bricks.
The creation of each design requires careful preparation, calculations, drawing up drawings and diagrams
Barrel
When choosing this material, you should make sure that the case is not covered with rust, has no dents or other deformations.
For grilling, it is best to use a 200 liter container. The wall thickness of such a barrel should be from 0.8–1.0 cm. This is enough so that the metal does not burn out with regular use. The body height is usually 85 cm, which makes the design convenient to operate.
Barrels with a wall thickness of less than 0.5 cm are not recommended.
For such a grill you will need the following materials:
- Barrel with a capacity of 50 to 200 liters.
- For the manufacture of legs - 4 steel tubes, 110 cm long, 3-4 cm in diameter.
- To strengthen the structure, two similar tubes of 60 cm and two of 40 cm each.
- 2 metal door hinges.
- For handles on the body and lid - 3 "P"-shaped parts made of thick reinforcement.
gas cylinder
When making a grill, old cylinders are often used. Propane containers are best. The thickness of the walls in them is 3 mm, and the diameter is 29 cm. So, the body will not burn out, and the brazier will be large enough.
To make a grill from a gas cylinder, you can use materials similar to the barrel option.
Brick
Not every type of brick is suitable for building a grill. For this, facing (for the body) and fireclay (for the furnace part) are used.
To build such a grill you will need:
- 150 red bricks;
- 35 fireclay bricks;
- finished grating or 30 steel bars 5 mm thick;
- reinforcing bars for reinforcing the foundation;
- concrete mix brand M 300;
- sand;
- gravel.
This design requires a solid foundation in the form of a slab foundation.
The finished plate must be at least 10 cm wider than the grill structure on each side. Its size will be 160x160x20 cm.
To find out the volume of the concrete mixture, it is necessary to multiply the height, width and length of the future foundation. For convenience, these parameters are recommended to be used in meters: 1.6 1.6 0.2 = 0.512 m³.
In order for the concrete base to be strong, it must be reinforced. To do this, use a mesh of metal rods, which is made of reinforcement with a thickness of 0.5 to 0.8 mm. The mesh size is 10x10 cm.
The calculation of reinforcement is more convenient to do in running meters. To find out how many rods are needed for the grid, you need to divide the length and width of the base by the size of the cell: 160:10 = 16 pieces - this is the number of rods placed across the width of the plate. Since it is square in shape, the same number of rods will be needed along the length of the plate: 16 + 16 = 32 pieces.
In order to further strengthen the foundation, two such grids will be required: 32 + 32 = 54 bars. Now you need to find out how many linear meters you need to purchase: 54 1.6 \u003d 86.4 m.
Lattice
A grill rack can be purchased at any hardware store or sports shop but it's cheaper to do it yourself. This will require a wire of stainless steel, 3–5 mm thick.
You can also use:
- steel corners with a side width of 2 to 5 cm (for effective heat they are set at an angle down);
- from sheet steel cut into strips 3-5 mm wide.
The optimal grid size is 40x60 cm.
The rods will be located perpendicular to the wide part of the lattice. To find out how many rods are needed, you need to divide the length of the lattice by the width of the rod and the cell (usually this parameter is 5 mm). Now you can calculate: 60:1=60 pieces. The width of the lattice will be 40 cm, therefore: 60 40 \u003d 2400 cm, or 24 linear meters.
Required Tools
To make a metal grill, you will need the following tools:
- manual circular saw;
- file;
- a hammer;
- welding machine;
- electrodes;
- yardstick.
If desired, a metal grill can be equipped with a motor that will be responsible for maintaining the desired traction.
If a brick structure will be made, you will need:
- shovel;
- concrete mixer or container for mortar;
- trowel;
- building level;
- brush;
- cord;
- pencil or marker;
- polyethylene.
Step-by-step guide to building a grill house with your own hands
The grill house is a small building resembling a gazebo. The classic version of the design has an octagonal shape with closed walls, equipped with windows and a door. Inside the grill house, usually in the center of the room, a brazier with a chimney is installed. Around it, benches are installed parallel to the walls. Thanks to this placement, everyone inside the room will be able to observe the cooking.
An octagonal or round table is often placed around the grill.
The area of the premises is made taking into account the placement of up to 12–15 people in it. The roof of the structure is made in the form of an octagonal cone, at the top of which a place is left for installing a chimney.
The grill house is most often erected in the form of a frame structure, followed by insulation. This allows you to save on building material.
Choosing the type of foundation
During the construction of a grill house, a foundation is required, which can be:
- columnar;
- on screw piles;
- tape;
- slab.
Each of these types of foundation is used depending on the quality of the soil. Choice is important preparatory stage construction of a grill house, since the integrity of the entire structure depends on this.
If there is a predominant amount of sand in the soil, then when the snow melts or during the rainy season, it can shift. In this case, it is recommended to build a slab, strip or pile foundation.
Soil with a high content of clay and sandy loam is prone to deep freezing, which makes it unstable. For such soil, it is better to use screw piles.
In swampy areas, only a pile foundation is also used.
Soil with a high content of gravel is not subject to deep freezing and deformation under the influence of moisture. Such soil, perhaps, is most suitable for construction, including for a grill house.
If the site is located on rocky ground, then there is no need to install a deep foundation. In such an area, all types of foundations can be used, except for screw piles.
Instructions for erecting a structure for recreation
To build a grill house, you will need to follow these steps:
- Select an area. Free it from debris and foreign objects.
- Make markings for the pit. Since a slab foundation was chosen for the grill house, the hole must be made 40 cm deep. For marking, it is convenient to use a cord stretched over the stakes, which forms a perfectly even line.
- After digging a pit, you need to level its bottom.
- Pour in sand to form an even layer, 10 cm thick. It is better compressed if it is wetted.
- Top with a layer of gravel of the same thickness.
- Now you need to install the formwork so that the foundation does not spread when pouring. To do this, you can use thick plywood, boards or OSB boards. From these materials it is necessary to make strips equal to the length (400 cm) and height (25–30 cm) of the pit.
- Install these wooden shields inside the pit, pressing each of them against the walls.
- To strengthen a concrete slab, it must be reinforced. To do this, from rods, 0.8–1.0 cm thick, make two identical gratings. The size of the cells should be 15x15 cm. Strengthen the intersections of metal rods with wire or plastic clamps. The frames should be laid in such a way that they do not touch, while the first does not touch the gravel. To organize such a space between the gratings, you can use the halves of the bricks.
- In order for the fire not to go out in the finished design of the grill house, air supply to the brazier is necessary. To do this, you need to install a "P" -shaped pipe with a diameter of 15 cm, a length of 155, according to the diagram. One end of the pipe protrudes from the middle of the foundation, the other is brought out beyond its limits.
- Lay both grids with respect to the gaps between them.
- Now you need to pour the mixture into the formwork. To do this, use concrete grade M 250 or M 300. In order for the mixture to be evenly distributed throughout the entire space of the pit, it is leveled with a shovel. The top grate should be completely hidden under the concrete layer.
- The liquid foundation needs time to solidify. In the summer, 3 to 5 days are enough for this, and in the cold months this period can last up to two weeks. It should be noted that under direct exposure to the sun, the mixture will dry unevenly. This is fraught with the fact that the foundation will be covered with cracks. Therefore, in the first two days after pouring, every 10–12 hours, the base must be moistened with water. In addition, the foundation must be covered with thick polyethylene. This will help prevent rapid evaporation of moisture, and protect the base from sunlight.
- Once the concrete has hardened, move on to installing the bottom timber framing. First of all, it is necessary to cover the surface of the foundation with a waterproofing layer. To do this, you can use liquid bitumen or roofing material.
- Before use, all wooden structural elements must be treated with antiseptic impregnations and antifungal agents. For the lower strapping, it is recommended to use bars with a section of 150x150 mm. At the ends of each of them, cuts must be made to create a “half-tree” connection.
- Install the bars on the foundation. To do this, use anchor bolts or metal corners.
- Inside the octagonal frame, install logs for the floor. To do this, you can use bars with a section of 150x100 mm. They are recommended to be placed parallel to each other or from the inner corners of the structure to the center, closing them around the pipe.
- Now you need to install 8 support posts. To do this, you need to use bars with a section of 150x150 mm and a length of 250 cm. They must be installed vertically on the bottom trim. To do this, in the upper part of the corners of the lower trim, it is necessary to drill a hole with a diameter of 20 mm. For the frame of the grill house, pins (a cylindrical wooden pin) 8 to 10 cm long and 20 mm in diameter will be required. To keep the racks in a vertical position, they are strengthened with slopes.
- Between the vertical supports install window sill boards. To do this, you need bars with a section of 50x150 mm.
- From similar parts, install vertical racks for the window frame.
- Now you need to make the frame of the upper trim. This will require bars with a section of 100x100 mm. The upper structure is made according to the principle of the lower strapping.
- When the frame of the grill house is ready, you can proceed to the manufacture of the roof. For this, it is recommended to use bars with a section of 100x50 mm. It is more convenient to make a roof frame on the ground, and then lift it up and fix it. The octagonal hole at the top of the structure must match the diameter of the chimney pipe. To securely strengthen the frame elements in the upper part, it is necessary to make a metal part, the elements of which repeat the shape of the beams.
- Now you need to install the basis for the roofing material. To do this, eight triangular-shaped fragments must be cut out of OSB boards, corresponding in size to the sides of the roof.
- Using self-tapping screws, attach these parts to the top surface of the roof frame. Treat the gaps in the joints with mounting foam. The basis for shingles is ready.
- Fasten the roofing material on top.
- Now you need to create the floors in the grill house. First you need to mount a layer of insulation. For this, granulated expanded clay is suitable, which is poured between the lags. The thickness of the insulation must be more than 10 cm, otherwise the thermal insulation properties may disappear.
- Level the expanded clay. Install grooved boards on top of it. Like all wooden parts of the structure, this material must be pre-treated with antifungal impregnations and dried.
- Install window frames and a door.
- Insulate the walls of the grill house. To do this, it is necessary to install foam plates in the frame openings.
- Make interior and exterior decoration. What can grooved boards be used for?
- Install the brazier. Connect its elements to the pipe directing the air. Attach the hood to the chimney.
- Place benches or seats parallel to the inner walls of the grill house. To do this, you can use bars with a section of 100x50 mm.
Do-it-yourself smoker-grill from a gas cylinder
The smoker grill is a universal design of interconnected thermal chambers for cooking meat and fish dishes, as well as vegetables and fruits. This unit combines a barbecue, smokehouse and grill.
The design of the smoker grill consists of:
- metal stand;
- furnace compartment;
- horizontal camera;
- smokehouses;
- chimney pipe.
The principle of the smoker grill is that hot air passes through all the chambers of the structure, leaving through the chimney. The hearth is located in the furnace part. This simple design requires careful preparation and drawing up drawings.
To make a smoker grill with your own hands, you need:
- Build thermal compartments. To do this, you can use old propane tanks of different capacities. The thickness of the walls will withstand high temperatures.
- Make covers for each compartment. To do this, using a manual circular saw, cut out rectangles from the cylinder body.
- Connect the bodies of the cylinders and the cut-out fragments with metal loops. To do this, you can use electric welding. The result will be functional covers to which you need to weld handles (they can be covered with wood).
- Having made cutouts in the cylinder body, connect them by welding. You should get a one-piece construction of a firebox, barbecue and smokehouse. Weld the chimney pipe to the last chamber from above. The smoker grill can be equipped with thermal sensors.
- Make a stand. To do this, you can use metal corners, pipes or channels. For ease of movement of the structure, its stand is equipped with wheels.
- For the combustion chamber, it is necessary to make grates. To do this, you can use metal corners with a margin of 10 mm or reinforcing bars with a diameter of 10–12 mm.
- For a barbecue, a grate with cells no more than 5 mm is needed, which can be made from similar materials.
Video: smoker grill and barbecue from a gas cylinder
Despite the fact that the vast majority of people have a purely positive attitude towards barbecue, the version of its traditional preparation with smoke and coals does not suit everyone. A simple example. Lovely country cottage. Next to it is a terrace for relaxing, where it is so convenient to receive guests and relax ... and a smoke-blackened metal box. Nonsense!
And gatherings without barbecue? One hope for help technical progress. An ordinary gas burner can become the basis for the design of your barbecue. We place a grill for frying or skewers above it and ... bon appetit. And to create the necessary surroundings, we will supplement the burner with decorative “logs” (analogue to those that are equipped with electric and gas fireplaces) and veneer the entire structure with stone. Better artificial stone, as it is cheaper and lighter, and has a fairly large resemblance to natural.
As a rule, a brazier of a similar design is erected around a portable gas burner equipped with grates. Non-combustible materials are used for work: asbestos-cement and steel sheets, metal mesh (see figure).
For the manufacture of the frame, a channel and a metal corner are perfect. In this case, the dimensions of the racks are selected in such a way that the latter can enter the channel. It is easiest to assemble the frame on rivets with detachable shanks. To give its design even greater rigidity, in the proposed version of the gas barbecue, four brackets (support) are installed. They are made in the form of steel racks, which cover the opening in the upper part of the frame. Along the edges of the racks, “ears” are cut out, used to rivet them to the frame.
The next step is to sheathe the upper end and side racks with a special ATSEID board (electrotechnical arc-resistant) 12 mm thick and a metal mesh.
Rice. 1 gas grill
BUT - general form; B - section of the frame; B - a device used for cutting plates; 1 - gas burner; 2 - head plates; 3 – screws (L= 25 mm); 4 - metal mesh; 5 - cover; 6 - blocks made of artificial stone; 7 - side walls; 8 - profiles (lower and upper); 9 - frame; 10 - support brackets; 11 - a cover that closes the hatch of the compartment in which the gas cylinder is placed; 12 - a hole designed to pull out the hatch, with a diameter of 12 mm; 13 - galvanized screws (L= 50 mm); 14 - bars with a section of 50x50 mm; 15 - opening for the installation of the cylinder; 16 - spacer; 17 - gas cylinder; 18 - concrete block; 19 - flooring; 20 - logs; 21 - bars with a section of 50x100mm; 22 - bevel; 23 - stone; 24 - screw.
Such a design is the most optimal surface option for subsequent mounting of artificial stone on it.
First, we cut out eight sidewalls with a grinder. They are needed in order to help straighten the frame as they are screwed into place.
The next step is to cut an octagonal cover from the same sheet. In it we cut a round opening for the grate of a gas burner. We attach the cover to the frame, then we fix it with a plaster mesh (metal). Then we fix the frame on the flooring boards with screws - self-tapping screws (L = 25 mm).
A cylinder with natural gas (propane) is installed under the decking of the terrace on a special concrete block - the base. We will connect it to the brazier with a hose of a special design. To access the cylinder in the flooring, we make a hatch from a bar (50x50 mm).
We begin to veneer the side walls from the bottom row. We put the stone around the perimeter of the brazier on a standard cement-sand mortar. From above, we cover the brazier with specially sawn (in the form of a trapezoid) head plates. To make the plates better fit one to the other, we make them according to special patterns. When marking the templates, it is necessary to take into account the 3 mm gap between these plates. On the corner stones of the brazier, we cut out the bevels with a special tool, which is easily done on your own (see figure). The head plates are easiest to cut with a grinder with a diamond blade.
After laying the plates, the seams between them are filled with sealant. The gas burner is installed on these stoves.
The grill with a gas generator is a very efficient and convenient device. It flares up instantly, its heat is regulated by a simple turn of the knob, but at the same time the food has the aroma of wood. For ignition, the wood itself is used, which replaces the usual charcoal for a classic grill.
materials
To create a gas grill with your own hands, you will need:
- stove with a gas generator on wood;
- blocks;
- grill grate;
- metal cover;
- thermometer;
- aluminum handle;
- hemisphere lid.
Step 1. In order for the flame from the oven to be distributed evenly over the grill grate, it is necessary to make a kind of distribution burner. For these purposes, a metal round lid is suitable. It is necessary to make thin long cuts in a circle on it. Their ends should reach the center of the lid, and the distance between them should be about 3.5 cm. Make similar cuts between them, but shorter.

Step 2. In the lid in the form of a hemisphere, for convenience, fix the lid and thermometer. For the cover, you will need to drill holes and install the fasteners with screws.

Step 3. Now the whole structure needs to be assembled. To do this, install blocks as supports. Between them you need to place a furnace with a gas generator.
Lay a homemade metal burner on top of the blocks, and lay the grill grate on it. Please note that there should be a gap between the burner and the grate so that the food being cooked does not touch the hot metal.

Basically, your homemade grill is ready. Now you can run it using branches or chips of apple, cherry and other types of wood as firewood for kindling. After starting the oven, turn on the built-in fan to fan the heat and then regulate the heat generated. You can put vegetables, meat, sausages and other foodstuffs on the grill, cover them with a lid and easily bring them to readiness without loss of taste.
True connoisseurs of a good kebab and barbecue are convinced that a real oven or smoker is made only for themselves and their loved ones, while the secrets of cooking a real kebab on it can be comprehended for a lifetime. In order not to mess with brick options, the easiest way is to make a gas barbecue grill with your hands from a container that is suitable in size, for example, a gas cylinder.
We prepare gas cylinders for the manufacture of the grill body
To make a barbecue grill, we need two fifty-liter propane gas cylinders, not new, but absolutely intact. Before proceeding with the construction of the grill, it is necessary to properly disassemble the cylinders:
- We unpin the valve of gas cylinders;
- We remove the faucet box, fill it with water for two-thirds of the container and boil;
- We cut off the support skirts of the cylinders and the sector in 1/3 of the side surface;
- We burn the cylinders to remove the primer and paint. After heating, the coating swells, after which it can be easily removed with emery or a metal brush.
Important! If you try to cut the container without filling, you can get an explosion of condensate vapor.
The gas grill device can be seen in the photo. Structurally, the barbecue installation consists of two compartments - the oven itself and the gas generating device. Firewood or coal is placed in the gas generator, and after ignition and heating, combustible gas begins to flow into the oven, on which barbecue or barbecue is cooked. The whole structure is mounted on a stand welded from a corner or fittings.

We build a gas grill from propane cylinders with our own hands
The assembly of the gas grill is carried out in the following sequence:
- The body of the gas generator and the furnace are welded, the doors are hung on the canopies;
- Install an outlet pipe on the furnace and control dampers on the gas generator;
- Mount handles, a drainage drain valve, drill holes for installing skewers;
- Install the entire structure of the gas grill on a borrowed or self-made stand, paint the grill structure in the most suitable black color.
Advice! To make the grill structure convenient to transport, it is recommended to equip two of the four legs with support platforms, and put two on wheels from a wheelbarrow or container.
We manufacture a gas generator and a grill oven body
To build a gas generator, it is necessary to perform three technological operations. To begin with, a standard propane tank, 960 mm long, must be shortened by 250 mm. To do this, we cut off a piece of the body in the area of \u200b\u200bthe welding seam of the bottom and weld the bottom in a new way.
To adjust the air supply to the gas generator, a triangular hole in the form of a sector is cut out in the bottom, on which the valve is attached. A hole of 75 mm is cut out in the opposite bottom, through which the gas flow from embers will be directed into the combustion chamber of the furnace.
At the next stage, a square sector 300x200 mm in size is cut out in the side surface of the body, which will later be used as a door or loading hatch. The door is hinged to the grill gas generator body by electric welding. The resulting gap between the door and the edges of the grill body must be closed with an overhead steel tape. Usually they use food grade stainless steel, which is fastened with rivets.

The body of the barbecue oven is made in a similar way, with the only difference that the body is not shortened, but is used in its original form. To connect the body of the grill oven to the gas generator, a hole with a diameter of 75 mm is cut out in the right bottom.
Important! The docking of the bodies of the barbecue oven and the gas generator is performed using a segment steel pipe, length and diameter of 75 mm. The seam between the pipe section and the inner surface of the bottom in each housing must be welded with a “green” electrode used for welding on stainless steel.
Before welding, the entire structure of the grill of two bodies must be laid on a previously made stand and the cylinders should be attached with welded points to its base. After the docking is completed, the points are replaced with full-fledged seams.

So that the barbecue oven can be used as a barbecue, holes with a diameter of 8-10 mm are drilled on the back of the case in increments of 70-80 mm. But for the preparation of shish kebab, holes alone for installing skewers are not enough. In order for the gas stream leaving the gas generator to be evenly distributed along the entire length of the furnace, a splitter nozzle is placed on the bottom. A nozzle is made from a piece of a metal profile with transverse holes - cuts.
A half-inch piece of pipe with a cork is welded into the bottom of the oven, through which condensate and hot fat are drained.
The chimney of the grill oven is made by welding from a thin-walled one and a half inch pipe in the form of two knees. Installed at the top of the chimney flat valve, which regulates the rate of gas flow into the combustion chamber.
Installing additional elements on a gas grill
To simplify the control over the process of formation of the gas flow, in addition to the grate, a welded metal container is installed inside the gas generator, into which coal and firewood are loaded.
The covers of the oven and the gas generator are equipped with handles with wooden handles, a pointer thermometer with a measurement limit of up to 300 ° C must be installed on the grill door, a grate is laid on the bottom. For cooking specific type products, you will need to use your own version of the lattice, the parameters of which are selected individually.

To prevent the hinged door from hitting the body when opened, a travel stop must be installed. If old Soviet cylinders were used for manufacturing, the gas grill body will not require additional modifications. For modern thin-walled propane cylinders, it will be necessary to perform reinforcement with the help of pieces of fittings or a water pipe welded along the length of the bodies and the door.
Barbecue is an integral part of organizing a trip to nature, relaxing in the country and receiving guests in country house. It has become a tradition for many families to gather together at the table under the fragrant smell of the barbecue being prepared. However, more and more often men (and we know that they are the ones who cook the best kebabs) do not so much compete in the quality of cooking meat as they brag about the functions and appearance of the technical “stuffing” of this process - the brazier. Many people are no longer so interested in buying a "leaky box with legs", but they want to do something special. A brazier from a gas cylinder, although it seems, at first glance, to be an ordinary scrap metal, copes with its tasks much more efficiently than any other industrial design. In this article, we will consider in detail all the stages of work related to the self-assembly of the finished product, including the preparation of cylinders, their marking and cutting, and also give helpful tips to work with such homemade equipment.
 When looking at such a work of art, you do not immediately understand that this multifunctional brazier is made from recycled materials.
Advantages and disadvantages of a do-it-yourself brazier
Gas cylinders are great for "rebirth" in barbecues and in general in any design associated with heating. They are made of durable steel, have standard sizes, and they are easy to find in the country house and garage or buy literally at a bargain price.
Advantages of a brazier from a cylinder:
- Versatile design. All models of gas cylinders are unified. There are not so many varieties that "something went wrong." Accordingly, it will not be difficult to find a couple of identical containers for creativity with a grinder in your hands.
- Heat resistance. The metal will not burn through or deform even after prolonged contact with an open flame.
- Multifunctionality. In such a barbecue, you can cook not only kebabs, but also bake vegetables, as well as smoke and fry.
- Safety. After cooking, you do not need to extinguish the coals with water. For these purposes, it will be enough just to close the brazier with a lid.
- Large volume. In such a homemade barbecue, you will feed not only yourself, but also a large company. Especially if you spend energy on welding a multifunctional unit.
- Availability. The main thing is to have a welding machine and a grinder at hand. This is an actual moment, because the price of a brazier from a gas cylinder, even taking into account the overpayment for some elements, will eventually turn out to be lower than the cost of the purchased model.
 One of the advantages of a homemade brazier is the ability to create a mobile model, which, if you really want, can carefully and imperceptibly for guests along with snacks and you move to another part of the garden
 For work it is better to take a 50-liter bottle. They have ideal dimensions for making a brazier: its diameter is 30 cm, and its length is 85 cm.
There are not many disadvantages, but they are also worth mentioning:
- In winter, the metal will cool down very quickly., so to invite friends to barbecue, you have to chip in for firewood. Since it will be much harder to maintain the desired temperature in the barbecue.
- Unsightly appearance. If you do not spend a certain amount of money on the purchase of a special heat-resistant paint, very soon your barbecue will lose its presentation.
- Toxicity. Before using the brazier from gas cylinders, it is necessary to get rid of the remnants of rot and dirt that could have accumulated on the inside of the cylinder over the years. Therefore, before starting all work, the cylinders are carefully opened, and all parts are calcined on fire, and only then they begin processing, clean off the dirt.
How to prepare a drawing for making a brazier with your own hands from a gas cylinder
Despite the fact that barbecue grills from gas cylinders are considered devices that are quite simple in design, before resorting to any work, it is better to draw a drawing. The pros do it using special 3D programs. For beginners, simple drawings of a brazier from a gas cylinder with typical dimensions are suitable.
Schemes for marking the main technological holes and the design of a standard brazier, a brazier - a barbecue, as well as a brazier-smoker made of gas cylinders
On the do-it-yourself brazier drawing from a gas cylinder, it is necessary to indicate the dimensions of each component, which will help to correctly and accurately markup, and, consequently, cut all the details. Such calculations will help determine how much material is needed for work, as well as understand in advance about the options for attaching various structural elements.
One of the main mistakes of beginners is that they forget to mark out a place under the blower. That is why you should not refuse to create such a “hint” that will help you properly organize all stages of work.
At this stage, it is important to decide whether your design will perform one function or combine several. For example, for a barbecue, you need to additionally cut the lid. And for a full-fledged smokehouse, not two, but as many as three cylinders are useful.
What tools and materials are needed for work
For work on cutting the cylinder, arm yourself with a gas cutter or grinder. In the process of work, you should take care of the availability of the following materials and tools:
- Steel pipe with a diameter of 100 mm with a 90° elbow (for a chimney).
- Corners for fastening elements and strengthening the structure.
- Hinges - you can use elements designed for doors or furniture.
- Barbecue grill.
- Rivets, bolts and other elements.
 Welding machine and grinder - the main tools when working with metal
 What tools and accessories will be needed when working on creating a brazier from a gas cylinder:
- welding machine;
- electric grinder;
- electric drill;
- drills designed for metal work;
- clamps with which you can fix metal components;
- metal ruler;
- electrodes with a diameter of 3–4 mm;
- cutting and cleaning discs for grinders;
- scriber;
- core;
- adjustable and gas wrenches;
- set of wrenches.
How to make a brazier with your own hands from a gas cylinder - step by step instructions with a photo
Before proceeding with any manipulations with gas cylinders, it is necessary to free it from gas residues. Even in an empty container, a suspension of liquid hydrocarbons almost always remains, which can explode on contact with air.
How to properly prepare a propane tank for making a barbecue
| Illustration | Action Description |

|
The first step is to remove the valve. First of all, you need to fix the balloon on the ground. To do this, we “grab” it to the stop. Next, we fix the gas key. |

|
We increase the "traction" with the help of such a steel pipe, it plays the role of a lever. We do it very carefully. |

|
After the valve is open, we fill the container with water, you can use soap, and leave our balloon for several days. |
During this time, the water will have time to dissolve liquid hydrocarbons, fill the tank again and drain it again. Now our balloon is safe. And you can start next stage works.
How to mark up and open a gas cylinder
If we are talking about a standard cylinder of 50 liters, in these designs the outer diameter of the container is 96 cm. This value should be divided into four parts. When carrying out these actions, you will receive a value of 24 cm. Marking should be done along the longitudinal seam. It is recommended to measure all distances from this line. This rule ensures smooth marking without distortions.
You will need to measure 24 cm from the seam on both sides and draw lines. The main thing is not to cut them around the entire circumference and leave a part sufficient for the base of your barbecue.
 Side seam option
  After trimming “by marks”, the following blanks are obtained
 We process the edges as evenly as possible to ensure maximum sealing of the barbecue container
At the place where the valve was present, a pipe should be installed with which smoke will be removed.
 Blanks for the future chimney
 In order for the heat in your brazier to spread evenly and there were no leaks on it, steel strip linings must be welded to the joints of the lid and body.
 This is how you can improve a regular balloon with a pair of gratings, a grinder and metal corners
 If you have not welded a corner for skewers inside the balloon, you can insert it into the sides of the barbecue.
 To do this, you need to make cuts with the help of a grinder. The ends of the skewer will be located in them.
 How to make barbecue legs
High legs will also require additional fixation, which is provided using a welded corner. It should be placed on the outer perimeter. Mounting the legs can be the simplest and a little extravagant.
For the manufacture of legs, corners or conventional welded pipe structures welded to the structure are often used. The main thing is to ensure the stability of the brazier.
How to weld covers and handles and assemble the entire structure
The lid is usually created at the first stage of work on the brazier or barbecue. After processing the edges, it is practically the first element attached to the main structure. The most difficult moment is not so much to attach the loops as to ensure a snug fit of the structure. Sometimes a thermometer is attached to the lid.
The hinges are welded at the beginning, but the handles are most often fixed after the final painting of the product. In order for the lid of the brazier not to open completely, a piece of a 10 × 10 square must be welded to the counterpart of the curtain, which is located on the cylinder itself.
 Such limiters allow you to control the angle of tilting the lid and keep the hinge from breaking.
 We mark holes and slots for skewers. We weld the barbecue guide. Do not forget to decorate our "blower" a little.
It is better to foresee holes in the base of the design. They will save your brazier from dust and dirt and remove excess moisture during rain. In addition, additional holes will contribute to additional traction.
How to paint a brazier
If you think that you can paint the brazier with ordinary paint, then you are greatly mistaken. Under the influence of high temperatures, the usual coating will turn into soot after the first heating. There are two very obvious solutions. The first is to leave everything as it is, and the second is to spend some money on a special heat-resistant paint.
However, before you run for a brush and to the store for paint, you need to do one very important thing. Burn some firewood in our barbecue. This is done in order to destroy the remnants of gas substances and degrease the structure.
 It is better to burn the brazier on the street or indoors, where it will be as safe as possible.
 The surface of the brazier can be coated different materials:
 This is how our brazier began to look after painting
 We add that the barbecue model discussed above is the base for many such structures. Most craftsmen improve their homemade products with additional cylinders, thereby expanding the functionality of the device.
What else can be made from a gas cylinder - manufacturing nuances
On the basis of a gas cylinder, dozens of grill, barbecue and smokehouse variations can be made. For convenience, we briefly describe some of these devices:
- Open barbecue from a gas cylinder. The simplest type of construction from a gas cylinder. Even a schoolboy can make such a brazier.
How to make a smokehouse from a gas cylinder
Consider some of the features of making a smokehouse from two cylinders.
Illustration Action Description 
The base for a brazier-smokehouse with your own hands from a gas cylinder can be a stand for an old sewing machine or such a welded structure. 
We think over in advance the options for fastening a sliding or folding table. The design may vary. 
Prepare the balloons following the instructions above. We cut each of them like simple barbecue grills. Do-it-yourself smokehouse from a gas cylinder is best done according to the drawings. 
The only difference is that in the furnace it is necessary to make a hole for the "blower", which will allow you to control the process of smoldering coals. Which, in turn, will create the smoke necessary for smoking. 
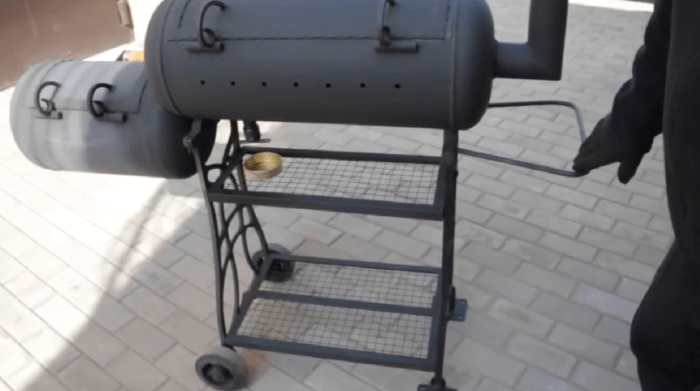
And here we have such a multifunctional smokehouse from a gas cylinder with our own hands. Do-it-yourself barbecue from a gas cylinder
An example of making a barbecue grill from a gas cylinder with our own hands, we examined in detail in this article. If you still have questions about how to make a barbecue grill yourself from a gas cylinder, watch this video:
Do-it-yourself barbecue from a gas cylinder
The role of a barbecue can be played by any of the homemade products discussed in this review. Even an open brazier will perfectly cope with this task. However, it should be remembered that most often such structures are not protected from either wind or rain.
How to make a brazier-steam locomotive from a gas cylinder with your own hands
This is one of the most difficult and most time-consuming tasks that real masters of working with metal set themselves.
It is not possible for a beginner to create such a design. A “homemade” product of this type is capable of solving several problems at once: it is a brazier, a smokehouse, a grill, and a barbecue. Each compartment performs its task. Such braziers have high performance due to the hermetic design, there is practically no heat loss.
If you decide to create a brazier-steam locomotive, then from this video you will learn how to weld a brazier from a gas cylinder.
Features of the use of braziers assembled by hand
Before deciding to create or purchase such a product, pay attention to some points:
- First of all, understand for yourself that any structure that works with fire is potentially life-threatening.
- Ask yourself in advance the question of where the product will be stored during the cold season.
- Learn the principle of operation of the brazier and its features. Each structural element has its own purposes.
- Prepare all materials for the work in advance.
- Do not leave small children unattended near power tools, and even more so with a cylinder.
- Consider how to buy a brazier from a gas cylinder if you are not completely sure whether you can finish the job yourself.
 And it is quite possible that already this summer your neighbors in the area will strive to take a selfie with such a work of art.