DIY greeting cards for women, scrapbooking. Creating original DIY scrapbooking cards for beginners. DIY postcard for a man
If you want to distinguish yourself and congratulate your family and friends, then you just need to make such a postcard
A postcard is a universal component of almost any congratulation or sign of attention. It is she who gives a gift as one of the ways of communication, not only with the help of words, but also with pleasant images. Everyone wants to give something not only beautiful and useful, but also unique.
And a handmade postcard will cope with this task in the best possible way. To decorate postcards, they use the scrapbooking technique, the essence of which is to create compositions from special paper, decorations and scrap materials. Scrapbooking can be done by anyone, regardless of age or artistic talent.
The term "scrapbooking" comes from two English words: scrap (scrap, scrap) and book (book). Indeed, the first scrap products of the late 16th century, albums, consisted of interesting newspaper clippings with quotes, poems, notes, and sometimes drawings. Later, with the advent of photography, photo albums began to be made using the scrapbooking technique. Today this art is popular among both professional designers and amateurs. This technique is used to make albums, books, boxes, business cards, and, of course, greeting cards.
What materials will be needed for work?
The base for the postcard is made from special cardboard - cardstock, or medium-density paper. If it is too tight, creases will be visible when folded. Sheets for pastels are suitable. The sheet size depends on the postcard format, on average it is 15x15 or 13x18 cm, but you can choose any other. To create the base you will need:
- Scrappaper. This is decorative paper that is sold in special sets or one sheet at a time. It can be of different densities, textures (for example, embossed), matte or glossy, with different patterns. In addition, sheets can be single-sided or double-sided.
- Paper for insert. On such a piece of paper you can place small pictures and text of congratulations.
- Decorative elements. You can decorate the card to your taste.
Most often used:
- satin ribbons;
- lace;
- stickers;
- rhinestones, buttons, beads;
- flowers made of paper and fabric;
- decorative carnations.
Decor for cards


Advice from the master on what materials are needed for beginners
Tools for beginner scrapbookers
There are a large number of special tools for working in the scrapbooking technique: from figured hole punches and cutters to sewing machines. Beginners are advised to purchase only the essentials and gradually add to their kit.
 What will you need first to get started?
First of all you will need:
- Scissors. They come in regular and curly different types. You can do without the latter at first, or buy 1-2 pairs of the most original ones.
- Double-sided tape: it can be used to secure photos and decorations, except for small parts and background paper.
- Glue: PVA and “moment” will be the most useful.
- Hole punchers: curb (they are used most often) or other shaped ones. For beginners, one or two are enough, over time it will become clear what exactly you need.
- Stationery knife. In the future, it is better to purchase special cutters.
- Cutting mat. It is convenient with its centimeter markings, but replace it with initial stage You can use any thick cardboard or an old magazine.
- Sewing machine. It is necessary for professionals, but you can sew a small amount of stitching by hand using a regular needle and awl.
- Rubber or silicone stamps with ink pads. Beginners are also not recommended to buy them in large quantities, it’s better to limit yourself to two or three and add to the collection as needed.
- Rulers. The most suitable for such work are metal ones. With their help you can cut through paper with a knife.
Useful tools part 1
Useful tools part 2
Useful tools part 3
Tips for composing compositions on postcards
The scrapbooking technique for beginning needlewomen is an opportunity to show their imagination and create a unique craft.
 Composition - example for postcard design
However, beginners often make mistakes that prevent them from developing creatively. Therefore, at the beginning of your journey, it will be useful to learn a few simple rules:
- In each composition it is necessary to highlight the main accents, which are also called semantic elements. There should be no more than three of them: for example, in a postcard this could be text, a frame and decoration.
- Don't overload your work with too much decor. This is one of the most common problems for beginning scrapbookers. The best solution would be to limit yourself to just a few elements and place them correctly.
- To create successful combinations from different materials, you need to choose those that resonate with each other in color, texture or type of pattern. Similar prints on paper and fabric, the same decor with beads and beads will make the work a single whole.
- The parts of the composition on the left and right, above and below must be balanced. If the volumetric decor is only on one side of the card, the composition will look unstable. However, there may be exceptions here when the designer intentionally creates an asymmetrical and slightly pretentious composition.
- Many beginners find it helpful to create simple pencil sketches. One of the simple and winning solutions is to draw straight lines horizontally, vertically and diagonally and place decorative elements on them.
Basic elements of scrap work
Basic elements of scrap cards
Scrapbooking card guidelines for beginners usually include five basic elements future work. These include the main photograph or picture, a background for it, small decorations, an inscription (magazine) and a title. For journaling, special cards, films are often pasted on, or the field is marked with a stamp.
Live cards


Beginners can purchase special sketches. These are cards that schematically depict the most successful options for arranging scrap elements on a postcard. It is not at all necessary to follow the proposed layout exactly, but it will give a general idea of how to make the composition harmonious.
Stages of making a postcard with your own hands
Let's look at scrapbooking work step by step. specific example. This card is interesting because its base consists of 2 types of scrap paper in contrasting shades. The size of the finished postcard is 20x20 cm.
- We cut out two blanks for the base measuring 10x20 and 11x20 cm.
- Draw a line along the long side of the larger rectangle, retreating 1 cm. Glue the second rectangle.
- Along the glue line we sew the base with two different threads in the color of the paper so that they go crosswise. Use an awl to make holes. We glue the ends of the threads from the inside out.
- We will use a white rectangle 9x12 cm as a background for the photo. Then we cut out three more rectangles from different scrap paper: 8x10, 8x16, 7x13 cm.
- We mark the location of the rectangles and the backing on the postcard, retreating two centimeters from the left and bottom edges, and one centimeter from the right and top edges. Before gluing, be sure to try on all the elements. To make the work more voluminous, we glue the rectangles onto pieces of cardboard or glue pads.
- We decorate the card (except for the white backing) with any decor at our discretion. These can be paper flowers and butterflies, beads, rhinestones and beads.
- Glue a small signature card to the bottom.
- In addition, we decorate small squares (2x2 cm) with small flowers, buttons, hearts and glue them at the bottom of the craft.
- For the title, cut out several ovals of different diameters, glue them together and glue them in the upper left corner. The inscription can be made by hand or in cardboard letters.
- Add a photo and signature.
 We make a card to your liking
Postcard - DIY photo frame
Making wedding scrap cards
This master class will allow you to make a gift for the newlyweds with your own hands.
 A voluminous postcard always looks very meaningful and beautiful.
You will need watercolor paper, sheets of scrap paper in pastel shades, satin ribbons and lace (white), and suitable decorations to suit your taste. In addition, you need PVA glue and a glue gun, a knife, a ruler with a pencil, ink and a sponge for applying them.
- We cut out a 25x15 cm base from watercolor paper, make 2 folds, measuring 3 cm from the bottom and 8 cm from the top.
- We cut the scrap paper into small rectangles of different sizes. You can also print the inscriptions or make the inscription yourself.
- We tint the edges of the rectangles with distress ink. Using double-sided tape, glue the rectangles to the paper, retreating 2-3 cm, and cut them out.
- We glue a ribbon approximately 50 cm long to the back side of the workpiece.
- Inside and outside (on top of the tape), we glue scrap paper. We paste a piece of paper with lines for congratulations inside (a notebook piece of paper will do).
- We design the front side of the postcard. We glue lace under the ribbon in the center. We glue the remaining paper rectangles on top of the tape.
- We decorate the card with flowers, leaves or rhinestones. The flower can be pinned with pins decorated with beads. Lightly burn the ends of the ribbon and tie them into a bow.
Master class on making a wedding card
DIY postcard for a man
A postcard that a man will really like should be designed taking into account the interests and preferences of a particular person.
 This card will be the most exclusive gift
For example, choose the topic of his hobby or profession. The next master class will tell you how to make a man's card in a neutral style. The decor can be adjusted to your taste.
- Cut out a square of thick scrap paper of a calm dark color (15x15 cm).
- The rectangle of white paper for the background should be slightly smaller than the size of the postcard.
- We perform wet embossing; it will require a stamp, ink, special powder and a hairdryer. Using a stamp we apply a pattern in the form of a research map. Apply powder on top and heat it with a hairdryer. We tint the drawing.
- Cut a strip about 3 cm wide. We make a torn edge for this strip and the rectangle with the “map”.
- We print a small slogan or poem on paper. Cut it in the shape of a tag and tint the edges. We do the same with a small title.
- We put all the elements together, try them on and glue them together.
- We decorate the work with any paper and metal decor (stars, rivets, coats of arms, etc.).
- We decorate the inside with strips of scrap paper with a figured edge and stamps. We make a “window” for the text of the congratulations (ordinary paper with a square or line will do).
An example of a postcard for a man
Scrapbooking is a universal technique that allows you to create cards for all occasions, not only serious, but also humorous. Once you have mastered the basic principles of operation, you can experiment with different styles and materials. This hobby will help you develop creativity, artistic taste and delight loved ones with unique gifts.
Larisa Volkova
Nowadays you won’t surprise anyone with colorful postcards with already printed words of congratulations. Comfortable? Yes. But not original! But make a congratulatory card DIY birthday cards aren't that hard, there would be a desire. And most often it is chosen for this scrapbooking technique.
If we characterize this type of decorative and applied art briefly, then scrapbooking- this is a decorative design for photo albums, postcards, photo frames using different materials and painting. He's been incredibly popular lately. Reason for popularity scrapbooking - fashion for things made with your own hands. In our fast age of constant lack of time, there is nothing more valuable than a gift given with your own hands. It keeps the warmth and memory of the person who made it and gave it to him.
My postcard– a delicate pink bouquet with butterflies.
For making postcards I needed materials:

Watercolor paper (20.5 x 20.5 cm, red cardboard) (19.5 x 19.5 cm);
Paper for scrapbooking with a delicate pink print and floral pattern along the edge (18.5 x 18.5 cm);

Openwork paper napkin;
Pink copier paper;
Glitter paper in red and silver colors;
Pink satin ribbon;
Pink nylon tape;
White lace;
White small beads;
Glue "Moment" transparent;
Decorative hole punches "Butterfly", "Flower", to decorate the edge of the sheet and corner.
At the smallest square (it will be the top one) We make out the corners with a hole punch.


Then, stepping back a little from the bottom edge, glue the lace and satin ribbon,
securing their ends from the wrong side.

Glue a napkin on top of the lace and ribbon in the center of the square. We overlap and glue the squares together.
Hole punchers "cut down" flowers and butterflies. To make them voluminous, we bend the wings of the butterflies, and lightly press the flowers with a simple pencil with an eraser on a terry towel.


Glue the flowers into the center of the napkin and decorate the centers of the flowers with beads.


Glue a bow under the resulting bouquet.

To the top right corner postcards glue butterflies (I have double ones and this can be seen in the photo).

And this is the other side congratulation cards.

Two hours of work and, voila, the postcard is ready.

Thank you for visiting my page. I will be glad if it is useful to anyone.
Publications on the topic:
Goal: making a postcard for March 8th with your own hands. Tasks:1. Teach children how to make voluminous postcard for the holiday from waste material:.
Soon we will all be celebrating one of the main holidays, Christmas. I bring to your attention a simple Christmas decoration.
A bright and sunny spring holiday is approaching - International Women's Day on March 8th. Preparations are in full swing in all kindergartens.
I work with children preparatory group. They are an inquisitive and very fascinating people. On New Year's holidays I offered to make them.
I bring to your attention a master class on making greeting card with children junior group for the holiday of March 8. For manufacturing.
Master class “A simple sweet bouquet for a birthday with your own hands” Video Good day everyone! We continue to get acquainted with suite design. There is currently no consensus on who invented sweet floristry.
DIY New Year's card. Master class with step by step photos Description of the material: This material will be useful to educators and teachers.
Nowadays, you won’t surprise anyone with colorful postcards with already printed words of congratulations. Convenient, but not original! But making a birthday card with your own hands is not so difficult, if only you had the desire. And most often the scrapbooking technique is chosen for this.
To carry it out, many stores now sell ready-made kits or individual elements - empty blanks with attached multi-colored pictures of any subject, colored paper, lace paper napkins, corners and other stickers, ribbons, beads, which can be folded into beautiful postcard your imagination will help you. I’ve already told you about the Orekhovo-Zuevo Women’s site, and now we invite you to watch and, perhaps, repeat, a master class with photos on making a very beautiful greeting card for a woman.
In order to make a birthday card using scrapbooking technique, we use:
- White cardstock;
- paper beige color with pink flowers;
- Paper of dirty pink shades;
- A Richelieu napkin with a diameter of approximately 7 cm;
- Light brown pigment cushion;
- A pigment cushion of dirty pink color;
- Shaped edge composter;
- Figured corner composter;
- Double-sided tape;
- Double-sided bulk tape;
- Stamp “Openwork corner”;
- Stamp “Health and Happiness”;
- Acrylic block;
- Outline stickers “Corners”;
- Paper flowers and leaves;
- Metal pendants;
- Semi-pearls of snow-white and red colors;
- A congratulatory inscription printed on a printer;
- Sewing machine;
- Glue “Moment Crystal”;
- Scissors;
- Stationery knife;
- Cutting mat;
- Simple pencil;
- Metal ruler.
Quite a large set, but our postcard should turn out to be at the highest level.
Making a birthday card with your own hands
1. From white cardstock you need to cut a rectangle 30.1 x 15 cm. In the middle, with an awl or scissors, press two transverse lines at a distance of 1 mm from each other so that you get two squares 15x15 cm. Fold along the lines. This fold is needed to prevent the card from opening. The base for the postcard is ready.
Treat the edges of the entire card with a light brown pigment pad. Don't rub too hard, just add a little tone!

From beige paper with pink flowers, cut out two rectangles 14.5x13.5 cm and two strips of pink paper 14.5x1 cm. We cut everything with a stationery knife on a mat - with scissors you will never achieve perfectly straight edges.

From pink paper, cut out rectangles 8x14.5 cm and two arbitrary ones - approximately 7x3 and 10x3 cm. They will be needed for the pocket and decorations.

Process the pocket blank on one side with a shaped edge hole punch to create a lace effect.

Along the perimeter of all paper blanks, sew a stitch on a sewing machine at a distance of 1-2 mm from the edge. If you don’t have a machine, you can draw the seam with a capillary or gel pen.

On back side Glue thin strips of double-sided tape along the edges of the blanks.

Let's start making a happy birthday card. On right side For the spread, first glue one large beige rectangle with flowers, pressing it to the fold line, then on the right - a thin pink strip. Remember that we initially cut the blanks half a centimeter smaller than the base, i.e. rectangles must be glued with a 2.5 mm indentation from the edge of the base.

Cut out an arbitrary rectangle from white cardstock (mine is about 10x12 cm), process the corners with a corner hole punch, and tint the edges with a light brown pillow.

Glue the white blank on the right side of the spread, decorate its two opposite corners with contour stickers, and put a corner stamp in the third free upper corner using a pink pillow.

On the left side of the spread, glue a pocket with the openwork side up - you can put a monetary gift here. Decorate the lower corners with contour stickers, and the upper corners with corner stamp imprints.

Place the “Health and Happiness” stamp in the center of the left spread.

Let's start designing the front side of the postcard. Glue the beige rectangle and pink stripe in the same way as on the right side of the spread.

Glue a napkin in the upper left corner.

Glue one remaining rectangle on top of the napkin vertically, the second - horizontally.

Glue the congratulatory inscription “Happy Birthday!” onto the horizontal strip. You can print it out on a printer, you can lay it out with outline stickers, or you can take ready-made nameplates with congratulations.

Decorate the left corners of a homemade birthday card with contour stickers, and on the pink stripe on the right - a golden stripe from the same set.

At the bottom of the card, glue a composition of paper flowers.

As a backing for the roses, I used: for the central rose - a metal pendant in the form of a flower, for the red ones - pink paper daisies.

Decorate the top of the card with a pendant with wings and a heart.

Glue white half-pearls onto the vertical pink blank.

Place red semi-pearls on the sides of the congratulatory inscription - to create an imitation of the carnations with which the sign is held.

Well, that's all. The result is a bright, unusual and very creative idea scrapbooking happy birthday cards for girls. Everything is very simple and fast. Good luck in your creativity!


As a child, every person at least once had to make cards on their own. For some reason, in adulthood, few people try to do this work with their own hands. Scrapbooking technique is unique opportunity return to childhood again, plunge headlong into creative process and create a unique thing that gives love and warmth.
The variety of materials for scrapbooking allows you to create unique cards for any occasion - for a girl’s birthday, for a girl’s wedding, or for a grandmother’s anniversary. Small, and large, and even huge - as your imagination dictates and time allows. It’s very interesting to create a postcard step by step - choosing lessons and teaching instructions is not difficult, the diagrams can be printed from the Internet.
Postcards using the scrapbooking technique turn out very beautiful.
Feature of postcards self made is that they can be both classic and very non-standard. The shape of the craft can be square, rectangular, round and curly. It is even possible to make crafts of very unusual shapes. Depending on who this gift is intended for, postcards are created in pastel colors or, on the contrary, bright, catchy products.
For a wedding event, it is recommended to use fabric and lace. Postcards in the form of a book or photo album look original. It is not at all necessary to create a template product, because scrapbooking provides a huge scope for creativity.
Children's crafts are often made in the form of cartoon characters and fairy tale characters. Bows, flowers, and bright designs would also be appropriate. If the gift is intended for an adult man, then you should resort to using strict tones; it is not recommended to decorate the product with lace. A postcard made in the shape of a jacket, tie or whiskey bottle will look original.
Postcards made in vintage style look beautiful and noble. This gift is ideal for a boss, colleague and a mature person.
Scrap crafts always look special and non-trivial, which is why they enjoy considerable popularity.
Gallery: postcards using scrapbooking technique (25 photos)


Scrapbooking: a simple card for beginners (video)
Happy birthday greeting card using scrapbooking technique: master class
A birthday is undoubtedly a celebration of childhood, no matter how old the birthday boy turns this year. Making cards for this celebration is an art. After all, the craft should be non-standard, bright, festive, giving only positive emotions.
What is needed:
- paper of different colors;
- watercolor paper;
- cardboard of different colors;
- brush;
- watercolor;
- pencils;
- glue;
- double-sided tape;
- ruler;
- bubble film;
- file;
- picture with inscription;
- buttons;
- needle;
- threads
Work progress step by step:
- Cut cardboard and watercolor paper using a knife and ruler into pieces of the required size.
- Moisten the sheet with a brush and immediately paint it with paint.
- Make streaks of paint on the file.
- Attach the painted blank to the file and press slightly.
- Take bubble wrap and paint all the bubbles with a darker shade of paint.
- Attach the film to the same workpiece and press it.
- Print the part with bubbles in several places.
- Perform all these actions with the rest of the prepared parts.
- Give the required color shade to the inscription by shading it with a pencil and shading it with a piece of fabric.
- Cut out several circles from paper and stick them on the backing.
- Using a pencil, draw lines reminiscent of a sewing machine line.
- Mark the place of the bend and glue all the prepared parts.
Sew buttons to the glued circles, thereby adding a little volume.
Postcard for a man in scrapbooking style: step-by-step instructions
It is quite difficult to please a man with a gift. But if you present him with a postcard in the form of a shirt, he will certainly appreciate this unusual and bright present. After all, these men's crafts deserve special attention.
What is needed:
- colored cardboard;
- dark scrap paper;
- template for shirt and vest;
- ribbons;
- watch pendants;
- metal brads;
- glue;
- scissors;
- pencil;
- ruler.
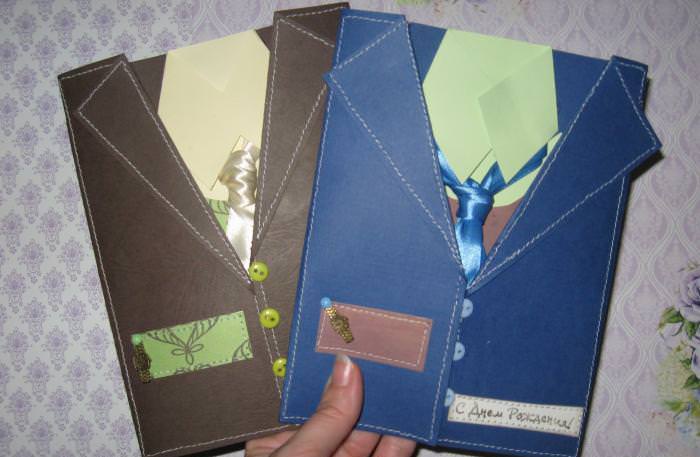
It’s quite difficult to please a man with a gift.
Work progress:
- Measure a rectangle with sides 14.5 and 19 centimeters for the future shirt.
- Make cuts on the sides, then carefully fold the collars.
- Cut out a vest from scrap paper and glue it to the shirt you just made.
- Form a jacket from a cardboard sheet and turn the collar.
- Place the shirt blank inside.
- Paste a suitable inscription.
- Cut out a square piece with sides of fourteen centimeters from scrap paper and use a hole punch along one edge to make it shaped.
- Cut another piece of rectangular shape with sides of 10.5 and 15 centimeters.
- Use these elements to form pockets.
- Tie a tie from ribbon.
Place your watch in the pocket.
How to make a card for mom using scrapbooking technique
A mother, like any other woman, wants attention and love. A postcard made using the scrapbooking technique will be a manifestation of these feelings. This gift is suitable for absolutely any holiday. You just need to select the appropriate inscription.
What is needed:
- watercolor paper;
- colored paper;
- lace;
- ribbon;
- artificial flowers;
- buttons;
- ruler;
- scissors;
- glue;
- purple marker.

Mothers, like any other woman, want attention and love.
Work progress:
- Fold a white piece of paper in half.
- Cut out four blanks from colored paper.
- Glue some lilac elements onto the purple ones so that the width of the fields is the same.
- Write congratulatory words and circle this inscription with a felt-tip pen.
- Stepping back from the edge about a centimeter, glue all the rectangular elements.
- Now glue the lace and the ribbon on top of it.
- Fix all colored parts on a piece of paper.
- Form a bow from the remnants of the ribbon and also fix it on the product with glue.
- Now glue the flowers and buttons.
Draw a monogram along the edge of the product with a felt-tip pen.
Vintage card using scrapbooking technique
In this style, any craft acquires special grace and charm. The postcard looks not only unusual, but also expensive. It can be safely presented to true connoisseurs of beauty.
What is needed:
- antique central image;
- cardboard;
- paper with appropriate patterns;
- dye;
- sponge;
- ink and stamps;
- brads;
- scissors;
- glue;
- double sided tape.
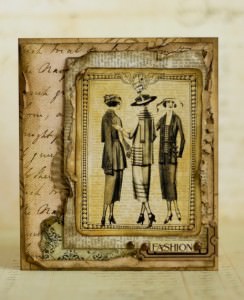
In this style, any craft acquires special grace and charm.
Work progress:
- Compose the main picture with decorative elements. At the same time, crush the paper a little and tint it.
- Put this composition together.
- Glue all the parts onto the base, securing some of the elements with glue and some with tape.
On the eve of Valentine's Day, all lovers begin to present their soulmate with some gifts. You simply can’t do without Valentine’s cards on this day. But if purchased products look boring and banal, then those made using the scrapbooking technique are just what you need.
The main thing is to consider the following points:
- primary colors are pink and red, regardless of who the gift is intended for, a man or a woman;
- The symbol of the holiday is the heart. It is recommended to make a Valentine card in this form. As a last resort, use such figures as decoration;
- the text of the message should be sincere and memorable. The use of banal phrases is not allowed.
Scrapbooking postcard: master class for beginners (video)
Anyone can master the scrapbooking technique. Postcards are just the beginning. After a while, this creative process is so exciting that you want to master more complex works that will become the pride of any needlewoman.