Printing one image on several A4 sheets. How to print a large poster from A4 sheets on a home printer
Do you want to print photos or a text document? Of course, it’s good to purchase a printer and connect it to a computer. But this is not the end yet.
It is necessary to complete all the settings, do not forget to install the driver for this printing device, and also additional programs for correct operation of the device.
The combination of these actions will lead to the desired result - the ability to print. It is from these steps that we will begin to move towards the goal.
Connecting a printer
Older models of printing devices required a lot of attention to connect them to the computer.
It required connecting to a special port and waiting for the operating system to complete everything. Much has been simplified now.
There are two ways:
- installing it as a network one;
- or print from a smartphone or tablet.
We will look at two main types of connection:
- locally
- as a network

Photo: local printer connection
First you need to install the driver.
When installing locally, make sure the device is turned off, then connect it to your computer, and then turn on the power. Standard Plug and Play makes the task easier - the operating system independently installs the necessary driver.
If this technology is not supported, you will have to install the driver manually.
In the first option, your actions:

If Plug and Play technology is not supported, then your actions are as follows:

When the installation is complete, in the folder Printers and faxes the corresponding icon will appear.
To use network type:

Note: The printing device may be the default one. Then all documents will be automatically sent to this device.
Driver installation
To install the driver, make sure the hardware is connected.
Then follow these steps:

If your device is in the drop-down list, then run the driver from the operating system during installation. This is not always good, as many functions will not be available. In this case, it is better to choose installation from disk.

This completes the work with the driver.
Setting up the printer
To configure or change the default settings:
- move the mouse pointer to the lower right corner of the screen, then up and click Search;
- enter in this field devices and printers, then click on it;
- equipment you will use, right-click, then select Use as default.

Using a laptop, mobile device or tablet, you can make settings for each network. The operating system remembers all these settings.
You can also select default different models on different networks:

Comment! If you want the settings not to change when moving from one location to another, follow steps 1-3, and select Always use the same default printer. Then click OK.
Basic Printer Settings
Before purchasing a printing device, you should familiarize yourself with the parameters that affect its performance: 

- containing dye;
- pigmented;
- quick-drying.
Everyone is good in their own way. But dye ink, for example, has the disadvantage of bleeding and short-lived color brightness. Pigment ink is more durable, however, it also has a disadvantage - it clogs the cartridges, which makes them unusable faster.
The most important thing is to refill each cartridge with the type of ink that suits it, otherwise problems with them cannot be avoided.
Video: typing on a computer
Print text
Let's consider how to print text from a computer to a printer using print options.
The first thing you need to do is select the text or part of it and copy it from any document or web page.

If you want to print part of the text, check the box. Selected fragment.
If you are typing Word document (eg Word 2007) first check for readability, grammatical and punctuation errors.
On the menu File click Preview(preferably), then Seal.

Photo: preview in Word 2007
In the window that opens, you can select the necessary parameters:

- even
- odd;
- scale – you can specify how many pages to place on a sheet, and all pictures and diagrams are also scaled;
- by page size – specify the required page format;
- Effects tab – allows you to set background images;
- Paper/Quality tab – Set the print quality and paper size. This saves ink;
- Finishing tab - you can specify how many pages per sheet you want to get, as well as set the text orientation.
In general, there is nothing complicated.
Black and white
You probably know about two modes: color and black and white.
To install the second one you need:

So, the current document will be printed in black and white.
Color printing
Walking through the window Color management You will see that you can view and change the default color printing values used.

- at the end press Seal.
It is possible to print several images, photos on one page. To do this:

Having looked at the methods of printing from a computer to a printer, you are convinced that there is nothing complicated. All operations are accessible, understandable and even somewhat similar. Just read carefully before setting the settings.
In addition, you can try any of them and choose the best option for each file type. Try it! There is no limit to perfection!
Many novice modelers have a question: “How to print a drawing to the required scale with an A4 printer?”. At the same time, often a drawing of your favorite aircraft comes across in image format ( *.jpg, *.png, *.bmp). I will show you how to do this using the example of 2 programs: and Microsoft Office Publisher 2010.
First, we need a drawing in image format; many such drawings can be found on the website AirWar.ru (Great Aviation Encyclopedia).
Next, if necessary, you can clean the drawing from unnecessary parts and elements using any graphic editor(for example Adobe Photoshop, Paint). I have already prepared such a drawing with the Mitsubishi A6M Reisen aircraft.
Let's get startedWithMicrosoft Office Publisher 2010.
The Publisher application is included with office programs starting with Microsoft Office Professional 2007. Therefore, many will not have problems finding this program as they might with Corel Draw.
1. Launch Publisher. In the window that opens, to create a document, you need to select a document template, select Posters. Then from the list that appears, we need to find a poster format that will suit our drawing. I chose 118.9 x 84.1cm.


2. Next, you need to import the drawing image. Go to the tab Insert- button Drawing. A dialog box will open Inserting a picture, after which we select our drawing file. 

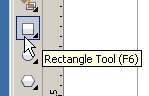
3. After our drawing is inserted, we need to draw a rectangle with which we will measure the wing span. It was decided to make the span of one half of the wing 40 cm to match the size of the ceiling tiles. Go to the tab Insert – Figures- button Rectangle.


After inserting the rectangle, resize it in height with a value of 40 cm. When the rectangle is selected in the toolbar Drawing Tools – Format – Size – Height.


Next we find the button Layout options and press it. A dialog box will open in which you need to set the overlap of pages that will serve to glue the drawing together. You can set 0.4-0.6 cm, that's enough. You can also change other print settings, such as sheet layout: Landscape or Portrait.
6. After all the settings have been set, click on the button.

How to do this in Corel Draw.
1. Launch Corel Draw.

2. Press the button New new document) or menu File– New) .


3. Then we need to import the drawing image file. To do this, go to the menu File –Import… (Import).


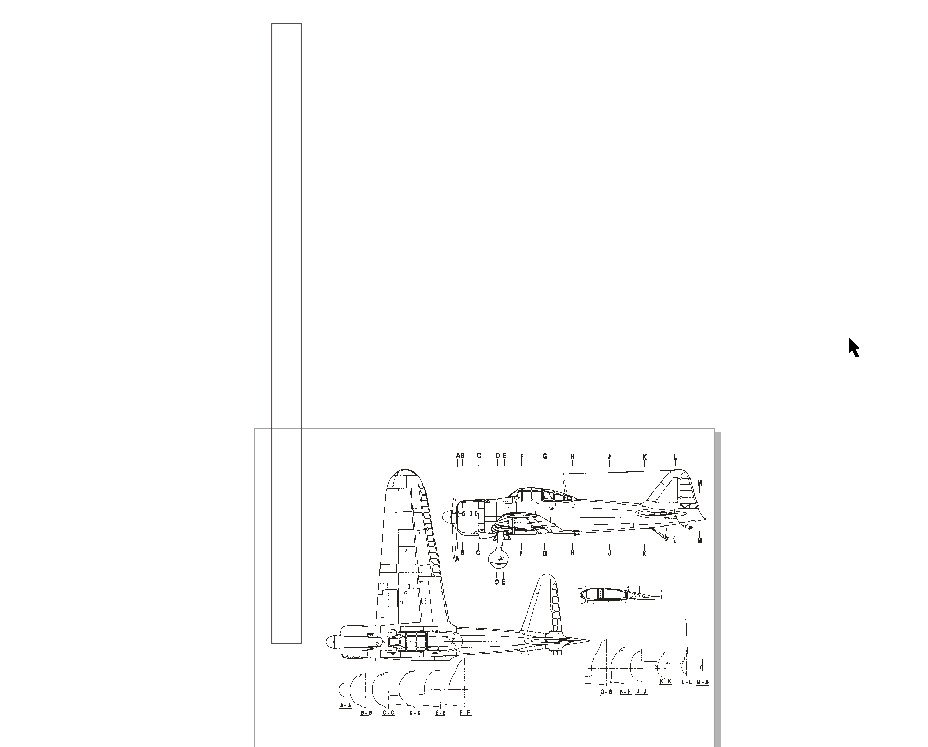
After selecting the file, the cursor will change to a triangle, with which you need to click on the document field to place our drawing.


To adjust the drawing to the desired scale, you need to select the created rectangle and set the height to 40 cm in the toolbar as in the screenshot.
As a result, we get a long rectangle. Then we click with the cursor on the image of the drawing to select it and, dragging it by the edges with the squares, we change the size of the image, adjusting it until the length of the rectangle is equal to the length of the wing. After we have adjusted the scale, the rectangle can be deleted.

5. Next, open the preview by clicking the menu File –PrintPreview. A preview window will open, but only the part of the drawing that fits on the A4 page will be visible on the screen.


6. In order to split the drawing into sheets, you must click the Print Tiled Pages button, which is located on the toolbar. After clicking on this button, we will see the drawing in full and the pagination grid.


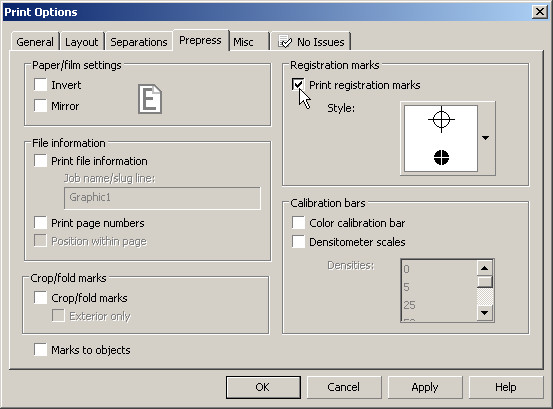
7. Next, go to the print settings by clicking on the button PrintOptions on the toolbar and in the window that opens, go to the tab Prepress. On this tab we find the option Printregistrationmarks and put a tick. This option is responsible for marking the print boundaries for further more convenient cutting and gluing of the drawing. Click OK.

8. That's it. Everything is ready. Now all that remains is to click on the print button.

Conclusion.
As you can see from the instructions described above, there is nothing complicated. All that remains is to glue the drawing together. These methods can also be used in other cases. For example: when some CAD programs do not allow printing on an A4 printer, but can be saved in image format.
Greetings!
Sometimes there is a need to print a photograph or any image in the form of a large poster. However, “mass” printers intended for home/office use only support printing on A4 sheets.
In this situation, you can use a solution that will “split” the image into several parts, which can later be printed on A4 sheets. By gluing all these parts together, you will get the desired poster.
Dividing the image for further printing as a poster
It should be noted that popular programs for viewing and processing images do not have the ability to split images. Therefore, we will resort to using a specialized utility - Pics Print.
Official website of the program.
This program specializes in dividing images into parts (A4 format), and then sends them for printing. By gluing them together, you will get a large poster.
Now let's look at specific example, how to add a picture and print parts of it on a pre-selected number of A4 sheets.
Printing a large poster on a home printer

Open Pics Print. In the top menu, click on the icon magic wand, and in the menu that appears, select the item Poster Wizard.

A welcome wizard window will open, with which we will set the necessary settings and select the image to be printed as a poster. Click the button Next >

Another wizard window will be displayed. It provides information about the printer used for subsequent printing, orientation and paper size.
When the button is pressed Change You will be able to change these parameters.

Window for selecting a printer and changing print settings.

If the specified parameters do not require changes, then click the button Next > to continue.

On next stage you are asked to choose where the image will be taken from, which will subsequently be divided and printed as a poster. There are three options to choose from: from the hard drive, from a connected camera, or a scanner.
We will select an image from the hard drive.

This window asks you to select an image that will be used for printing as a poster. Specify the required image.

After specifying an image, it will be downloaded and displayed in the wizard window. Click to continue Next >

A new window will be displayed in which you can set the image division settings.
The first option sets the division of the image along, and the one below it sets the division across. In the example, we will divide the image into 2 parts lengthwise and crosswise.
If you slightly move the wizard window, you will be able to visually evaluate in the main program window how the image will be divided.
After entering the desired parameters, press the button Next >

In the last window of the wizard, we are told that everything is ready for printing. All you have to do is check the box Print document, and then press the button Finish.
As a result, the printer will print four sheets, which will be components the originally selected image. Glue them together and the poster is ready!
Brief summary
In this review, we looked at a utility with which you can print a poster in just a few steps. Moreover, the components of the poster will be A4 sheets, which can be printed from any home or office printer.
If you have any questions, you can ask them in the comments.
Do you urgently need to print photos of a certain size for documents or a photo album, but don’t have time to run to a photo salon? Your trusty printer and editor will help you out." Home Photo Studio"! From the article you will learn how to print a photo of the desired size on a printer using these two tools.
Step #1. Install the program
First of all, download the Home Photo Studio program to your computer and install it. You can find the distribution on one of the pages of our website -. All that remains to be done after this is to launch the installer, select the folder in which you want to place the application, create a shortcut on the desktop and wait for the installation process to complete. When everything is ready, launch the editor. Click the button "Open photo" and indicate the path to the image you want to print out on paper.
Start menu of the “Home Photo Studio” program: upload a photo to work with
Step #2. Set up printing
The program's operating menu will appear on the screen. Immediately click on the button with the image of the printer on the control panel or go to the same menu through File > Print.

Click the "Print" button
Select your printer from the drop-down list and enter the number of copies required for printing. Specify the paper size: A4, A5, A6, sheet 10x15, etc. Don't forget to indicate the page orientation: it can be either horizontal or vertical. And, of course, don't forget about the fields. In the columns of the same name, indicate the requirements for them by entering all the values manually or defining them using special switches.

Customize the printing process: specify sheet size, orientation and other parameters
Step #3. Print photo
Now about how to print a photo of the desired size on a printer. There are three “circles” on each side of the image. By grabbing any of them, you can change the size of the picture: to do this, simply drag the photo in the direction you need.

Change the photo size to the size you need
Please note: by default, the program crops the image based on the boundaries you specify. If necessary, disable this function: just check the box “Maintain photo proportions”, then the photo will not be cropped when changed. Is everything ready? Start printing by clicking on the button of the same name.
Step #4. Photo enhancement
"Home Photo Studio" is not only a program for fast printing photos, but also a convenient editor that will improve the quality of any photo.
In the tab "Image" you will find large number tools for improving photography. This includes adjusting brightness, contrast, saturation, and correcting light and hue, and eliminating defects - red eyes, overexposed or darkened pictures and many other useful options.

In the “Image” tab you will find tools for enhancing photos
After basic photo enhancement, you can continue processing the image in the menu "Effects". Here are hundreds of different effects that will be a worthy addition to any image, highlight its mood and add a “zest”.

The “Effects” tab offers over 100 design styles for your photos
In the tab "Design" you can choose an original frame for your photo, customize a 3D outline, process the edges using a mask, decorate the photo with clipart, turn it into a postcard or even a calendar.

Any photo can be decorated with a spectacular frame
Conclusion
Great! Now you can print photos of the desired size at home without any hassle or fuss. You can also save the processed image on your computer: the program presents all the popular ones, any of which you can select to record all the changes made.
You can print a collage or poster using a Canon or HP printer. In most cases, there is no need even for specialized software.
What will we talk about:
Preparation for the process
First you need to prepare an image. Its resolution must correspond to the intended purposes, since ignoring this indicator can lead to problems with the clarity of the picture. That is, the more sheets that need to be printed to create the required image, the higher the required image clarity.
Printing pictures
Next, select a printing device. A Canon (HP) printer must work with sheets of A4 format and have a function that implies no margins. The latter will allow you to create a poster, calendar or photo collage on several sheets in A4 format with great success and without unnecessary hassle.
Each printer, regardless of the manufacturer, comes with an instruction manual. Before turning on office equipment in electrical network, you should definitely familiarize yourself with it and use the settings that are written there for printing in a special mode. The result will be positive when using “Crop Lines in the Margins”. Thus, before each PC page is printed, it is laid out automatically. This ensures trouble-free laying of finished sheets on top of each other and their connection with glue.
Printing a picture using Microsoft Word
To print on several A4 sheets in Word, you need to save the desired image in this program. A4 sheets are placed in the tray intended for them, and go to the menu called “File”. There they find “Print” and fill in the required parameters; to view the selected mode, open the “Preview” tab.

If the resulting image matches the desired result, the poster is sent for printing via Word. To finalize the printed parts, you will need glue and scissors. The choice of inappropriate parameters will result in defects in the finished product. Then the whole process will have to start again.
The properties of the following lines are set:
- sheet size (minimum four puzzles);
- sheet orientation (landscape or portrait);
“Cutting lines in the margins” are divided into indicators indicating the edge and the place where another fragment is attached. A more detailed breakdown of images in Word is possible using specialized programs.
Using Microsoft Excel
Often, to print an image on several A4 sheets on a printer, the well-known Microsoft Excel is used.

A spreadsheet will greatly facilitate the process of breaking down the whole picture into its constituent parts. To do this you need:
- upload the drawing to the office program;
- go to the tab called “View”;
- select “Page Layout”;
- stretch the image horizontally and vertically, leaving its boundaries far beyond the boundaries of the marker, while reducing the scale;
- take a position covering the required number of pages;
- print the picture, not forgetting about the settings (orientation and size), they are checked using a function such as “Preview”.

Printing an image via Paint
The Paint program is familiar even to novice personal computer users. It is considered a mandatory element of the Windows operating system, so it is available on every device. To print a picture on several sheets in A4 format using Paint:
- go into the program;
- open the desired image in it;
- go to the “File” tab and select “Print” and “Options”;
- indicate the required conditions (book or landscape orientation, number of sheets in length and width, centering and scale)
- confirm them by clicking “Fit”;
- check the correctness of the entered parameters by going to “Preview”;
- If there are no flaws, send the poster or collage for printing.
This is very quick way get a picture without swiping additional settings settings in the printer or other programs.

Online printing via Photoshop
It is possible to print a picture in Photoshop on several A4 sheets. How to print an image using Photoshop? Is it possible to carry out the procedure online? First, you need to make sure that the program supports the image format and is online. Next, you need to open it and go to “File-Print”. Here you need to configure the Photoshop program by selecting and confirming:
- An HP printer (Canon), on which you will have to print “puzzles” for the image using Photoshop.
- Number of sheets in A4 format.
- Method of pagination.
- Color preferences.
- Picture orientation (portrait or landscape).
- Source of supply of consumables.
- Photoshop quality.
The last step is to view the resulting image online and print it on sheets in A4 format using Photoshop.

Setting Printer Settings
Plotters are not needed if settings are made in the printer menu. In this case, the following recommendations must be followed:
- open the picture;
- select a function that involves printing it;
- go to the “Properties” tab, then click on the line called “Page”;
- in the “Page Layout” item, select the “Poster Printing” column;
- confirm your action by clicking on the “Set” tab;
- determine the breakdown parameters;
- send the poster for printing.
The result is shown in the photo.

In this case, it may be difficult to choose between cut lines and overlap marks. According to experts, the latter are a more acceptable option. Unfortunately, not all printers have this functionality.
Using special programs
Professional artists most often use programs created specifically for this type of design of pictures for collages, posters and posters. The corresponding utilities and drivers have more flexible settings that allow you to provide for all possible defects and irregularities that may occur on A4 sheets. Similar developments include “Ace Poster”, “Corel”, “ABViewer”, “The Rasterbator” and many others.