How to convert Word to book version. Printing of teaching aids (textbooks, manuals). Landscape page orientation
Sometimes some users need to solve a problem related to how to print a brochure. In general, printing a document in the form of a brochure is not as difficult and time-consuming as it seems at first. To do this, you only need tools Microsoft Word and an inkjet/laser printer or multifunction device. Therefore, in this situation you will not need any additional software applications, and you can print as many brochures as you want absolutely free. You can just as easily print a booklet.
To begin, open the document from which you want to make a brochure and go to the “Page Layout” tab in Word. There, click “Page Setup”, and then check the paper size in the window that opens. If the A4 format is installed there, then leave everything in its place. The fact is that in order for the finished product to correspond to the A5 format, it needs to be printed on an A4 sheet.
Click the "Fields" tab, then go to the "Multiple Pages" drop-down table. From the list presented, click on “Brochure”. Then the program will automatically change the sheet orientation to landscape and show you a sample consisting of two columns, each of which represents a page of the future brochure.
Preparing the cover
To print your brochure as efficiently and effectively as possible, take the time to special attention preparing its cover. To do this, go to the “Insert” tab and click on the title page. Select the template that interests you most. For example, for business text opt for a conservative style.
Next, you will be asked to fill in the name of your organization, select a title for the book, date, etc. The abstract will be located on the second sheet. If you want, you can write something there, if not, then feel free to skip this step.
We put down the numbering
To receive a document in the form of a well-executed brochure, you should also consider numbering. Double-clicking at the bottom or top of any page will take you to the header and footer mode. On the software side, the “Designer” tab will be activated, which contains buttons for moving to the footer/header. Here, if you wish, you can change the fields.
Format the text
This stage is no less important than the previous ones. On an A4 size sheet, as a rule, you can fit four smaller pages - if you print them on both sides. Thus, in a future printed book, the number of pages must be a multiple of four.
As for formatting itself, during this procedure you need to reduce margins, move pictures away from the edge of the document, align all text in width, etc. If you notice that subheadings are positioned separately from the text that immediately follows them, then be sure to correct this, otherwise the printed document will look “clumsy”. To do this, find the “Paragraph” line in the “Page Layout” tab and, selecting “Page Position”, click on “Keep from next”.
Brochure printing
On last stage When you open the print tab, check the box next to the line that indicates two-sided printing. After this, Word itself will layout the future brochure and set the order in which all sheets should be printed. After ejecting several sheets, the device will pause its operation so that you can transfer them to the input tray. Turn the sheets over as needed (depending on specific model printer) and continue printing. At the end, you need to wait until the printing printer finishes its work.
How to make a brochure from a PDF document?
If you are interested in the answer to the question of how to print a document in pdf format, then for this you need to download Adobe Acrobat.
- Select the desired device via “File” => “Print” and specify the pages intended for printing.
- Once you have identified the pages you need, click on “Brochure”.
- To print specific pages on a different sheet, be sure to specify them using the Sheets From/To option. In “Properties” you can select the appropriate paper tray and, if necessary, specify other settings.
- At the last stage, you just have to decide on the additional parameters necessary to complete page processing. For example, determine on which sides of the sheet of paper the document should be printed.
Thus, you will receive a printed PDF document in a book.
As you can see, making a convenient and beautiful brochure from several pages of a document using a printer and Microsoft Word/Adobe Acrobat is quite simple if you follow the sequence of steps. Most likely, you will now understand how to print a document in the required form.
Prices for teaching aids (textbooks, manuals)
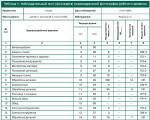
Printing teaching aids (textbooks, manuals) on KBS
| Circulation | Number of pages in a block | |||
| 96 | 160 | 240 | 360 | |
| 10 | 4340 | 5460 | 6740 | 8780 |
| 50 | 16940 | 20300 | 26300 | 35300 |
| 100 | 27200 | 36800 | 44000 | 59600 |
| 200 | 46960 | 63600 | 70000 | 94000 |
| 500 | 90500 | 114500 | 150500 | 204500 |
Prices are for printing on 80 g/m offset paper 2 . The color of the block is 1+1, A4 format. Cover 4+4, coated paper 200 g/m 2. Gluing.
Please check with the manager for prices for other formats, circulations and specifications.
Printing Tutorials at Printside
- Exact adherence to format and other technical parameters. As you know, printing manuals and teaching aids requires compliance with certain requirements and standards. At the Printside copy center it is fully complied with.
- Short terms . Printing of textbooks and methodological manuals We carry out this process using modern, high-performance equipment, which allows us to accurately meet deadlines even when ordering fairly large quantities.
- Excellent quality. It is ensured both by the professionalism and extensive practical experience of our employees, and by using only the most the best materials(printing inks, paper).
- Low prices. Printing textbooks and manuals at Printside most often costs significantly less than our numerous and respected competitors.
class="eliadunit">
So, the problem is this: we need to print the text from a text document (created in Notepad, Word 2000/2003/2007 versions, etc.) in the form of a book (manual).
At the moment we can highlight three the main ways to solve such a problem. Whatever the method, it is worth recalling that when printing a book on an A4 sheet, the pages have an A5 format, based on this, remember when typing text to set the page format to A5.
1 way. This method is the easiest, but depends on your printer. If your printer has the ability to print books or brochures and, accordingly, do the layout yourself, then the issue is resolved.
How can I be sure that my printer has this capability? Go to any text editor and press the print button (or a keyboard shortcut Ctrl+P) and click on " Property" (shown in the picture).

It is difficult to give further universal advice, because... Each printer has its own characteristics, so in the new window that opens we look for something similar to printing brochures or printing a book. If you haven’t found it, but you assume that such a function is present, then the advice here is simple - surf the Internet and make sure for sure.
Method 2. Manual. Suitable only for small print volumes. At the same time, you need to imagine in your head the order in which the pages will be printed. Here's a little advice: if you've already decided to print this way, then it's better to first write down the numbering on a piece of paper or in Excel .

It is not worth commenting on the inserted picture for a long time. Anyone who decides to print this way will understand. However, it remains to add that the picture shows that a book is printed with a total number of pages - 32. And also, if you are not yet very experienced in this matter, you should almost always write in this way, because It often happens that there may be several blank pages left in the middle of the book (this occurs if the total number of pages is not a multiple of 4).
3 way. The most convenient. Install a program that will independently break your text into pages. There are quite a few such programs, however, I recommend you download ClickBook. How to use the program Click Book? First, install (in the archive with the program there is small instructions). Second, open our text document, click “Print”, then select “ClickBook Printer” in the list of printers, click “OK”.
class="eliadunit">

After this, the program itself will open and offer printing options; We are interested in the option " Books":

Then we look through ready-made option breakdowns. If the breakdown was successful, click " Seal":

To our slight surprise, it will not print, but will be prompted to save the document in PDF format. You should agree to this option, but with one important setting. To make the settings, and it concerns Cyrillic texts, you need to press " PDF Security...":

Then a settings window will appear in which you can choose something useful for yourself, but the main thing is to check the box " Multilingual support (Unicode characters)":

After this, a pdf file will be generated, which will be divided into a book. All that remains is to do double-sided printing correctly. Good luck!
Tell THANK YOU- this YOU thank the author!
Modern technologies can provide us with a lot of information, which, among other things, includes e-books, brochures, etc. One day, you may be faced with a situation where you need to print a document in book format. The reason for this may be personal interests (reluctance to buy hardcover material and the ability to print the book yourself) or work and related responsibilities.
Microsoft Word will help you in solving this problem, which provides a number of relevant functions and capabilities.
To begin with, prepare the text of your future book, edit and adjust the formatting, check it for various errors or advertising templates, etc. After that, check to see if the pictures or diagrams have “moved” in the document, if they are present, of course.
Setting Page Options
After the final check of the text, you can move on to setting up the basic parameters that will allow you to print your book correctly. This implies setting page parameters. Go to the "Page Layout" tab at the top of the toolbar and find the "Page Setup" area, then click on the small arrow in the lower right corner of this item.
In fact, this is where the main changeable parameters are located. To get started, under Pages, select the Brochure type from the drop-down menu called Multiple Pages. Notice that the page orientation has changed to landscape. Then enter the number of pages included in your brochure/book. The optimal value is 4. It turns out that you will have 4 pages on one A4 sheet.

Now to place the text correctly, you need to adjust the margins, taking into account the indents for binding. You will probably notice that in addition to the “Right” and “Left” fields, there are new fields called “Inside” and “Outside”. If you are going to make a glued binding, indicate 1 cm in all points. If you decide to use a binder, you need to increase the indentation in the “Binding” field, because using a hole punch, you will need the appropriate space. In addition, now you will need to control the indentation of the text from the place of binding, that is, from the holes made in the paper. To do this, pay attention to the “Outside” item.

If your document has headers and footers, in the same Page Setup menu, on the Paper Source tab, edit them and apply them to the entire document.
By the way, next to it is the “Paper Size” tab, in which you can specify the width and height of the sheet used or its format. The default format is A4.
Before you print the document, check everything again, because it will be a little disappointing if the text or picture slips somewhere, the formatting, paragraphs, lines, etc. get lost.
Printing a document
It's time to move on to what we actually did all the steps listed above for. In the File section, select Print. By default, you should have single-sided printing, however, you need to change this by clicking on this field and selecting “Double-sided printing” in the drop-down menu.

After the first part of the book is printed, take your time. You need to understand how the printer feeds paper from the print tray and how it comes out. If you place the paper incorrectly, your printer may start printing text on the already used side of the sheet, which will be extremely annoying. This point varies depending on the printer, so we recommend that you print one test page, rearrange it for subsequent printing as you see fit, and see what happens. If you are satisfied with the result, continue printing your book. When the first part of the book is printed, a window will pop up in Word, telling you exactly how to place the sheets in order to continue printing on back side leaf. Please note that when you click “OK”, printing will continue, therefore, carefully check the placement of the paper in the tray.
Binding and gluing of sheets
Once the document is completely printed, you will notice that it has a brochure-like appearance. In order to make a full-fledged book, you will simply need to bend the sheets exactly in half and apply them to each other, rather than nesting one inside the other.
Naturally, you should start with the first sheet, which will be your title side of the cover, and you should end with the last page, because it will contain the back of the cover. Having attached all the sheets to each other, at the junction, spread a thin layer of glue and fasten them. If you used a hole punch, we naturally skip this point.
You can cover the binding itself with an ordinary piece of paper, cardboard, or, in general, anything, it all depends on how beautifully you want to decorate the book.
This article is dedicated to layout well-known, popular, Microsoft program Word. Is it possible to layout in Word? Can! Layout can be done in any program that allows you to add text, photographs and design elements to the document. It is important to understand why this is being done, and even more important to know the basic rules of typing, which are taught not in layout courses, but in the first classes on computer literacy. If you don’t know them, use the services. The rest go ahead!
Today I will teach you how to layout in Word a simple book. Make a book I want it myself with your own hands, using a printer, a small office cutter, a stapler and glue. I think this is relevant, because in search engines Dozens of users make requests every day: “text layout using a book”, “layout in word”, “word 2007 layout”, “book layout download”, “do it yourself book”, “how to make a book in word”, etc. I'll try to answer their questions.
First, you need to properly prepare the text: remove double spaces, unnecessary tabs, paragraphs, line breaks, etc. We agreed that the basic rules of computer typing are familiar to us, so we don’t stop here. I won't use any macros or plugins, I know what I need and it's quite easy to do.
1. Create a document template
Press Crtl-N (File > New new document) . Setting up document parameters (File > Page Setup), this is very important stage. In the tab "Fields" set the values as in the example. In the tab "Paper Source" don't forget to check the box “distinguish between the headers and footers of even and odd pages”. The default paper size is correct - A4. Once you've printed a few pages, you'll understand why these parameters are the way they are and learn how to manage them, but for now just take my word for it.
2. Adding headers and footers
Let's add a footer, I select the top one.

Then, by double-clicking on the page number that appears, I can edit the header and copy the title of this article there. This must be done for an even-numbered page; then the headers and footers will appear automatically.

Using the menu Format > Borders and Shading Let's set a horizontal line to design the header and footer. The footers are ready.

3. Filling with content
We copy the book material into the template we prepared. Don't forget to use styles for headings, text, signatures and footers. You can use default styles, edit them, or create your own (Format > Styles and Appearance). Our layout was automatically filled with text. .

4. How to make a book with your own hands?
To do this, we will need an A4 printer, an office cutter, a stapler, A4 paper (it is advisable to use thicker paper for the cover) and glue. We print the book in a tricky way: we need to run each page through the printer twice, turning it 180°. Each printed page will look something like this:

On the back of the first page we print the second, but on the back of the third the fourth, etc. Once you get the hang of it, you will print all the pages in order, you just need to turn them over in the right way a pack of paper. Next, we fasten the block with paper clips on the sides, two or three times on each side. We glue the hand-folded covers so that they cover the staples, and cut them with a cutter exactly in the middle, or wherever you have enough cover sheet (ideally it should be longer than A4). We get two ready-to-use books!