DIY paper birds (diagrams, templates). How to make animals, birds and decorations from threads? How to make a bird
In this article you will get acquainted with instructions on how to make the simplest spring bird craft with your own hands. First you need to cut out the silhouette of the bird, and then its wings. For work we use colored cardboard and paper. All components are cut out of paper; they will need to be glued to the base - colored cardboard.
The back of the bird needs to be pierced with a hole punch in order to thread a string through this hole. This craft can be hung anywhere, it will look very beautiful and original everywhere.

Alternatively, use more than one layer of paper for the body of the bird. And use colored napkins as material to create the tail. Then the bird will have a luxurious and bright appearance.

The simplest version of a children's bird craft is considered to be a model with a fan tail as in the photo. Fold the napkin into an accordion, make slits in the body of the bird and insert accordions of colored napkins instead of the wings and tail.


Making double-sided birds

To make a double-sided bird you need:
- take cardboard, fold it in half, cut a semicircle on the fold so that when you turn it around, you get a circle;
- inside the fold you need to glue a thin strip of cardboard folded in half;
- We cut one side of a thin strip, turning them into feathers for the tail, cut the other side of the strip at the end diagonally, forming the beak of the future bird;
- You need to glue the eyes and wings to the body.

You can arrange a competition or competition for the best craft among children, it will be very interesting and educational. Children can improve their bird models with a variety of additional details.

Feather craft in the form of beautiful birds
Decorating your own home with your own hands is always pleasant and useful. Children will be happy to join this magical process of creating wonderful birds.

From a piece of plasticine, feathers, a bamboo skewer, crepe paper (green) and tape, you can create cute pets.


Making a bird of happiness
Pre-purchase:
- thick double-sided paper of different colors;
- patterned paper;
- threads, ribbons, ribbons;
- markers;
- glue and scissors.

The base for the craft will be thick paper, but you can also use cardboard. A description of the process with additional images can help you easily create masterpieces with your own hands.


Brief description process:
- Fold the paper that serves as the basis for the bird in half. Draw its outlines on the sheet, capturing the fold.
- Divide a standard sheet in half and bend it into an accordion shape.
- Draw a shape on one side of the accordion.
- Now you need to cut out a figured pattern along the contour.
- Having bent the cut out element, you need to duplicate the same pattern on the other side of the accordion, it also needs to be cut out.
- You have two openwork wings ready.
- Using decorative sheets, draw the head and tail of the bird on them. Use a marker to highlight the outlines. Use scissors to make the tail curly, and on the paper where the head is drawn, you need to cut off the corners.
- We glue all the parts to the base, use scissors to make cuts under the wings to thread the loop.
- We cut out the eyes from paper, stick them on the head and decorate them with rhinestones (the pupils of the bird).
- We draw the beak, eyes, tail and loop with a marker in any shape.
- We insert the wings into the slots, decorate the neck and wings with rhinestones.
- Using a beautiful rope we form a loop for the craft.

We spread the sides of the craft’s body, straighten the wings of the bird of happiness, and bend their edges down so that they look like a fan. Ready!

How to make chickens?
You need to paint eggshells where you can put funny chicks.

Inside you can create a warm bedding from straw and hay. This craft in the form of domestic birds looks very attractive and natural.


Crafts from pine cones
Draw the wings and tail of the future bird on paper. You need to cut out these elements from felt according to a template and glue them to the pine cone.


Form a beak from black paper and glue it to the pine cone. You can also draw eyes with a marker. Such a craft bird from natural materials You can hang it on the Christmas tree, you just need to make a loop.

Photos of bird crafts


Today we will tell you in detail how to make birds from threads or leftover yarn with your own hands quickly and beautifully. The idea is very simple and kids will definitely love it. You can bring birds made from threads as a craft to school or kindergarten or decorate your children's room. The main thing is to understand the principle of creating such a bird and, by changing the colors of the yarn, you can create various types birds, even a bullfinch, a tit or a sparrow.
How to make birds from threads
Materials:
- threads of three colors (black, red, gray)
- wire
- cardboard
- almond nut for nose
Wrap the cardboard with threads as indicated in the photo.
Gray - 30 turns, black - 50 and red - 60.

Now let's assemble the bird step by step:
- Tie the red and black threads together exactly in the middle
- Place the black threads on one side and tie them together with the red threads.
- Place strands of gray yarn under the red threads.
- Tuck the remaining red threads from the bottom to the tail.
- After that, also throw the cheese threads to the tail and tie everything with thread.
- Place a spout of half an almond on a wire in the center.

To secure the beak, you can use a small nail, pin or toothpick. Use glue to better secure the beak.

As a result, you can make a whole flock of birds from threads

If desired, you can make the bird's legs out of wire and sew on eyes.
There is another way to make birds from threads by forming a head.
How to make a tit from threads

First, wind yarn of different colors onto cardboard blanks
For many years now, bird crafts have been particularly popular among home-creativity enthusiasts. This is explained by their versatility, because feathered creatures will look equally harmonious both on the shelf of the nightstand and on any of the home’s green spaces. Unfortunately, there are people who do not know how to make a bird with their own hands, and our task is to help them figure it out.
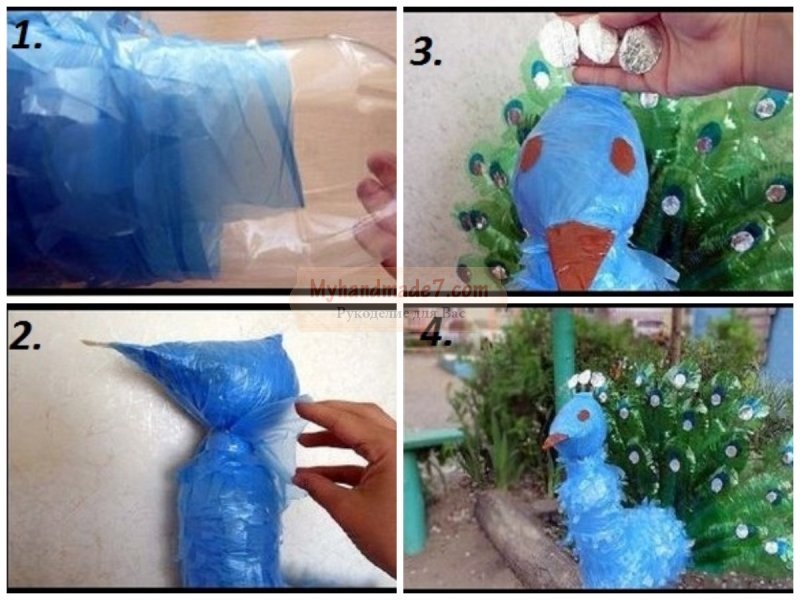
Peacock from bottles
To create a peacock from bottles, you will need the following elements:
- multi-colored plastic bottles;
- foam;
- a piece of log that will be used as a stand;
- metal twig;
- foil;
- thin multi-colored plastic;
- glue gun

The body and head of the peacock are cut out of foam plastic; small holes need to be made in the eye area. Using a metal rod, you need to attach the body and head of the peacock to a wooden block.

Bird feathers are created from colorful plastic bottles. In total, three types of feathers will be required: long ones will be attached to the tail, short ones will be attached to the neck, medium ones will be used for the body of the bird.


In order to make feathers, you will need to cut off the neck and bottom of the bottle, and then cut it lengthwise into three parts. One end of each strip is rounded with scissors, after which the edges of the large strip are cut into thin strips, the result should be something similar to a bird's feather.

The rounded part of the feathers that will be used for the tail should be decorated with two or three ovals of different colors made of foil and plastic. They are attached using a stapler.

A beak is cut out of a red plastic bottle and attached to the place intended for it. Then, using a special gun, you need to start gluing feathers onto the bird's body. You need to start from the tail and end with the neck; the feathers of the bird are attached slightly overlapping, this can be seen in the photo.

You need to cut out a crest of any shape from plastic of different colors and glue it to the bird’s head. Using acrylic paints, you need to draw the bird's eyes. If desired, the eyes can be supplemented with eyelashes, which will need to be pre-cut from a colorless plastic bottle.

You should start making the peacock's tail; for this, an abrasive mesh is used. You need to make holes in the base of the feathers, and then use thin wire to attach them to the mesh.

To make the tail, you need to start from the end, laying feathers in rows one on top of the other, actions are performed until the tail is completely ready. The tail is attached to the body. Such a bird will be an ideal decoration for any garden plot.


Chickens made from cotton pads
The presented birds will be a wonderful decoration for any preschool. To create chickens you will need the following elements:
- sponges;
- wooden skewers;
- colored paper;
- thin multi-colored ribbons;
- plastic eyes;
- scissors;
- glue.

Having prepared all these things, you can start making the birds:
In order to make one bird, you need to prepare five sponges. One of the disks is cut in half, and the rest are left whole.

Using glue, you need to fix four cotton pads on a wooden skewer, this is done in such a way that the skewer is inside. The first pair of sponges acts as the bird's head, and the second pair acts as the body.

Halves of cotton pads are attached to the already created body on both sides; they act as wings.

You need to attach the beak and eyes to the bird's head using glue. The beak is made of colored paper. The chicken's neck is decorated with a thin ribbon.


Above are only the simplest options for making birds. If you already have experience creating similar crafts, then you should pay attention to the birds of paradise from polymer clay, owls made of colored paper and a firebird made of salt dough.

When using food paint in the latter case, the resulting bird can even be eaten, which will further lift the mood of a creative person.

DIY bird photos


In the design of a garden or playground, when decorating a children's room or serving festive table can be used birds, do it yourself made from the most different materials- from wood to simple plastic bottles. In addition, you can knit any bird you like using the amigurumi technique; you may end up with a penguin or a feathered cartoon character. Don’t forget about another fascinating type of needlework - creating various figures from rainbow loom rubber bands, for example, this is how you can make original Angry birds keychains.
DIY bottle birds
A beautiful well-kept lawn or a small impromptu garden in your yard can be complemented by figurines birds from bottles, do it yourself Any family member can make them, but it’s better to make this creativity a collective one, because during the process you can have fun, communicate with the children and learn together with them new technology doing crafts.
DIY bird made from plastic bottles will look perfect against the backdrop of a green lawn or in a flower bed, so you can start making this craft, but be prepared that in the process you will need special tools and materials, because this craft will not be easy at all.
The most beautiful DIY bird made from scrap materials, which will become a real decoration for any garden plot and playground, is a beautiful peacock with a painted tail. Plastic bottles you need to stock up on large quantities, and you will also need five-liter eggplants. Materials also include blue garbage bags, foil, and tape. We will make crafts using scissors, a stapler, and to decorate the finished peacock we will also need acrylic paints and a brush, varnish is used to fix the result.
When all the materials are prepared, you can begin the creative process: let's start with processing plastic containers. All bottles that you have prepared must be thoroughly washed inside and out, remove labels, and dry. It is necessary to wash the containers in order to get rid of the adhesive trace on the outside, as well as any remaining liquid inside, otherwise your hands will become sticky when cutting bottles, which will complicate and slow down the work.

The most difficult thing is to make the peacock’s tail, so we’ll start the process with that: the middle part must be cut into three oblong tongues. The neck and bottom must first be cut off.
One end of the plastic tab needs to be rounded so that it looks like a feather, and then small cuts need to be made along the edges. On each rounded tip you need to attach a blue oval from a plastic bag and a circle of foil. You can secure them at the tip using a stapler. Since the tail should be fluffy and voluminous, you need to make a lot of such blanks.
DIY birds for the garden
For the next step, we will need a five-liter eggplant: we need to cut off the neck and bottom, and cut out a semicircle from the middle part, to which we will attach the prepared feathers using a stapler.
Now let’s make the body of the bird: cut off the neck from a five-liter bottle, cut off the bottom from a two-liter bottle, and fasten the prepared parts together with wide tape.
The next step is to make the peacock's head: cut the neck and twist them into an oblong funnel, where the long point will be the beak. The prepared part must be connected to the cut bottom using tape, and then the workpiece is fastened to the rest of the body.

DIY bird made from material will delight you for many years, because all the materials used can withstand bad weather, plastic and polyethylene will not deteriorate in rain or snow. In addition to the fluffy tail, it is also necessary to make plumage for the body. For this we will use blue plastic bags It is recommended to take garbage bags. They need to be cut into strips, the tip made pointed, and then attached to the body. The strips should be fastened in rows, overlapping, moving towards the neck from the tail.
Body and tail DIY birds for the garden you need to fasten them together with a rope; to do this, you first need to make a hole in the place of fastening. So that the finished peacock can be fixed on the lawn, a stick should be firmly attached to the bottom of the body. The eyes and beak can be painted with paints, securing the result with varnish. You can decorate the bird with a crown made from foil. To prevent the plastic figurine from being blown away by a strong wind, it should be weighted down by pouring sand inside.
Eat DIY birds for kindergarten , which are much easier to make, for example, penguins, to create them you will need paints, because we will draw a penguin on the basis. You can complement the penguin with a hat made from socks or thread. And if in your creative process If you have enlisted the help of men, you can make more complex designs with a metal mesh as a base and foam plastic to decorate the head. And don’t forget that crafts for decorating a playground in the shape of birds can be made from a car tire.

DIY birds
If you look at possible options creation DIY birds photo, then pay attention to the variety of materials and techniques used. The most common figure is a peacock, which is not surprising, given the beauty of this bird, which amazes the imagination with its painted tail. It is the bright tail that inspires needlewomen to use the most interesting techniques.
A beaded peacock tail can become a stylish pendant or earrings, but to make it work, you need to choose the right accessories. Using a wire base, you can also make a voluminous peacock with a fluffy tail, which is made using the French weaving technique.

Let's not forget about another popular technique for creating stylish jewelry - kanzashi, which is widespread among needlewomen today. It is used not only for hairpins and flowers, but also for other original crafts. To make a peacock using the kanzashi technique, you need to make a wire frame and wrap it with threads, and the basis for the tail will be a cardboard semicircle.

Even when going to a masquerade, do not forget about such a bright peacock tail, which can be made in a few hours. The skirt will be asymmetrical: the front will be very short, made from strips of brown tulle interspersed with green, but the back will be long, for which it is better to use bright tulle - green, light green, turquoise. The main decoration of the ponytail, of course, is the “eyes”, which are created separately and then sewn onto the tulle. To create “eyes” you will need felt or fleece in four colors: brown, light green, light blue and dark blue. You can sew it for a boy.

How to make a bird with your own hands
Solving the issue how to make a bird with your own hands, let's not forget about . For example, you can make a cute yellow chicken, and the craft is quite simple, so even a preschool child and his mother can do it.

For this craft, your skills on how to make pom-poms from yarn will be very useful. First, you need to make paired blanks from cardboard: a large one with a diameter of 45 mm and an internal diameter of 15 mm, as well as a smaller one with a diameter of 15 mm. You can take any thread, but, of course, yellow. Threads must be wound around the workpieces so that the inner hole is completely filled. To make winding the thread more convenient, you can use a long, thick needle. Then cut along the outer edge, thread a thread between two pieces of cardboard and tie a tight knot. Straighten the strings to make a fluffy ball. Using the same principle, you need to make a smaller fluffy ball.

The two balls must be connected using the threads left over from the knots. And you can start decorating: cut out a comb and beak from felt, carefully sew them to the head, as well as two black beads for eyes.

The chicken will become the main decoration; such birds can be used to serve the festive table. For this craft we will need a chicken egg, glue and colored cardboard, scissors, a marker, plasticine and gouache paints.
In a raw chicken egg, you need to make a neat hole at the bottom and top so that the shell does not crack. Then you need to blow the contents into a plate and rinse it with running water so that there are no traces of protein left inside. The empty egg should be left in a warm, dry place to dry, after which you can begin the craft.
The shell must be painted with yellow gouache, left until completely dry, and during this time you can cut out the beak, legs and wings for it from colored cardboard. The legs and beak will be attached to the base using pieces of plasticine. You can draw eyebrows and eyes on the top of the egg with a black marker.
The cut out paper wings must be rounded and glued to the body. You can complete the craft with a neat bow or a stylish top hat.

DIY wooden bird
DIY wooden bird- this is a craft that can only be made by a real master who knows how to work with special tools. It is called the “bird of happiness” and, according to popular belief, it brings happiness to the house and protects the hearth. For example, if a person came into the house, they immediately looked at the hanging amulet: if he turned his tail towards the guest, it means the person was bad, if he turned his head, then he was good. Since ancient times, such a talisman was considered the best gift for relatives.
For crafts, we usually use pine or spruce wood; we will need a block about 30 cm long, from which we need to chop off two bars. One will be used for the body, the second for the wings.
You need to draw the outline of the wings on the block, and perform further actions with a chisel: make locks and round the tips of the wings. If the wood is fresh, then the wings can be split immediately, but dry wood must first be steamed. Creating wooden amulets is a labor-intensive process, but everyone will be delighted with such crafts.
If you don’t have time for complex crafts, an excellent option for winter creativity would be original feeder DIY for birds, which will also decorate your garden, and in winter the child will be able to watch the birds that will flock to feast on the grains.