How to limit the consumption of Internet traffic on android. How to limit network traffic to individual processes
Most modern TP-Link routers are able to limit the connection speed. This function is also called shaping or shaper. In this article, you will see how to configure the speed limit in TP-Link routers.
Uniform rate limiting for all clients
In this section, we will consider a situation where all connected users need to set the same connection speed.
We press the button "Start Check".

After measuring the speed, we get the results. They should roughly match the speed you specified in the client limits.

The speed limit for our client is working.
In the same way, we add restrictions for other clients.
Client MAC address change protection
Rate limits will work for every wireless client that you have mapped an IP address to a MAC address. However, if the client changes the MAC address of its network adapter, it may fall into the general speed limits of the router, i.e. get access to the maximum speed of the Internet connection.
To prevent this from happening, you need to create a list of MAC addresses in the router that are allowed to connect to the router. All clients not included in the list will not be able to connect to the router.
Go to the menu Wireless - Wireless MAC Filtering and press the button AddNew...

First of all, you need to add your wireless devices from which you configure the router. Otherwise, after applying the filtering, you will not be able to connect to the router.
In field MAC address: enter the allowed MAC address.
In field Description: enter a description of the computer.
In field Status: must be chosen enable.
We press the button Save to save the settings.

In the next window, activate filtering by MAC addresses. Choose Filtering Rules - Allow and press the button enable.

Now only clients whose MAC addresses are included in the allowed list will be able to connect to the router.
To control traffic means to manage user access (accounting, statistics and monitoring). Traffic restriction includes blocking certain sites, the speed of its consumption at the entrance and exit, as well as the work schedule. Control traffic in local network can be done with various programs.
You will need
- - User Gate program;
- - Lan2net NAT Firewall.
Instruction
Hello dear friends! I have already written many articles on setting up Wi-Fi, about various errors, problems, etc. And now you leave a lot of comments on these articles, with different questions in which I try to help you. And very often from the comments you left, I find topics for new articles. Already repeatedly in the comments, I met the question of limiting the speed through wifi router.
Someone needs to limit the speed only for Wi-Fi, someone only for certain devices (computers, laptops, phones), or make a speed limit for all devices that work through a router. Today I decided to write an article in which I will tell you about how you can limit the speed of the Internet through a router. I will show on the example of the TP-Link TL-MR3220 router (just working through it now). But my instruction is suitable for all routers of the company TP Link.
TP-Link routers have a special item in the settings Bandwidth Control, it is designed specifically for setting Internet connection speed limits. Now we will look at how you can set a limit on all devices that work via Wi-Fi and via a network cable. We will also consider a method for limiting the speed only for certain devices over IP. And in order to limit the speed by IP, you need to bind the IP address to the MAC address. And you also need to make sure that the client does not change the MAC address and bypass the speed limit. We will consider everything, the article will be fun :).We limit the speed for all devices that work through a router
As I wrote above, TP-Link routers use IP addresses that are assigned to each connected device to limit Internet speed. In order to set up a restriction, it is desirable that the router automatically distributes IP. This business in the router is handled by the service DHCP. By default, it is enabled and works, if you did not disable it, then everything is fine, but if you don’t remember, then let’s check.
We go into the settings of the router. If you still don't know how to do it, then I'll tell you :). Type in the address bar of your browser the address 192.168.0.1 , or 192.168.1.1 and follow it. You will be prompted for a password and login to enter the router settings. If you have not changed them, then this admin and admin.
In the router settings, go to the tab DHCP and see if the status is marked enable. This means that the DHCP service is enabled.

Checked. Now go to the tab Bandwidth Control. We need to enable this service and specify some settings.
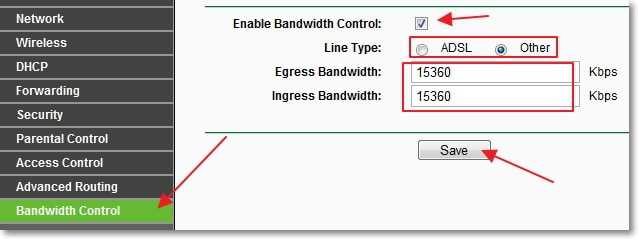
Against Enable Bandwidth Control Check the box to enable this service.
Near Line Type you need to select the type of connection. If you have ADSL, then mark this item. If you have a different type of Internet connection, then set the item Other.
In field Egress Bandwidth you need to specify the maximum outgoing speed (when files are being transferred to the Internet). I advise you to set the speed provided by your provider in this paragraph. For example I have 15 Mbps. Therefore, I need to write 15360 (1 Mb = 1024 Kb, 15 * 1024).
And in the field Ingress Bandwidth you need to specify the maximum (dedicated by provider) incoming speed (when you get information from the internet). I have the same 15 Mbps so I have specified 15360 Kbps.
Saved the changes, now go to the tab Bandwidth Control – Rules List. Click on the button “Add New…”.

Immediately check what would be opposite enable checkbox has been set.
In field IP Range you must specify a range of IP addresses. If you want to limit the speed for all devices connected to the router, then you need to specify the same range as on the DHCP tab. Port Range skip, near Protocol you can choose a restriction for a specific protocol, but it's better to leave it there ALL.
Now we set the maximum, outgoing and incoming speed for this rule.
In field Egress Bandwidth – Max Bandwidth(Kbps) specify the maximum outgoing speed (when you upload files to the Internet). For example, I want to limit the speed to 3 Mbps. Therefore, you need to write in this field 3072 (3 * 1024 = 3072 Kbps) .
In field Ingress Bandwidth – Max Bandwidth(Kbps) set the maximum input speed (when you download from the internet).
Click to save Save.

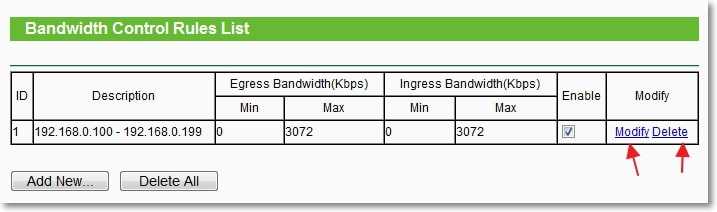
Everything, the rule is created. Now let me explain a little what we did. We are for all devices that will receive an IP address from the router in the range from 192.168.0.100 before 192.168.0.199 speed limit to 3072 Kbps(3 Mbps) . To edit or delete a rule, click on the links Modify, or Delete.
Internet speed limit for certain devices
Let's now look at how to set an Internet speed limit on certain devices. There was a comment today when it was necessary to set a limit on two laptops that took the Internet via Wi-Fi, and a computer that worked via cable had to receive full speed, without restrictions. True, the author did a little differently, he's just on the tab Wireless decreased the indicator next to the parameter Max Tx Rate. But I will write the way that I think is correct.
Since the limit is set by IP, then you first need to bind the IP address to MAC address of a specific device. For example, we will bind a specific IP to the MAC address of the laptop, for example 192.168.0.120 . And when you connect this laptop, it will always receive this IP (will be identified by MAC). And already on this IP we will set a limit.
To do this, go to the tab DHCP – address reservation. Click on the button “Add New…”.
Against MAC Address enter the MAC address of the device to which we want to bind the IP address. And in the field Reserved IP address enter the IP address that we want to bind to the device. Status we leave enable. We press the button Save.

How to find MAC address?

Reboot your router. Tab System Tools – reboot, button "Reboot".
After the reboot, go back to the tab DHCP – DHCP Client List and check if the IP is assigned to the required device.

Now go to the tab Bandwidth Control – Rules List and press the button “Add New…”.

Against enable- check mark. In the first field, opposite IP Range enter the IP address of the device for which we want to set the restriction. Port Range and Protocol leave it unchanged.
In field Egress Bandwidth: – Max Bandwidth(Kbps) specify the maximum outgoing (upload to internet) the speed you want to set for this device.
In field Ingress Bandwidth: – Max Bandwidth(Kbps) you need to specify the maximum input speed. The speed is set to Kbps. This means that in order to specify the maximum speed, for example 3 Mbps, you need to write in the field 3072 (3 * 1024 = 3072) . Click the button Save to save changes.

If, when saving this rule, an error occurs:
Error code: 27009
The rule you add conflicts with the existing rule, please input again.
This means that you have already created one rule that contradicts this. Just delete the previously created rule.
If everything is fine, then you will see the rule we created.
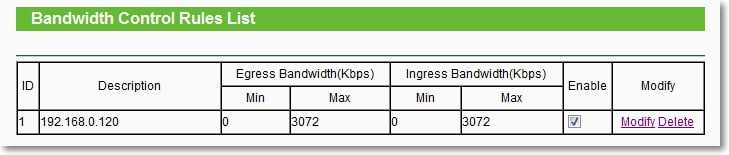
This rule means that for a device with an IP address 192.168.0.120 we have limited the speed up to 3 Mbps. The rule can be deleted or changed by clicking on the links Delete and Modify.
In this way, you can create many rules for different devices. It doesn't matter if it's a laptop, phone, tablet, etc. they all have MAC addresses.
What if the client changes the MAC address?
Yes, if the client changes the MAC address (It's very easy to do this on a computer), then it will not be assigned the IP address we specified. And if no IP is assigned, then the speed limit that we set will not work.
Well, nothing, now we will make it so that when the MAC address changes, the client’s Internet will not work at all. That's how cruel I am :).
True, if you often connect new devices, then this method is not very convenient. It's just that the Internet will only work on those devices, the MAC addresses of which we will register in the router settings.
Go to tab Wireless – Wireless MAC Filtering. We press the button “Add New…”. First you need to add the MAC address of the computer from which we are configuring the router. And then we will close access to ourselves.

Near MAC Address enter the MAC address of the host computer in the field Description- description. Status we leave Enabled. Click the button Save.

Now check the box next to Allow the stations specified by any enabled entries in the list to access (this means that only those devices whose MAC addresses are on the list will be able to connect to the router).
Click the button enable to enable MAC address filtering.

Now only one device that is on the list can connect to the router. To add new devices, just click the button “Add New…”.
MAC addresses of connected devices can be viewed on the tab DHCP – DHCP Client List
In order to disable filtering by MAC addresses, on the tab Wireless – Wireless MAC Filtering press the button Disabled and delete the added addresses.
By the way, such filtering is one of the better ways protect wireless wifi net.
Afterword
I don’t know if you will also need to install filtering by MAC addresses, but I wrote it just in case. And the method of limiting the speed itself is very good and I think it will come in handy for you. To be honest, I don’t know how things are with other manufacturers of routers. But on TP-Link routers, this is done as I wrote above.
If you have any questions or additions, please leave them in the comments. Good luck!
More on the site:
How to limit the speed of the Internet through a Wi-Fi router? On the example of a router from TP-Link updated: February 7, 2018 by: admin
Regulation of traffic speed, maintaining the history of network interactions, detailed control and analysis of running processes in the Windows operating system. Is it possible?
Many users (especially those who use a dialup connection) are familiar with the situation when there is an urgent need to open a web page or download a file, but the already slow channel is already impossibly "clamped" by the downloaded data. The picture emerges bleak - the opening of the desired page may be delayed indefinitely. How to be? Having the ability to adjust the speed of each connection in this case would not hurt ...
Well, let's try to make this wish come true with the help of the NetPeeker program. This utility, in addition to regulating the traffic of running processes in the system, also allows you to perform the functions of a firewall and network analyzer. But let's not rush and tell about everything in order.
NetPeeker has a rather user-friendly interface, made in a kind of futuristic style. The utility minimizes to tray animation even with all such settings disabled in the system. Probably, this is an integral element of the unusual design of the program.
NetPeeker 2.73. For each process, you can see the amount of transmitted / received information, data exchange rate, port number, and much more.
For each of the running processes, any of the following actions are possible:
- kill the process (kill process);
- break the network connection (disconnect);
- block the connection (block it);
- show detailed information(snow details);
- limit the connection speed (limit speed).
A few words about the built-in firewall. In addition to the main tasks performed by programs of this kind, the NetPeeker "a firewall has configured filters in its arsenal that will help block the activity of some well-known spyware programs. In my opinion, a very useful innovation.
NetPeeker: built-in firewall.
A trifle, but nice: a whois service built into the utility that allows you to get detailed information about the selected host.
In addition, NetPeeker allows you to:
- block browser popup windows (Internet Explorer, Netscape, Opera);
- save all (or selectively) network traffic to disk for further analysis;
- keep a history of network interactions;
- protect the program download with a password;
- display traffic information in graphical form.
So let's recap. NetPeeker is a great tool that will come in handy not only in everyday work, but also serve good service user to detect suspiciously active network programs, thereby creating a reliable barrier against viruses and Trojans.
By connecting and configuring a network combine or router, the user may come to the conclusion that the previously completed basic settings are not enough for him. Let's say the connection with the provider is working, and all subscribers of the "locale" regularly get access to the Internet. In this case, the question may arise how to limit the speed on the router for a particular user, which is usually done in order to divide the traffic equally. In fact, it is always possible to restrict traffic using the MAC address of the subscriber device. At the same time, it will remain possible to specify the IP address or range of addresses of those for which the pre-set speed limit will apply. Consider both methods, their advantages and disadvantages.
Internet distribution
Device interface
An option that meets the task in question is usually provided in the interface of any router. The examples below use the GUI of TP-Link devices. Actually, this company's web-interface turned out to be not the simplest, but it is very well structured. We need to set a restriction on the reception and transmission of data, but not for all subscribers at once, but for a specific subscriber. Then we go to the group of tabs called "Bandwidth Control":

Bandwidth Control
On the “Control Settings” tab, which opens first, the exchange rate is adjusted for all at once, that is throughput in the Internet channel. Set the download speed value (Ingress) and the data upload speed value (Egress), then click "Save".
Local speed limit
Here we will limit the data exchange rate for a specific subscriber. The router can identify the device connected to it by the MAC address, and then the speed will be reduced for the selected device.
At the same time, you can set a rule according to which the speed limit will apply to a specific IP address or a set of them. The second method is more often used as follows: the entire range with which the DHCP server works is indicated as IP addresses. Well, those users to whom the restriction does not apply should use static IPs that do not belong to the range of the DHCP server. This is an example, not a recommendation. Let's move on to the settings.
Identification by hardware address
So, you have decided that it will be easier to determine the subscriber by MAC address, and not by IP, and you need to set a speed limit for it. A couple of tips on how to find out the MAC address.

DHCP Client List Tab
- If the subscriber is connected to a network combine, open the "DHCP Client List" tab and find the one you need
- If it is a computer, look at the MAC value in the “Status” of the connection (follow the transition “Support” -> “Details”)
- On the case of smartphones and some other devices there is a sticker where the MAC address is printed explicitly.
Write the required value on the sheet, as it will have to be entered from the keyboard. If there are no difficulties, proceed to the next step.
From the "DHCP" tab group, click on the "Address Reservation" link:

address reservation
Click the "Add New" button. In the field that appears at the top, you will enter the required MAC address. Well, the bottom field is for setting the IP address (use any value from the "locale" range). The most win-win option is to set the IP that has already been assigned to the device (see the “DHCP Client List” tab). After verifying that the "Status" list is set to "Enabled", click "Save". The router will go into reboot.
Remained final stage. Open the "Bandwidth Control" -> "Rules List" tab. Here you need to click "Add New":

In the "IP Range" field, you enter the IP address that was assigned to the device in the previous step:

Entering an IP address
Of course, you need to fill in the "Engress Bandwidth" and "Ingress Bandwidth" fields (the same speed limit values), and then you click "Save". You can check that the download and upload speed is now limited, moreover, only for one subscriber.
Using a range of IP addresses
Above, we looked at how to limit the speed for a specific local device. But you can limit it to a whole set of devices. In this case, you can even specify that the restriction applies to all subscribers receiving an address via DHCP. The last of the methods is discussed below.
Let's find out which address range is used for automatic issuance. Open the "DHCP Settings" tab and see what the value of "Start IP" and "End IP" are:


As you can see, there is nothing complicated here, we just used the same numbers that are specified in the DHCP settings, indicated the same address range.
Remember that on each of the tabs you click "Save", and only then the changes take effect.
If the restriction, as indicated above, applies to the entire range of the DHCP server, then you can proceed as follows. You configure any new local device to automatically receive a mask and address if you need to limit the speed for it. And if this is not necessary, then assign a mask with the last zero to the network card, as well as an address like 192.168.1.X, where "X" belongs to the interval 2-99 or 200-255. The numbers shown are correct for our example.
Wireless network, speed limit
Everything that is said above applies to both the wired LAN segment and the Wi-Fi segment. That is, the router does not distinguish between wired and wireless subscribers when it comes to restricting traffic. But most often in Additional settings wireless network" there will be a parameter called "TX Rate". By explicitly setting its value, you will limit the reception rate (meaning data transmission in the direction from the router).
In addition to everything that has already been considered, you can limit in WiFi networks rate of broadcast of Multicast packets. Such packets (multicast) are used when the subscriber watches IPTV. Find the corresponding parameter in "Advanced settings ...", replace its value. We note right away that each of the parameters indicated in this chapter will not necessarily be present in the interface. But in some network combines all this is provided, and there are simply no other ways to regulate traffic. Happy routing!
Calculate MAC using "Statistics"