Types of maritime knots and their application. Nautical knot: how to tie nautical knots, how to tie knitting patterns. Main maritime nodes
The art of knitting maritime knots in fact, it is useful not only for those who regularly sail on ships. It will be useful for any tourist to have a couple of such techniques in his arsenal, and at least for a more durable installation of a camping tent and attaching a rain awning to it. And how interesting this process is in itself! For those who want to learn how to tie sea knots, patterns and methods are given in this article.
in our lives
Tying knots is one of the first things that humanity learned in the process of its evolution. They were used to fasten tools, make the first snares and traps for hunting, as well as locks.
The very first ropes were strips made from tree bark, vines, and animal skins. They were used to fasten the first clothes and the first bed. Gradually, people mastered weaving and were able to make ropes on their own, making them stronger and longer. Yes, and it was thanks to them that its main symbol, the flag, first rose above the state.
Rope is a person’s faithful companion on travel, both sea and air. It is difficult to imagine using a rope without tying knots. These words have long been associated with each other. It was the sailors who were the first to start tying sea knots, diagrams of which can be found in textbooks on rigging.
Nautical knots: history and knitting pattern
They are an integral part of human culture; it is difficult to imagine our world without them. New nodes continue to be invented today, and each of them receives authorship as an invention and a patent.
Their genius is in their simplicity. They can be locking, quick-release, tightening or non-tightening. This art has been passed down from generation to generation. Thanks to ropes, the first devices for swimming on water appeared - rafts. The knot also has a mystical meaning - it is not just a way of fastening, but a talisman that protects its owner from harm.
The sailors of Northern Europe had a belief about three magical knots - if they were correctly tied on the ship's rigging, they protected them from wreck. There was even a ritual for untying, which was supposed to cause the wind.
In the heyday of navigation, there were about 500 knots. Their names originate from the gear to which they were used - for example, pile or boat. These days, knots are also identified with the country where it was invented - the Spanish bower knot or the Flemish loop.
The working ends of the cable, with which the tying is carried out, are called running ends. They circle around the indigenous ones, who remain motionless. These ends are opposite to each other.
To this day, you can find peoples who have not been touched by the benefits of civilization, and they still make weapons and snares for hunting and fishing using knot tying.
Rope knots: their types and methods of knitting
You will need a rope that is not very thick and quite soft. Just like knitting, you need practice here. You won't remember much the first time, so each new knot should be practiced several times. And of course, they need to be used in everyday life, otherwise they will quickly be erased from memory.
Yes, each of them has its own name. But you shouldn’t focus too much on them; it’s better to remember the sequence of combinations. There are not many established names, and more often they depend on the source.
The simplest knot is knitted like this: a loop is made at one end of the rope into which the running end is threaded. All. Its disadvantage is that it reduces the strength of the rope. An experienced fisherman or sailor always cuts off accidentally tied simple knots or replaces them.
You can start practicing knitting skills with a figure eight. It does not reduce strength and is easy to untie. The practical significance is to limit the movement of the rope. The figure eight is an element of other more complex nodes.

If you need to join two ropes, tie a straight (or reef) knot. To increase reliability and strength, figure eights should be made on the running ends. When knitting, two ropes are crossed twice in succession. One of the free ends is folded in half to form a bow. If the number of running revolutions is increased, the result will be that it is tied on tensioned cables.
Extra yarn overs and turns can not only ruin everything, but also turn one knot into a completely different one. Therefore, when knitting, carefully monitor the directions of the turn.
Classification
Straight or reef is included in the 24 main sea knots. Why are they called that? It is believed that they are most commonly used in navigation and that is where it all began. In this classification, straight and reef are two knots, although the principle of their tying is absolutely the same. Figure eight and surgical (or double straight) also apply here.
In cases where it is necessary to tie the ends of two ropes, knit a flat knot or a bayonet. His distinctive feature- this is symmetry. Knitting technology: one of the ends is folded in a loop, the other end is wrapped around in the same way, the ends pulled through are pulled together. They must be intertwined one through the other.
One of the most used in rigging is the pile knot. The running end is inserted into the loop using the same loop. Tighten it around an object, otherwise it will not tighten.
Separately, such nodes of the “bayonet” type are distinguished. It is straight, with two spurs, with drift and fishing. The first is used for high-quality mooring. The technology of its knitting has already been described above. Here everything is the same, only the rope is first wrapped around the mooring pole. To reduce wear on the cable, they came up with a bayonet with two hoses. In this case, the rope is wrapped twice around the pole. The bayonet has an additional loop. This is done for even greater reliability. The fisherman's knot differs from the knot with two hoses in that an additional loop is knitted, and not just thrown over. This is what is used for anchoring.
To firmly tie a cable to something, another rope or rope, knit the running end, which is carried around the object, carried over the main one. The second hose is knitted in the opposite direction.

There are also nodes called retractable bayonet, buoy rope knot, double gazebo and simple gazebo, noose, masthead, double eight, locking, towing and boat. There is also one called It does not tighten at all and is used to secure slings. Outwardly, it looks like an intricate weave.
Most famous
The main quality of marine knots is reliability, as well as simplicity and the ability to do it with only one hand. Simplicity seems to be an inappropriate concept here, but in fact, intricate sea knots are knitted really quickly and easily thanks to clearly proven technology.
15 popular nautical knots include the already familiar figure eight, straight and flat, bayonet with two hooks, fishing bayonet, stopper and reef knots, as well as the noose, tightening noose, Portuguese bowline, improved dagger knot, Flemish loop and Flemish knot.
Why are they included in this classification? They are widely used not only in maritime affairs, now they are indispensable, for example, for climbers. Imagine that you urgently need to throw a lasso with a secure knot onto a rock or quickly wrap a rope around your waist with one hand in order to be pulled out of a place that is difficult for other people to reach.
Enough theory
Now you know what exactly sea knots are. Drawings and knitting patterns for some of them, namely those that can be applicable in everyday life, are listed below.
For training, use a regular clothesline and a chair. First, just do the simplest ones. To do this, you need to throw the rope over the crossbar and bring one end through the resulting loop.
Here's how to knit the Flemish knot, one of the simplest and most popular. It will be useful to you for securely fastening two ropes together.

At the end of one rope, make a loose figure eight, and now take the running end and carry it, as if overlapping, over the main one. Now you need to pull it through the leftmost ring. If you are interested in how other sea knots are knitted, you can find diagrams for two more in this article.
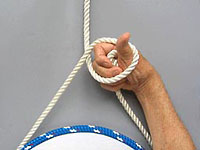
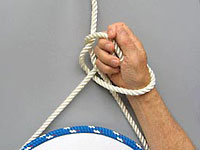
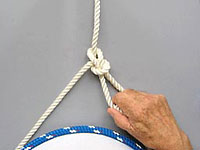
We knit a double arbor knot
This skill can be very useful to you in life, because it is used to create reliable support for your legs, when building hanging gazebos or scaffolds, and it is also useful for creating an emergency lifting mechanism. The picture shows, The diagram is described below.

Make an open loop in the middle of the rope. Now you need to fold it closed and thread the end of the first one through it. Loop the elongated loop around the entire knot to the very ends. Tighten.
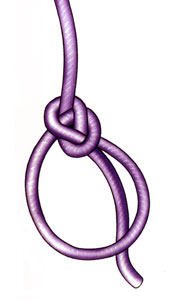
Let's try tying a Portuguese bowline
If suddenly a difficult situation occurs in your life when you have to raise a wounded person, this knot can come in very handy. Its purpose is to create two loops in which you can just put your feet. The root end is then knitted with a half bayonet under the armpits so that the fastening is as reliable as possible for a person who is in an unconscious state.

Make two circular turns on both sides.
Pass the running ends around them. Make a simple knot and pull it to the side. Remember that it does not tighten too much. Pull the center loop through the body of the knot.

So you have learned how to tie some sea knots. It is impossible to reflect all the diagrams and drawings in one article, so those who are very interested are recommended to study specialized reviews or textbooks.
To tie a sea knot correctly, first of all, you need to remember that the fixed end of the rope is called the main end, and the movable end is called the running end. There are several simple examples knittings that are useful both at home and during outdoor activities.
It is also called a gazebo and is classified as a fundamental node. It contains elements of several schemes, which gives it universal properties: the fastening allows mooring, securing sailors, and fixing the rope to the hook. The bowline is very reliable, it can be used with almost all cables, regardless of material and thickness. The gazebo is quickly tied and easily untied (but not spontaneously), it does not slip, when used in sea conditions exhibits high reliability.
Sea knot tying pattern for beginners:
- Form a loop from top to bottom.
- Pass the running end through it from bottom to top.
- Pass the chassis behind the main one and pass it through the loop again.
- When the running end is enclosed in the small loop formed, the rope must be tightened tightly.
To untie the bowline, just move the loop slightly in the direction from the running end to the root end.
Knitting a figure eight sea knot
This is a typical modification, which got its name due to its characteristic shape. The figure eight is usually used to form a stopper or stable fastening. The main advantage is that it is easy to deal with, even if the rope gets wet.

How to knit a sea knot:
- Circle the running end around the main one, pull the first one from above so that you get a loop.
- Pierce the resulting loop with the running end so that you can then pull it behind you.
- Tighten.
A beautiful knot with the rounded outlines of a figure eight is formed.
Knitting pattern for a straight sea knot
One of the oldest modifications, in Ancient Greece the knot was called the Hercules knot. With its help, you can firmly connect two ropes having approximately the same diameter. But the scheme cannot be called reliable: under heavy loads, the joint will be overly stretched, and it will often slide along the cable. It is not recommended for use in critical situations or when activities involving immersion in water are planned.

Classical technique:
- Take 2 running ends of the cables, one should cover the second.
- The other end forms an open loop.
- It is necessary to stretch the rope into this loop so that the first end is also braided.
- Tighten both ropes.
There is a subtype of the direct knot - the reef knot, which is distinguished by its ability to quickly untie.
Half bayonet and bayonet
The half-bayonet is not tightened; to perform it, the running end is wrapped around the object on which it is planned to fasten the cable, the main one is circled and passed through the formed loop. Next, both ends are fastened together. The unit can withstand heavy weight and is reliable.

Using a bayonet, the mooring ends are fixed and towing is performed. It is based on 3 half-bayonets - this quantity is enough for any purpose. It cannot be assumed that 4 or 5 half-bayonets are stronger; the effect when used will be the same.
How to tie a sea knot with a fisherman's bayonet

This variation has ancient roots; it has survived to this day due to the fact that it allows the rope to be fixed as firmly as possible on the anchor, and is suitable for all types of manipulations under conditions of strong traction. Initially, you need to secure the cable to the object using additional hose, then you can begin to form half-bayonets. The first of them must capture the barrier encircling the base.

If the ends of the rope are not visible, outwardly this knot cannot be distinguished from a straight one. It got its name due to the fact that this similarity was actively used on ships in order to identify the theft of sailors’ personal property and provisions. The connection is used mainly for domestic purposes, since when tensioned, the knot can spontaneously come undone.
Procedure:
- The running end of the first rope is folded into a loop.
- The second cable is threaded into this loop in such a way as to capture the root and running ends, and is pulled out in the opposite direction.
- Tighten both double ends.
Orientation cords are often attached in this way.
How to tie a woman's and mother-in-law's knot: a simple diagram
The variations are extremely similar: these are two erroneous ways of forming a thief's knot. The names “woman’s” and “mother-in-law” are based on everyday specificity of use - they are widely used to connect ropes, but do not take into account the unreliability and even some danger of sliding fastenings.

Knitting a sea knot is not difficult: two running ends are passed through each other in different directions and duplicate this action in mirror image.
Professional sailors and active lifestyle enthusiasts demonstrate woman's knot for educational purposes only, since its use in field conditions is fraught with injury and property damage.
The mother-in-law's knot differs from the woman's knot in that here the ends of the cable come from the finished combination in a diagonal direction. The modification was first used in European countries in shipping, but was later replaced by more practical and strong knitting options that do not have the ability to unravel spontaneously. Now in practice it can only be found in subsidiary plot as an auxiliary link for packaging raw materials and food products.
To perform the mother-in-law knot you should:
- Form a partial loop from the running end of one rope.
- Pass the second end into the loop from top to bottom, go around the first rope and bring it out.
Even if you tighten it tightly, there is a high probability that with further tension the ligament will open.
Types and methods of performing a noose knot
The noose knot can be performed in straight, flat, and fisherman variations. In the first case, a strong connection is formed, increasing strength when wet.

Knitting pattern:
- Form an open loop on the rope: give it the shape of the letter “s” and begin to form turns that are placed as closely as possible in relation to each other.
- Pass the running end into the lower eyelet remaining after winding the rope.
- Tighten.
The carbine noose has a narrow scope of use - it is popular among professional climbers. Here the running end is secured to the carabiner with an 8-shaped connection; the remaining part of the rope, if necessary, can be passed through the carabiner to cover a support, say, a tree.
The noose on the support is knitted as follows: the rope covers the support, enters the loop and wraps around it 3 times, then passes into a small loop. Even if the rope is wet, a stable connection is formed that can be used without support.
All sea knots, despite the characteristic name of the category, are widely used in everyday life. Thieves', mother-in-law's and woman's - a quick way to tighten the neck of a bag; a noose, with a skillful approach, helps in working with loads and sports. All variations of bayonets allow you to quickly fix the rope on a stationary support. It must be remembered that the strength of the connection depends not only on the skill of tying, but also on the strength of the rope.
The history of the use of knots goes back many millennia. According to scientists, even cave people used simple knots in their everyday life. The ancestors of complex types of knots are sailors. With the advent of sailing ships, the need arose for convenient and reliable knots to secure the mast, sails and other gear. Not only the speed of the ship, but also the life of the entire crew depended on the quality of the unit. Therefore, sea knots are very different from ordinary ones. They are not only reliable, they are easy to tie and just as easy to untie, which is not possible with regular knots.
The classification of knots came to us from England. Usually the British divide sea knots into 3 types:
- Knot – needed to increase the diameter of a rope or weave something.
- Hitch - attach a rope to various objects (masts, yards, anchors).
- Bend – connect ropes of different diameters into one.
There are about five hundred descriptions of sea knots, but only a few dozen are currently in use, as motor ships are replacing sailing ships. The ability to tie sea knots will be useful not only for yachtsmen, but also for tourists and fishermen. By gradually mastering the diagrams with pictures below, you will quickly learn how to do this.
Straight knot
Although this unit is one of the most ancient, it is not particularly reliable. Its disadvantages are frequent displacements on the rope, it is not easy to untie after heavy loads and getting wet, and with such a knot the strength of the rope decreases. Used for easy gripping on light pulls and splicing two ends of the cable. More complex knots are knitted on its basis. Despite the fact that the knot is very simple, it has its own nuances. The free ends should be on one side of the rope. If they are located on different sides, then such a knot is considered incorrect and is called not a simple one, but a thief’s one.
How to tie a straight knot:
- A regular knot is tied.
- We make a loop from one fixed end of the end rope.
- We wrap the free end around the outside of the loop and bring it inside.
- We tighten it. The result is the correct node. For greater security, another regular knot is tied on top.
Gazebo knot (Bowline)
In yachting, this unit is used more often than others. Initially, it was used to tie a gazebo - a device with which sailors climbed onto the mast of a ship. That's why it got its name. This knot has no disadvantages; it is easy to tie and untie. You can use it to tie ropes of different diameters and materials and not be afraid that it will come undone. It is most often used when mooring a ship or in cases where you need to make a loop or tie something.
How to knit a gazebo knot:
- We make a regular loop.
- We insert the free end inside the loop and braid it diagonally around the fixed end.
- We pass it back inside the loop.
- We tighten the ends of the rope. To make the knot strong, it is very important to tighten the ends tightly.
Figure eight knot
By appearance looks like the number 8, so the name speaks for itself. The knot is simple, but very important. More complex knots are knitted on its basis. The advantage of the figure eight knot is that it will never move or unravel under stress. Also, when the cable gets wet, it can be easily tied and untied. Used as a stopper at the end of the cable and as a securing knot. You can use it to make handles for a wooden bucket or secure strings on musical instruments.
How to knit a figure eight:
- We make a regular loop.
- We rotate our loop 360 degrees and thread the free end inside the loop.
- We tighten it.
How to knit a figure eight stitch:
- Fold the free end in half to make a loop.
- Make a second loop near the double end.
- Rotate the second loop 360 degrees.
- We pass the first loop inside the second.
- We tighten it.
Noose knot
This knot is a self-tightening loop. Its advantages are simplicity and speed of knitting, reliability and easy untying. Suitable for tying to objects with a flat surface.
How to knit a noose:
- Make a loop at the end of the rope.
- Make a second loop to make a bow.
- We wrap the free end of the rope 3-4 times around.
- We insert the end from the back into the second loop.
- We tighten it.
Bloody Knot
In ancient times, such knots were tied on a cat - a whip with nine or more ends. The cat was used as an instrument of torture and to maintain discipline on the ship - the blow was very painful, the lacerations did not heal for a long time. This is why the knot got its bloody name.
How to tie a bloody knot:
- The free end of the rope is wrapped twice around the stationary one.
- We tighten it.
Flat knot
Used when you need to tie the ends of a rope of different diameters or from different materials. Withstands heavy loads and wetness well. But this is not the simplest knot; it is easy to tie it incorrectly. The most important nuance when knitting a flat knot is that the ends of the ropes must be parallel to each other.
How to knit a flat knot:
- Make a loop from the thick end of the rope.
- The thin end is inserted inside the thick one.
- Make two turns over the thick end.
- We tighten it.
Clove hitch
Initially, this knot was used to fasten ropes - thin ropes from which ladders for cables were made. It is one of the most reliable tightening fasteners. Its peculiarity is that greater reliability is possible only under load. Also, its reliability is affected by the surface on which it is tied. A big plus of a knotted knot is the ability to tie it with one hand. Used to fasten ropes to objects with a smooth and even surface - logs, masts. On objects with edges, the bleaching knot will not be as effective.
How to knit a bleached knot:
- The free end of the rope is wrapped around the object.
- An overlap is made.
- We thread the end into the resulting loop.
- We tighten it.
Second method (knitting with half bayonets):
- Let's make a loop. The long end of the rope is on top.
- We throw a loop over the object.
- We make a loop at the lower end of the rope and throw it on top of the object.
- We tighten it.
Anchor knot or fishing bayonet
It has been used for thousands of years to attach a rope to an anchor. This knot is also used to tie the ends of the cable to any mounting hole. It is a reliable and easy to untie knot.
How to tie an anchor knot:
- We pass the end of the rope two times through the loop of the anchor or other fastening hole.
- We throw the free end of the rope over the fixed end and pass it through the resulting loop.
- We tighten both loops.
- We make a regular knot on top for reliability.
Stopper knot
Used in cases where it is necessary to increase the diameter of the cable.
How to tie a stopper knot:
- We fold the stop rope in half.
- We attach it to the main one.
- We wrap the free end of the locking rope around the main and second ends of the locking rope 5-7 times.
- The fixed end that we wrapped is returned to the loop of the stop rope.
- Tighten both ends.
Clew knot
Such a knot used to be used to tie sheets - gear for controlling the sail. Currently, it is used for tying ropes of different diameters. Not suitable for knitting synthetic ropes as they are slippery.
How to tie a clew knot:
- We make a loop from a thick rope.
- We bring a thin rope inward, go around the loop and wind it under itself.
- We tighten it.
Tying knots on a rope for practical use for various professional purposes and at home is one of the most ancient inventions of mankind. Binding, tightening, locking, quick-release, non-tightening and many others maritime knots, invented by man thousands of years ago and serving us faithfully today, are truly brilliant in their reliability and simplicity.
The straight knot, well known in Ancient Egypt, was widespread in the everyday life of the ancient Greeks and Romans. His image is often found on fragments of vases and jugs in the form of their handles. It adorned the staff of the ancient Roman god Mercury, the patron saint of trade, and was called Nodus Hercules - the Hercules knot, since this ancient hero wore the skin of a killed lion, whose front paws he tied on his chest with this knot. The ancient Romans tied the belts of their tunics with Herculean knots.
The inventors of the most ingenious and reliable knots were sailors. After all, it was they, and not the permanent inhabitants of the land, who had to deal with ropes much more often.
A sailing ship that appeared more than six thousand years ago was unthinkable without the ropes that fastened the masts, supported the yards and sails... And if you remember the structure of a large sailing ship at the beginning of our century, for example, the four-masted barque “Kruzenshtern”, then this is tens of thousands of meters of all kinds of gear, hundreds of blocks, hoists, etc.
The rigging of a vessel with any sailing rig was always based on sea knots, and the mechanics of sail control were based on cables and blocks. Each crew member of a sailing ship was required to have impeccable knowledge of rigging: the ability to splice ends, make braids, ogons, benzels, buttons, musings, weave mats, sew and repair sails. Every sailor had to be able to quickly and correctly tie dozens of all kinds of sea knots, and often do this in the dark during a storm at many meters in height. The art of tying sea knots was brought to perfection by sailors. After all, the safety of the ship under sail depended on it.
By the heyday of the sailing fleet, there were almost 500 sea knots in the maritime industry, not counting buttons, musings, various braids, etc.
How did the names of sea knots appear in our language?
Historically, many of them came to us from English and French back in the middle of the 17th century. In the days of the sailing fleet, sailors used about a hundred different sea knots, which had specific names. Names of maritime knots used in various countries, mostly English, and many have two or three, and some five or seven, names at the same time, which introduces some confusion.
Many sea knots got their name from the gear on which they were used, for example, clew, halyard, bleach, gynets, or from the name of the objects to which they were tied - pile, hook, boat, barrel, masthead, etc. Some sea knots. , contain a national characteristic in their name, for example: Spanish (gabor), French (top), Flemish loop, Turkish knot, etc. However, there are few knots bearing the names of countries in maritime affairs, since all maritime knots can be considered an international and very ancient invention. After all, even the best of all sea knots, the bow tie, known 5000 years ago in Ancient Egypt, was invented by the Phoenicians.
With the advent of steamships, which in less than a century displaced sailing ships from the sea roads, the need for sailors to know many ties disappeared. The art of tying knots disappeared along with sailboats. And if in the middle of the last century the skill of tying sea knots, brought to perfection, was regarded only as a sailor’s craft, then today it is a rarity, a thing of the past and almost forgotten art
To make it easier to navigate the complex interweaving of knots with their ends, open and closed loops, run-ins, hoses and bayonets, you should first of all understand the interpretation of the basic concepts and terms used in the navy today.
Elements of maritime knots
a - root end; b - running end: c - loop (open); g - peg (closed loop); c - half knot; e - run-out; f - schlag.
ROTAL END - the end of the cable (gear), fixed motionless; or remaining motionless when tying a knot, opposite the running end.
RUNNING END - the loose, free end of the cable that moves (walks) when tying a knot; with its help they select tackle.
LOOP (open) - the running (or main) end of the cable, bent twice so that it does not intersect with itself.
PEG (closed loop) - a loop made by the running or root end of the cable like this. that the cable crosses itself; a type of knot for shortening a cable.
HALF-Knot - a single overlap of two different ends (main and running) of the same cable, or two ends of different cables.
OBNOS - wrapping a cable around an object (spar, firewood, bollard, capstan stock, etc.). made in such a way that both ends do not intersect.
SLAG - a complete (360°) revolution of the cable around any object (spar, other cable, eye, shackle, hook, winch drum, capstan stock, etc.), done like this. that after this the running end is directed in the opposite direction. A rope is also called a loop of cable, tucked into a coil or wound around a view.
HALF JOINT - carrying around an object with a cable, followed by crossing the cable at its root end with a straight knot, without passing it into the resulting closed loop.
Sea knots... and why do divers actually need them?
There seems to be a fairly wide selection of carabiners that allow you to attach anything to anything.  But then the need arises to urgently attach something underwater, a suitable carabiner is not at hand - and the fun begins!
It suddenly turns out that despite the fact that some divers theoretically know how to tie a bowline or figure of eight, practically no one uses them underwater. At best, a straight knot is tied, and at worst, the structures created by divers are beyond description! 
But there is nothing simpler, cheaper and more reliable than a correctly tied sea knot.
This article provides basic patterns for tying sea knots that may be useful to a diver. Of course, this is also just a theory - tying sea knots requires regular practice - then, if necessary, you will be able to use them automatically.
Schemes for tying sea knots - Bowline
Its other name is “gazebo knot” - from a ship’s device for painting work - a loop with a board on which a person sits. Bowline is considered one of the most ancient and perfect nodes. In England it is called the “king of knots”.
Knitting pattern bowline:

 |
Forming a crossed loop |
 |
Turn the loop with your wrist |
 |
We draw the running end around the loaded rope |
 |
We thread the running end into the crossed loop |
 |
Hold the undercarriage and sides of the loop while pulling up on the main end to tighten the knot. Depending on what you need the assembly for, you may need to adjust parts of it before tightening it |
In addition, you can tie bowline with one hand:
 |
 |
 |
 |
 |
 |
 |
 |
 |
 |
 |
 |
Knitting patterns for sea knots - Figure Eight
The figure eight is a sea knot, named because of its shape. Its main advantage is the ease of tying and untying, even on a wet rope.
How to tie a figure eight knot:

- Wrap the running end around the main one, pull it over it, forming a loop
- Thread the running end into the loop
- Tighten firmly
- The node is ready
Knitting patterns for sea knots - Straight knot
One of the simplest knots.
Unfortunately, synthetic ropes can slip under load and are therefore considered unreliable.
How to tie a straight knot: 
Schemes for knitting sea knots - Weaving knot
Similar to straight, but wears less on the rope and is easier to untie.
How to tie a weaver's knot: 
Knitting patterns for sea knots - Half bayonet
Simple half bayonet widely used in maritime affairs and among divers.
It is often used as a finishing knot for other sea knots - it serves as insurance against the unraveling of the main knot.
It makes no sense to tie more than three half-bayonets in a row - the strength of the knot as a whole does not increase with a larger number of half-bayonets.
In everyday life, the knot can be used in cases where the cable needs to be temporarily attached to some object for strong traction, for example, towing a car.
How to tie a knot simple half bayonet:

- We wrap the end of the rope around the attachment point
- Wrap the end of the rope around the main end and thread it through the loop.
- We tighten
- The simple half-bayonet knot is ready!
Knitting patterns for sea knots - Flemish loop
- a strong and easily untied loop at the end of the cable. In diving, it is often tied to fasten items of equipment to a carabiner.
How to tie a knot Flemish loop:
- Fold the end of the cable in half
- Tie a eight-piece on the double part of the cable
- Flemish loop is ready
In conclusion, I would like to remind you that in order to avoid getting into an unpleasant or funny situation underwater, learn to tie sea knots in practice - and regularly refresh your skills!
You can read more about sea knots in the book by L.N. Skryagin