Wicker weaving for beginners: simple instructions. Do-it-yourself weaving of willow furniture
In Rus', basket weaving was quite common. Almost every peasant could weave a good basket if necessary. Well, basket makers weaved baskets for every taste: small and large, round and rectangular, oval and conical, with simple and complex weaving, with and without lids. It was difficult to manage without baskets on the farm. They wore clothes to the river; taken on the road, setting off on a long journey; they harvested crops in them; We went mushroom hunting with them.
In modern life, baskets also find various uses, and it’s hard to imagine a real mushroom picker without them. And willow is best suited for mushrooms. The willow branches from which the basket is woven contain a large amount of tannins. Thanks to them, the mushrooms do not spoil for a long time, and the air passing through the rods as if through a filter is cleaned of harmful microorganisms. In addition, willow twigs absorb excess moisture and, thanks to their thermal insulation properties, protect mushrooms from overheating.
First of all, you need to prepare good quality raw materials. More than 170 species of willows grow wild in our country. The rods of many of them, after appropriate processing, are quite suitable for weaving. Willow wood is famous for its flexibility and high ductility. Only some types of willows, for example brittle willow, are not suitable for weaving due to their fragility. Of the wild willows, the most commonly harvested for weaving are young shoots of willow, willow, and willow.
Three-stamen willow, popularly called belotal, whitevine or simply vine, is a small shrub that grows along the banks of rivers, lakes and other bodies of water in almost all regions of our country. The leaves of the belotal are oblong, long and shiny. The bark is greenish-yellow on the outside and lemon yellow on the inside.
Basket willow, also called broom and white willow, is a shrub or small tree. One-year-old young branches are yellow or olive-brown. The leaves are long, lanceolate, smooth above, and silky-tomentose, whitish below. The eye vein running along the lip is yellow and sometimes slightly brownish.
Along roads, on the banks of rivers and ponds, or not far from housing, you can often find a large spreading tree, sometimes reaching thirty meters in height. This is white willow, or willow. The branches of the willow are green-yellow, the bark is covered with silky hairs resembling a whitish coating. You've probably seen more than once how in a matter of seconds, as soon as a gusty wind blows, the willow crown turns from green to silver-white.

In the old days, peasants harvested willow using the so-called topless method. They cut off the top of a willow tree growing near the house, which was used for firewood and various crafts. By autumn, the remaining part of the trunk was densely overgrown with young shoots suitable for weaving. Most of the twigs were cut off, and by the next autumn new ones grew in their place. They do approximately the same thing in modern basket production, breeding cultivated species of willow - twig-shaped, purple and others - in special areas.
For weaving, rods aged from one to two years are usually used. For small graceful weaving, annual shoots are taken, which individual species they are thin and long like a cord; for weaving large items, as well as for making basket frames - two years. Willow rods intended for weaving must be long, thin, flexible, viscous, straight-layered and split well along the fibers. It is necessary to harvest only those rods whose surface, after removing the bark from them, looks clean and glossy.
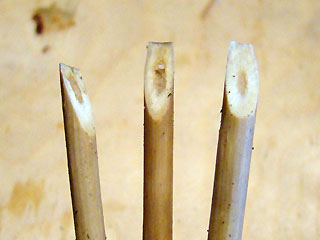
For baskets, try to prepare rods at least 60-70 cm long with a diameter at the butt (at the cut point) of 5-10 mm. Typically, willow shoots on one bush have approximately the same physical and mechanical properties. Therefore, before cutting twigs from a bush, first check the quality of one of them. If a willow branch has a core that is too large when cut, and even with a brownish-reddish tint, do not take twigs from such a bush - they, as a rule, are brittle. For our purposes, we need branches that have a small, barely visible core when cut. And, of course, you need to choose fairly straight shoots, without growths and knots.
It is practically possible to harvest vines for weaving baskets all year round.
But most often basket makers prepare it in the spring or autumn. The bark of spring twigs can be easily removed without pre-treatment. But if the twigs are cut at another time of the year, then in order to remove the bark, they need to be soaked or evaporated. In summer and autumn, the rods are soaked in running water from a river or stream; It is also possible in a barrel or trough, but in this case it is necessary to change the water every day. The harvested vine is tied into a bundle, a load - stones - is placed inside and immersed in water. To prevent the rods from being carried away by the current, they are tied with a rope to a peg driven into the bank. The rods are soaked for one to two weeks.
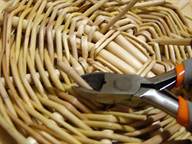
Instead of soaking, you can steam them. Then the processing time will be reduced from one or two weeks to one or two hours. Place the rods in a tank or trough, fill with water and put on fire. Bring the water to a boil and simmer for one to two hours. Then take out the rods, wait until they cool down, and remove the bark with a pincer (Fig. 5).

There are many designs of pinch pins, but the simplest of them is a metal slingshot driven into a massive bench, table or log. The squeezer can be made from two metal rods. Hammer pointed rods of the same length into a wooden base at the same time. Wrap them from below with thick wire, laying turn to turn, to a height of 5-7 cm. Spread the free upper ends - you get a slingshot.
To remove the bark from a twig, insert it with the thickened butt part into the pinch and, pressing the twig to the pinch with your left hand, pull it towards you with your right. If the bark is removed only from one side, pass the rod through the pinch again. Sort the cleaned rods by thickness. If you were unable to prepare thin rods, then split the thicker ones into strips - halves and quarters. Remember that wood that is too damp does not split well, so dry it at room temperature.
Etch or paint some of the rods intended for artistic weaving. A grayish-brown color is obtained if the rods are dipped in a solution of iron sulfate for a while; brown color - in a solution of potassium permanganate or in a decoction of alder bark.
If you want bright colors, use regular aniline fabric dyes or colored inks. For a bucket of hot water you need about four packets of aniline dyes. Add a few tablespoons of acetic acid to the paint solution. To ensure that the rods are well dyed, soak them in the dye for three hours. Then rinse with clean water and dry at room temperature. Immediately before weaving, soak the rods in cold water.
To weave a basket yourself, you need, first of all, to master the various types of weaving and methods of sealing the side.
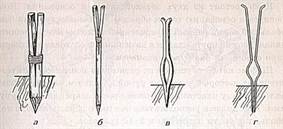
The most common is simple weaving. In some cases, to speed up the process, it is performed in two or three rows at once (Fig. 1). Although simple weaving is quite quick and easy, its strength is not high.

A variation of simple weaving is weaving in inclined rows (Fig. 2). By alternating rows of multi-colored rods, you can achieve great decorative expressiveness.

Rope weaving (Fig. 3) is used in cases where special strength is desired in some areas of the basket. For example, in flower beds, intersecting or parallel rods are intertwined with a “rope”.

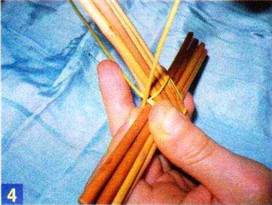
Checkerboard weaving (Fig. 4) is used mainly for decorative purposes. Rods of two contrasting colors are laid alternately as in ordinary simple weaving, only not through one riser rod, but through two.

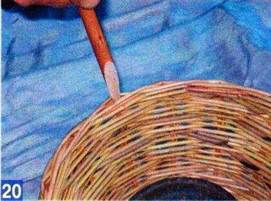
The beauty and strength of the basket largely depend on the correct sealing of the side.
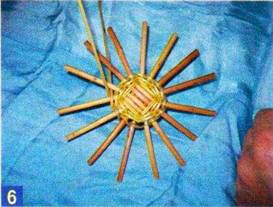
The simplest and quick way- through one riser rod. The first rod is wound behind the second, the second behind the third, and so on until the last (Fig. 6).

The side is also sealed with two rods, only through two riser rods (Fig. 7)

or with one rod - through two riser rods (Fig. 8). Using these methods, the ends of the rods must be brought inside the basket, and the remaining ones must be carefully trimmed with a knife.

Sealing the side with a “pigtail” takes more time, but it gives the basket special beauty and expressiveness. To braid a braid, the edge is first sealed in a simple way through one rod. In this case, all the rods are tied together with threads of three and intertwined as is done when weaving a regular braid. When braiding a braid around the side, the used rods are trimmed, sealing their ends under the braid, successively including more and more new groups of rods into the weaving (Fig. 9).

People have been weaving from vines since ancient times, only at first they wove from grapevines, which is why the name came about - weaving baskets from high-quality vines, although you can use twigs and other plants (raspberries, blackberries, currants) for weaving, which will be more pliable for beginners. Then man found a more flexible and durable plant - willow. Willow twigs are flexible and do not break like a grapevine, so large objects, furniture (sofas, tables, shelves, shelves, armchairs), as well as smaller products, boxes, baskets, bread bins, dishes, vases, figurines are woven from it. , photo frames and much more, for which only your imagination is enough.
Many saw wickerwork and some of them also wanted to get such a household item for their own use. Therefore, the question often arises about how to weave large and small baskets from wicker. Weaving it with your own hands is possible and not at all difficult, you just need to stock up on time, patience and materials for weaving.
Photo lesson on weaving baskets from wicker for beginners
Preparation
For beginners in wicker weaving, it will be more useful to prepare the material yourself, i.e. It is necessary to cut one-year-old twigs in large quantities and with a reserve, because for beginners twigs break more often during work. You need to cut off thin twigs with a sharp knife or pruning shears, leaving 3-4 more buds on the branch so that the branch can continue to grow.
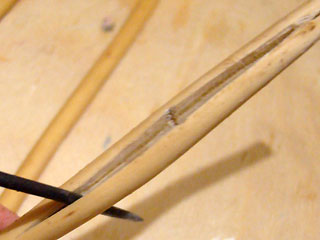
Before cutting a large number of vines from a certain bush, you need to check the flexibility of the first cut branch, i.e. you need to bend it in half from the thick end, if it is not cracked, it means it fits and you can cut it further.
To ensure that the vine in the finished product does not change color, it should be soaked, preferably in running water (up to 1 month), steamed in hot water (1-2 hours) or boiled in boiling water (up to 20 minutes), peeled from the bark, and then dry it on a flat surface so that the color is uniform and without stains. Before work itself, the vine should again be soaked in water or wrapped in a wet rag and bag to again give it the flexibility so necessary during weaving.
Material and tools
Material required for the basket: 8 rods for the bottom cross, 7 mm in diameter and 20-25 cm long, for the rigidity of the walls - 15 rods 25-30 cm long, and 5-7 mm in diameter, for braiding - 20-30 pieces of vine thickness in diameter no more than 4-5 mm, and length up to 1 meter.
Tools that will be needed during work: knife, round nose pliers, pliers, side cutters, awls of different diameters, incl. and a thick curved awl (kochedyk), a weight to hold the work in place and elastic bands or rope.
Weaving bottom
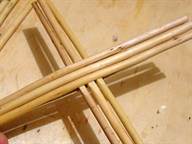
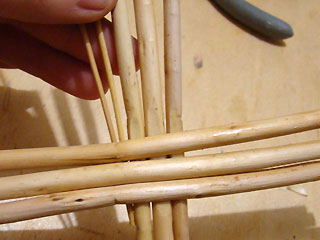
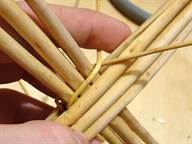
Basket weaving starts from the bottom. You need to take 8 thick rods approximately in length, make a cut in 4 of them, i.e. you need to split it in the middle with a knife or an awl, then insert 4 more rods, so you get a cross bottom.

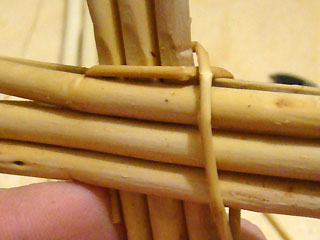
The braiding of the crosspiece begins using the “rope” technique, the thin ends of two rods are hidden in a crack in the crosspiece, then the rods are separated and one goes above the axes of the crosspiece, the other under the axes, then they change places and so one or two rows pass in a circle.
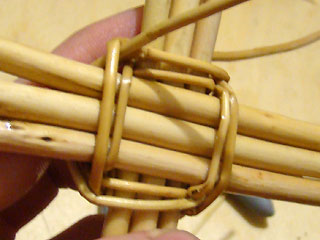
Then the axes of the cross are divided into two and braided further.

Then you need to make an odd number of rays of the cross, because This is necessary for simple weaving; one of the rods is cut with a side cutter. The rods are moved further apart and the angles between them are made equal so that the bottom is round and the weaving is uniform.
So the weaving continues until the entire length of the rays is braided, the excess ends are cut off.

Basket walls
The next step is to attach 15 side posts into the weave bottom.

It is necessary to bend these posts 90 degrees, set them in a vertical position and tie the upper ends of the posts together with an elastic band or rope.

The border between the bottom and the walls of the basket is then braided with three rods. You need to take three pieces of vines and insert them into the bottom with thin ends near each of the three successively located racks.

The leftmost twig goes around the outside of two posts to the right, goes behind the third post inside and comes out outside near the fourth post. In the same sequence, 2 other twigs of the vine are braided. This is how several rows (2-3 pieces) of braids are woven (the border between the bottom and the walls of the basket) to form a shape.


The weaving of the walls occurs using the usual weaving method, i.e. one rod is behind the counter, the other is in front of the counter.


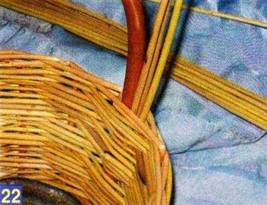
Basket handle
It is necessary to take a thick rod of the required length and bend it into the shape that the finished handle should look like, sharpen the ends and insert it into the weaving of the wall on both sides.

6 thin rods 2-3 mm thick are inserted next to the thick rod, they are braided around the handle, and if necessary, they are fastened with tape.


This rather ancient type of creativity does not lose its attractiveness today. From the vine you can weave not only baskets, but also various trays, boxes, decorative elements for interior decoration and even. Once you get carried away with this process, you won’t be able to stop. And your reward will be beautiful handmade products.
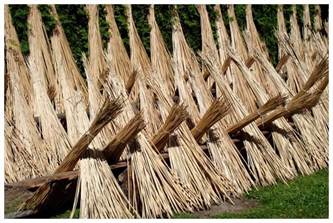
Harvesting vines for basket weaving
Naturally, it all starts with . The vine is usually cut during the period of sap movement (early spring or autumn) and in winter. The vines cut during this period are of good quality. In addition, you need to ensure that it is made from fully matured wood.
Processing the vine involves boiling it in boiling water for 20 minutes. Moreover, you need to fill it not with cold, but with boiling water.
To make sure good quality vines, you can conduct a simple experiment: bend the cut branch 180 degrees at the thickest point - if it does not burst, it can be safely used in weaving. Otherwise, discard this lozina - it will constantly break.
Weaving an oval basket from wicker
Weaving wicker baskets always begins with weaving the bottom. The oval basket is no exception. Therefore, for it we prepare 3 twigs of 25 cm each, 5 twigs of 13 cm each and 1 short twig 6 cm long.

In principle, you can use different lengths of twigs to get a larger or smaller basket. You just need to stick to this size ratio. The number of rods should always be odd, and in our case their number is 9. We split 3 long rods in the middle, push the middle rod through the splits and braid them crosswise with a thin rod.

After this, at a distance of 3-4 cm from each other, we stretch and braid all the other twigs, and attach the short twig to one of the sides of the cross. As a result, we have a cross with 17 ends.

Now we need to braid this cross. As a result, we will get an oval bottom, the size of which is currently 25x15 cm. It needs to be leveled by cutting off the protruding ribs. And to complete the bottom we add additional ribs.
We use thick rods, approximately 5 mm in diameter, as side ribs - they act as a frame for the future basket. These ribs must be there odd number. For example, as in our case, there can be 33 of them. Make sure that the distance between the ribs is absolutely the same. The finished bottom is 40 cm long and 30 cm wide.

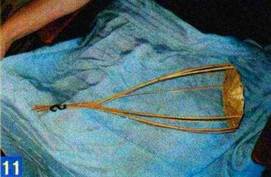
We braid the edge of the bottom and bend the ribs. We collect the tips of the side ribs into a bunch above the center of the bottom. Inside them, at a height of 15 cm, insert a spacer ring, which should be slightly larger than the bottom. In our case, we use a ring 50 cm in length and 32 in width. We secure the ring with wire on two opposite sides.
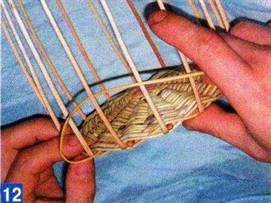
We continue weaving, which now goes upward along the side ribs. We bring the ends of the rods to the outside of the basket - later we will carefully trim them.

As soon as we reach the spacer ring, remove it and continue weaving to the desired height. After this, we braid the top edge, starting from any edge.

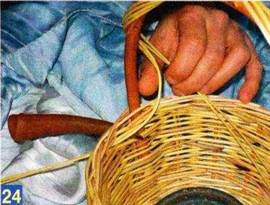
Weaving a handle for a wicker basket
When braiding the top edge, leave two long rods parallel to each other. They will serve us as additional strengthening of the handles.

We make a handle, insert it into the side holes where our left ribs come out. We braid the handle with thin long rods, inserting 5-6 rods from one edge. We wrap them around the entire length of the handle a couple of times. We do the same on the other side.
 |
 |
 |
 |
 |
 |
To make the handle tight, we pull it along its entire length with twine. It can be removed when the basket dries well and accepts the required form. We braid the protruding ends of the rods on both sides.
Wicker weaving dates back to Ancient Egypt and Ancient Rome; wicker chairs and boxes were found during excavations. In ancient times, various baskets were woven from willow. During the Renaissance and the Middle Ages, boxes, bread bins, baskets and baskets, baby cradles, and carts were created using wicker weaving. A master class on simple and quick weaving from dense wicker will help beginners quickly master the technique.
In Russia, initially, in most cases, baskets and fishing gear were woven; later, with the development of trade, weaving began to be used for packing transported goods into boxes for sale. In the 19th and early 20th centuries, before the Great Patriotic War, many factories were created throughout the country for growing cultivated willow and weaving furniture and household utensils from it. Entire plantations abandoned during the war began to be revived and weaving factories, mainly baskets, were created anew. There were entire villages that were engaged in wicker basket weaving.


Initially, grapevines were used for weaving, but more often in Europe and Asia flexible willow twigs were used for weaving. In addition, in Asia they weave furniture from materials such as rattan and bamboo.
Due to the fact that in today's Russia there are few masters in weaving from wicker, some began to be interested in how you can weave a basket from willow vine with your own hands, because there is a desire to have such a natural thing with a special aura in everyday life or in the interior. The natural energy of this item brings coziness and comfort to your home.
Harvesting vines for weaving products for beginners
Before you start creating a wicker item, you must first prepare a vine for weaving.
You can, of course, buy ready-made rods to start weaving right away, but it’s better to learn how to prepare the material yourself, this will help later in working on the product.
For weaving, shoots of the first year of growth are used, and they are collected all year round. The branches should be cut at a sharp angle with a knife or pruning shears, so as not to harm the tree; it is more useful to leave 3-4 buds on the branch remaining on the tree. When collecting twigs, it is important to check them for flexibility: the first twig cut from the tree must be bent in the place where the thicker end is; if it is not cracked, then it is suitable for decorative weaving. Spring shoots have a very soft bark, so the bark can be removed without pre-treatment, and if the shoots were collected at another time of the year, then the rods must first be soaked for 1-2 weeks or steamed for 1-2 hours, or boiled for 20 minutes, removed bark After peeling the bark, the shoots must be dried, otherwise the rod in the finished product will delaminate and break. The rods should be sorted to make it convenient during painting and weaving. Before work itself, the vine is again soaked in water to gain flexibility.
Painting can be done with aniline dyes, a solution of potassium permanganate or herbal decoctions, immersed in the dye for a while, then the rods are rinsed with clean water and dried on a flat surface, preferably on the floor, so that there are no stains in the color.
Some rods are too thick for weaving small to medium sized items, so you will need some tools to cut the rods into narrower strips.


And a pinch or pinch helps to remove the bark from the twigs.

Mastering weaving with a simple master class
Immediately before weaving, it is necessary to soak the willow rods in hot water, and also during work you will need to moisten them with water - all this to maintain the flexibility of the rods.
For beginners in wicker weaving, it is better to start with a simple element - from the bottom, this is the basis of many wicker items, using a photo or video master class.
It is better to take rods for weaving with a reserve, because... for beginners, the rods often break during work; soaking or wrapping with a wet rag for the bottom requires seven or more sticks with a diameter of 4-7 mm, a length of about 20 cm, more is possible, depending on the desired size of the bottom and thin rods (up to 3 mm in diameter) 30 pcs. and more, the length of which must be at least 50 cm. The thicker ones are used to create the skeleton (rays), and the thin ones in the form of a rope braid all the ray sticks.
The first step is to make a cross, around which weaving will then be carried out. You need to take 3 thick sticks (you can take four for each side of the cross), cut off a third of the thickness on them in the middle part and sharpen the ends from the thinner edge, for the convenience of inserting other sticks into the crack. The other three or four sticks must also be split in the middle with a knife or awl.
This should be done carefully so as not to split too much or the entire stick, because this cannot be corrected, and the product will be defective.
Then it all comes together.


It is imperative that all the inner sticks, on which part of the thickness was cut off, be turned to one wrong side, and the fit of the outer sticks to the inner ones, in the place of the crack, should be as tight as possible.
Now you should take two thin twigs and begin the braiding process. The ends of the so-called rope must be hidden in the crack of the axial sticks.
Two twigs diverge in directions, one will first go above the axes, an arc will go under the axes, then they change position. The inner guides must be braided first.
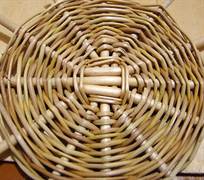
Two rows are braided (you can make three such rows of braiding), then you need to move the axes to the position of the rays, like the sun, in a circle so that the distances between all the rays are equal. The diagram in the photo below:

The braiding begins not of three sticks at once, but of each one separately in the same manner.


When the twig used to braid ends, you need to weave the next twig of similar size and color, as shown in the photo.

We must try to ensure that the ends of the finished twigs come out on the wrong side, then the front side of the bottom will be smooth and beautiful.

The twigs must be taken of different lengths so that the growth occurs evenly in different places. The larger the bottom of the product, the greater the distance between the beams of the cross, so if the product is large, you need to use more beams.
For the oval bottom of a basket or cradle, use a similar cross pattern:

Furniture for skilled hands with job description
Furniture weaving is done by skilled craftsmen in this craft with their own hands, because it was necessary to weave a lot of different bottoms and baskets for these bottoms and gain experience. Also, to make furniture with your own hands using wicker weaving, you will need not only experience, but also a greater variety of materials and tools. Furniture requires strength, because... a greater force of gravity will act on it than, for example, on the bottom of a basket or cradle, so first a frame of sticks is built (thickness 2 cm or more). Next, you need to attach racks to the frame, which will later be braided with thinner twigs or strips/ribbons from twigs; during the weaving process, perpendicular racks are regularly added for rigidity. You can braid various types weaving.
Wicker weaving originated in ancient times. Over the long centuries of its existence, from the production of objects necessary for human life, it has turned into real art. Weaving is practiced all over the world. Rattan and palm fiber, even pine roots and paper are used for this activity, but the most common material is willow twigs. The variety of materials has led to the emergence of various weaving techniques; objects created in different parts of the world are unique and different; they are united only by beauty and environmental friendliness.
Willow twig is an indispensable material for creating extremely useful household accessories. Containers woven from willow are good for storing cereals; they absorb and remove excess moisture and do not interfere with air circulation. In addition, willow contains bactericidal substances that prevent rotting. Since ancient times, wine bottles have been woven with willow to preserve it. Thanks to this “case,” the optimal temperature is maintained, the drink does not overheat and does not cool too much. Jugs braided with willow are also used for preparing fermented milk products. Fruit baskets, candy bowls, and bread bins are made from willow; they are very beautiful and functional. Items made from wicker are easy to clean without losing their shape.
Wicker boxes for storing kitchen utensils - interior decoration Wicker vases and candy bowls - interior decoration Candy bowls, bread boxes and vases made of wicker - table decorationAccessories woven from willow are also very good for storing things. Their variety is impressive - these include small boxes and huge chests. Things in them do not cake and do not acquire an unpleasant odor. Wicker boxes and storage boxes greatly decorate the interior.
Wicker baskets for storing things - beautiful and functional Wicker chests - interior decorationHandicraft baskets allow you to neatly store numerous balls, spools, scraps, and ribbons.
Wicker furniture
Wicker furniture is an interior decoration. It is appropriate both in the country house or in the winter garden, and in a chic living room. It is suitable for home and restaurant. Furniture woven from wicker was used both in palace interiors, surprising with exquisite decoration in silver and gold, and in simple houses. Classic English and French interiors are unthinkable without it. But the willow vine allows you to create a wide variety of forms that will fit into the most radical interior without violating the concept. Wicker furniture includes cozy armchairs, majestic sofas, laconic stools, tea tables, bookcases, and even beds and playpens. Wickerwork is used as finishing for cabinets, cabinets, and chests of drawers.
Wicker chairs, a table and a floor lamp - interior decoration A rocking chair made of wicker and an openwork table - comfort in the interior Wicker whatnot - lightness in a classic interior A wicker table will decorate any interiorWicker furniture goes perfectly with wood and stone, with animal skins. It makes any room warmer and closer to people. It is not without reason that it is traditionally used in rooms intended for recreation. Such furniture is very functional, it is very light, and you can rearrange it at any time. She is never cold. It is convenient for people of all ages - it’s a grandmother’s rocking chair, a cradle for a baby, and some strange object in a teenager’s room.
Wicker furniture - a cozy corner for drinking tea Wicker furniture - decoration of a garden, veranda, room Wicker chair - a feeling of warmth in the interior Wicker bed for a classic bedroom Original wicker chairs - the highlight of the design Original wicker chair for a modern interior Wicker stool in the interior - beautiful and practicalWicker houses for animals in the interior look very stylish, make the room cozy, and are usually very popular with pets.
Wicker cat house - interior decorationWicker decorative items
Lampshades woven from wicker for floor lamps, chandeliers, and sconces greatly decorate the interior.
Any painting or photograph in a wicker frame looks like a masterpiece.
Mirror frames made of willow twig, give the room solidity without depriving it of comfort.
Floor and table vases made of wicker greatly decorate your home. They are ideal for dry arrangements, but can also be used for live bouquets on a special moisturizing base. Flower pots and tubs look beautiful in the interior and are comfortable for indoor plants.
Wicker wicker floor vases - for different design styles Wicker flower pot and hanging vases for decorating rooms Wicker amulet for the kitchen - drive away evil spirits from the roomWall panels made of wicker look very exotic, and floor mats are pleasant on the feet.
Wicker sculptures for home and garden
If the backyard of your country house is decorated with wicker sculptures, it will become more pleasant and lively. Wicker sculptures are distinguished by size and design features models. These include: statues, columns, crafts of animal figures, people or characters from fairy tales.
Animal figurines made from wicker are a wonderful decoration for a garden or a large room. Made by hand, they seem to live: under the influence of conditions, they slightly change their poses and move.
Peacock made of wicker - the work of a Donetsk masterWicker toys
A special place is occupied by wicker toys for children - sleighs, horses, carts. Unlike sculptures, they are woven from stronger rods; the ends of the rods are joined especially carefully so that the product does not fall apart and does not scratch the child.
Animals made from wicker - baskets for toysAll wicker items are made by hand, each of them is unique and each contains a piece of the master’s soul. Therefore, rooms filled with such things become very cozy.
A car made of wicker - to decorate the garden Did you like the article? Share on social networks!