How to make a firebird with your own hands. Beautiful birds made from plastic bottles with your own hands. How to make chicken from plastic bottles
There are various ways garden and dacha decorations. If you have a lot of free time, you can start decorating your site. We bring to your attention the master class “Firebird from plastic bottles" To do this you need to be patient and have a lot of plastic bottles. So, in this article, we’ll look at how to make a firebird out of bottles.
Popular lesson
For this we will need the following materials:
- Dense foam;
- Plastic bottles of different shapes and sizes;
- 5 liter bottles;
- A piece of linoleum;
- Wire;
- Nails;
- Brush;
- Awl;
- Scissors;
- White paint;
- Paint for the finished product.
Having prepared everything you need, you can start working.
Step 1
Let's take the peacock diagram as a basis, because... The peacock differs from the fairy-tale character only in the color of the finished product. So, we cut out the body from dense foam (Fig. 1).
Figure 1:
Step 2
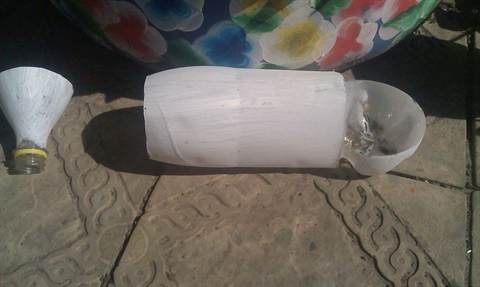
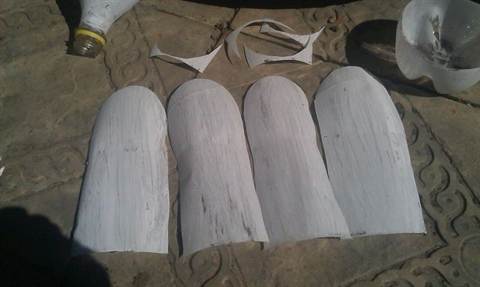
Making feathers for the tail. Take a 1.5 liter plastic bottle, wash it thoroughly and dry it. Now you need to paint this bottle with white paint. It is better to use 2 layers of paint to avoid the plastic showing through. Be sure to let the paint dry completely.
Cut off the neck and bottom of this bottle (Fig. 2).
Figure 2:
We cut the resulting shape into 2 parts, and then divide each part into 2 more equal ones. So, you have 4 equal parts. Trim the top as shown in Figure 4.
Figure 3:

Figure 4:
Next, we make the teeth so that they look like feathers, bend each part in the middle (Fig. 5). You will need to make quite a lot of such feathers. Draw circles on each of them, as shown in the following pictures.
Figure 5:

Step 3
Let's get to work on the tail. To do this, cut out a piece of linoleum measuring 1.2 * 1.4 m, this will be the base (Fig. 6).
Figure 6:

Figure 7:

This is what your tail should look like.
Figure 8:

Using nails, we attach the tail to the base (body) and also paint it with white paint (Fig. 9).
Figure 9:

Step 4
Making wings. It is necessary to cut a small cylinder from the bottle and cut it into 2 equal parts. Make teeth on these parts and also attach them to the body with nails (Fig. 10). The feathers need to be attached to the base until the entire bird is covered with feathers (Fig. 11).
Figure 10:

Figure 11:

Step 5
Now we need to make the tuft. It is necessary to cut out a part from plastic, the diagram of which is shown in Figure 12.
Figure 12:

Bend the leg in the middle, cut the round part into teeth and draw circles, as on the tail feathers of our bird (Fig. 13).
Figure 13:

Cut a triangle for the beak from the neck of the bottle, paint it with white paint in 2 layers and bend it in half (Fig. 14, 15).
Figure 14:

Figure 15:

The beak must first be attached to the bottom of the head with nails, then to the top (Fig. 16).
Figure 16:

We glue the feathers of the crest to the head and draw beautiful eyes (Fig. 17).
Bird crafts have always been very popular among lovers of home crafts. Figures of feathered creatures are especially relevant on Bird Day, which is celebrated in the spring on April 1 in kindergartens and schools. The holiday is dedicated to the return of migratory birds and marks the onset of spring and the renewal of awakened nature. On this day, children of all ages make bird crafts, and older schoolchildren make birdhouses and hang them on trees.
Bird crafts can be made from a wide variety of different materials: cotton pads, colored paper, plastic bottles, salt dough, natural and any available materials. There are many options for creating birds - from simple ones for small children to complex ones that schoolchildren can easily master with the help of adults.
We bring to your attention several lessons on creating birds with your own hands with step by step instructions, diagrams and tips. We hope that they will help you learn all the intricacies of this fascinating process and be filled with new bright ideas.
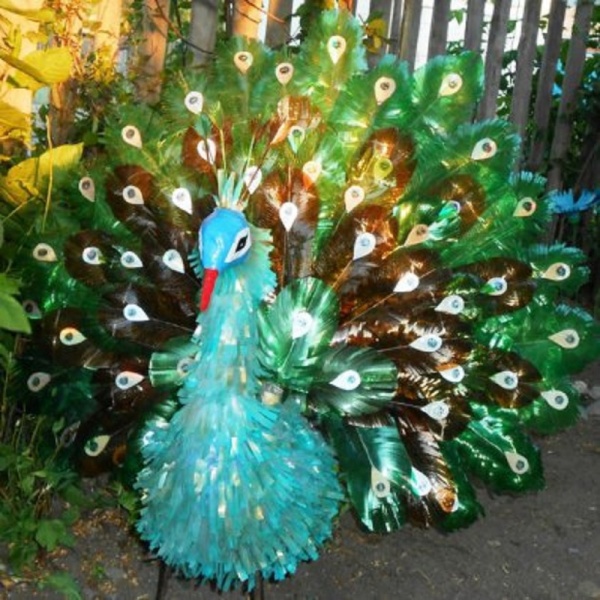
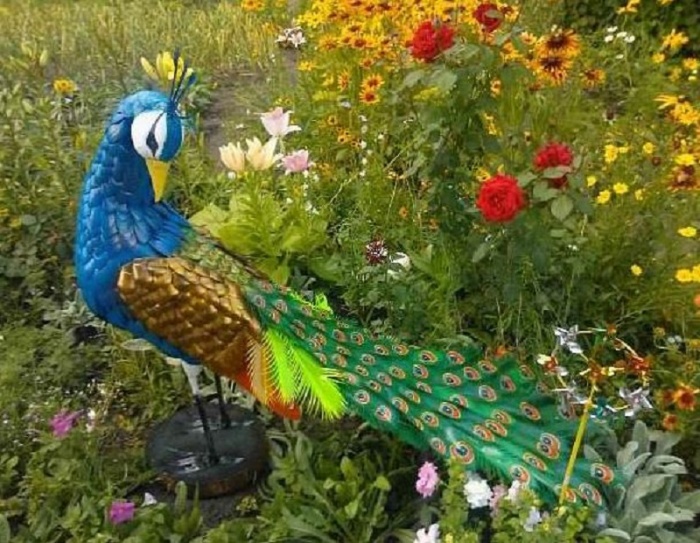
Peacock for a summer cottage made of plastic bottles - master class

We will need: plastic bottles of various colors, polystyrene foam, a wooden block as a stand, a metal rod, foil and thin colored plastic, a glue gun.

Step one: Cut out the peacock's body and head from foam plastic, not forgetting to make small indentations in place of the eyes. We attach it to a wooden block using a metal rod, which plays the role of legs.

Step two. We make enough peacock feathers from plastic bottles of different colors. We will need three types of feathers: long for the tail, short for the neck and a little longer for the body. To do this, cut off the bottom and neck of the bottle and cut it lengthwise into 3 parts.
We round one end of each strip with scissors and cut its edges into thin strips so that it looks like a bird’s feather. We decorate the rounded end of the feathers intended for the tail with two or three multi-colored ovals made of foil and plastic. You can attach them using a stapler.


Step three. We cut out a beak from a red plastic bottle and fasten it in place. Next, using a glue gun, we gradually glue the feathers onto the body of the bird, starting from the tail and ending with the neck. Attach the feathers slightly overlapping, as shown in the photo. Do not forget that medium-length feathers are intended for the body, and meek ones for the neck.

Step four. We cut out a tuft of any shape that our imagination dictates from colored plastic and glue it onto the head. Using acrylic paints, draw the eyes of a peacock. You can glue eyelashes cut from a transparent plastic bottle to them.

Step five. Let's start making the tail using an abrasive mesh. We make holes at the base of the feathers and attach them to the mesh using thin wire.
We start making the tail from the end, gradually layering feathers on top of each other in rows until the bird’s luxurious long tail is completely formed. After that, we attach it to the body and place the peacock, made with our own hands from plastic bottles, in an area among flowers and greenery.
DIY firebird made from salt dough - master class

For Bird Day, you and your children can make a three-dimensional firebird from salt dough. The work will take little time, require very few materials and will provide the children with a fun and festive mood.
We will need: salt dough, gouache or watercolor paints, clear varnish.

Step one. Making salt dough. To do this, mix a glass of flour with a glass of salt and knead the dough by pouring 100 ml of brewed starch into it. We are preparing it as follows: dilute a tablespoon of starch in 100 ml of cold water and pour a glass of boiling water into this mixture.

Step two. Divide the salt dough into 5 pieces and paint them in different colors. To do this, add gouache or watercolor paints to each piece and lightly knead it again. Next, we draw a sketch of the firebird and sculpt the bird’s details on it: wings and body. Dry them in the oven at low temperature.

Step three. Making the tail fairy bird. We draw stencils of feathers and use them to sculpt them from pink and blue salt dough. Dry the feathers in the oven. Next, we paint all the parts of the bird with paints, cover them with colorless varnish, and connect them. We decorate a colorful festive panel with crafts. The salt dough firebird is ready!
Birds made from cotton pads - master class

Another very cute craft that is perfect for decoration. kindergarten on the wonderful holiday Bird Day. It's easy, fun and very fast. Young children can be introduced to making birds from cotton pads.
For creativity we will need: cotton pads, wooden skewers, colored paper, narrow colored ribbons, plastic eyes, glue and scissors.
Operating procedure:
- To create one bird we take 5 cotton pads. We cut one disk into two halves, and leave four whole.
- We fix two pairs of cotton pads on a skewer with glue so that it is inside. One pair of disks plays the role of the bird's head, and the other - the body.
- We glue the halves of the cut cotton pad to the body on both sides - these will be our wings.
- Glue the eyes and beak, cut out from a piece of colored paper, to the head and decorate the bird with a ribbon. A cute chick made from cotton pads for Bird Day is ready!
Owl made of colored paper - master class

You can make cute owls for celebrating Bird Day at school with your own hands from colored paper. We will need the colored paper itself, scissors, double-sided tape and glue.
Operating procedure:
- We make a cylinder from a sheet of colored paper, glue its edges on one side, as shown in the photo, and press down the middle so that we get ears.
- Cut out a heart from paper and glue it to the bottom of the cylinder - these are the owl's feet.
- We cut circles of equal size and glue them onto the central part of the cylinder as feathers. In order for the circles to give volume to the craft, it is better to stick them with double-sided tape.
- We cut out a triangle of the same color as the legs and glue it to the top of the plumage - this is the beak.
- IN last resort glue on the eyes by cutting out circles for them from black and white paper. Your handmade owl is ready!
DIY bird of paradise made of polymer clay - master class

Delightful birds of paradise made from air-hardening polymer clay. This modern material We are also familiar with the names “self-hardening plasticine”, “modeling mass” and “velvet plastic”. To make charming feathered creatures, we will need aluminum wire with a diameter of 1 mm, polymer clay, foil, scissors, pliers, a stack, a glass for rolling out clay, a little patience and diligence.


Operating procedure:
- We create three birds at once - while we are sculpting one, the rest are drying out. We cut the wire twice as long as the planned tail. We wrap half the wire with foil, crumpling it and forming the body of the bird.
- We make legs from wire, as shown in the photo, and insert them into the body. We take a piece of clay, shape it into a sausage shape, then roll it out and flatten it. Carefully remove the wire from the bird, place it inside the clay sausage, rolling it up using a glass. We insert the finished colored tail back into the body. In the same way we prepare the remaining two birds.
- We take a piece of blue, yellow and red clay, roll them out and gradually, smearing them with our fingers, stick them around the birds until the entire foil is covered. We will get three blanks of bright birds.
- Starting from the center, we stick around the paws. Then we take a piece of clay of the appropriate color and make the cheeks, crown and beak. We sculpt eyes from balls of black clay, not forgetting to squeeze out the upper and lower eyelids around them.
- Create a tail and crest. To do this, we cut off several wires of the length we need and roll them into clay. When it dries, we round off the ends using pliers and insert the tail parts into the bird’s body. We make shorter feathers from thin clay sausages by twisting the ends.
- We create the plumage effect by placing pieces of clay rolled out in the form of droplets on the body and working with a needle in the direction of feather growth. Using a needle, we create featheriness throughout the bird's body. To make the eyes shine, you can coat them with varnish. A wonderful hand-made bird of paradise is ready!
More ideas and patterns for bird crafts from various materials
For needlewomen familiar with the isothread technique, it will not be difficult to create paintings with beautiful white swans with their own hands and decorate a holiday with them, dedicated to the Day birds. For creativity, it is better to use floss or iris. On the wrong side of the cardboard we draw a swan and draw waves. We divide the drawing into details, drawing figures of different sizes, and embroider using the isothread technique.


Woolen threads make a very charming feathered creature. You can easily create it with your own hands according to a simple and understandable scheme.


And according to this scheme, by introducing children to creativity, you can make a bird of happiness from a beautiful bright fabric.

Even small children can create such a colorful bird from circles of colored paper.

You can even make a charming bird from a strip of colored paper and a clothespin.

A bird you made yourself for Bird Day can be placed in a nest made from paper plates.

Simple clothespins in the hands of a craftswoman can turn into an extraordinary fairy-tale bird.

And finally, ideas for bird crafts made from natural and improvised materials: cedar or pine cones, painted feathers, cardboard and plasticine.


Add bright colors summer cottage Do-it-yourself decorative elements from plastic bottles will help. Crafts vary in degree of complexity, but always become the subject of attention of others. Many birds made from plastic bottles are made using a similar algorithm, only the outlines and details differ. About the options for their production we'll talk further.
Available materials and nuances of the design process
The creative imagination of a master is capable of creating a masterpiece from ordinary things. In addition to bottles, other available materials are used to decorate birds:
- Plastic canisters make an excellent base for a bird's body.
- Polyurethane foam helps to add the required volume.
- Styrofoam will help make the bird's head as close to the original as possible.
- Self-tapping screws, wire or glue are used to connect the parts together.
- The finishing of the bird's legs is carried out with a corrugated pipe, twine, or parts are cut out of plastic containers.
- Small dairy bottles help give the bird's thighs the desired shape.
- Moisture-resistant acrylic paints and anchor varnish transform the nondescript silhouette of the bird beyond recognition.
To cut and connect all this, you will need scissors, a stationery knife, a stapler, and an awl. This is the main list, which changes depending on the selected bird model.

Comment! The beauty of a craft is largely determined by the quality of the plumage. If you want to decorate your area with a spectacular bird, be patient to make a large number of small and large feathers.
Beginners can offer a simple step by step guide, where a peacock acts as a bird made from plastic bottles:

Advice! Preliminary filling of the body with sand will help to give stability to the bird's figure.
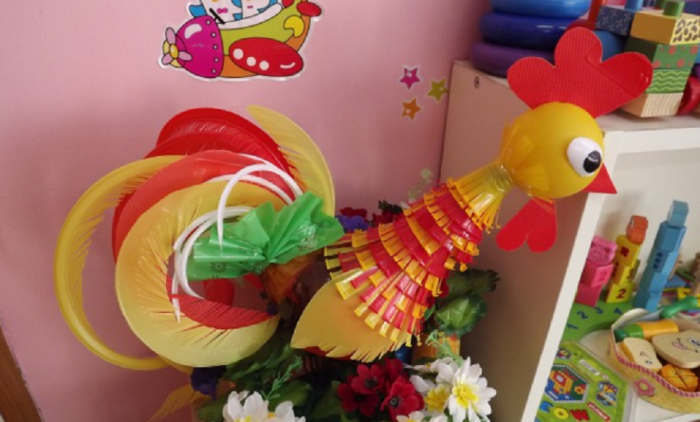
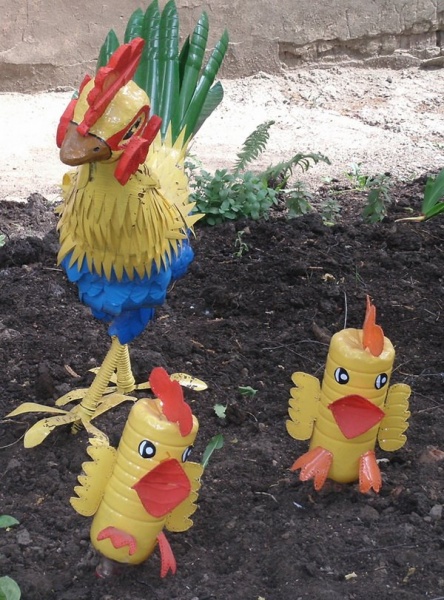
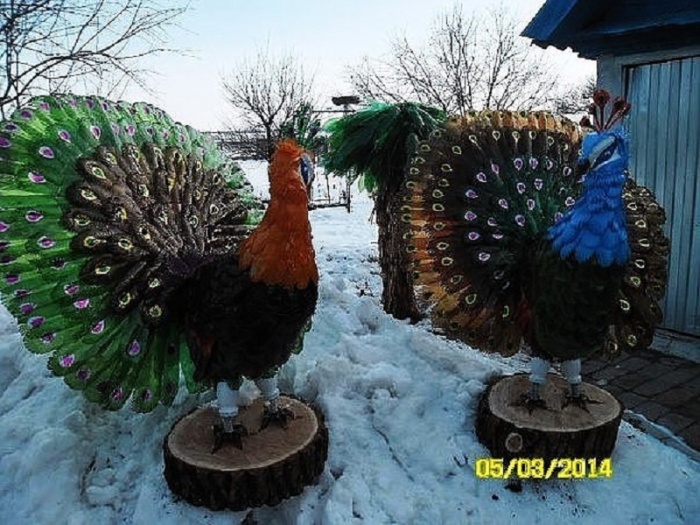
Making poultry using a rooster as an example
Having gained experience with easy crafts, you can move on to a more complex process. The proposed algorithm for making a rooster from plastic bottles will be an excellent guide for making other birds.
Available materials:
- plastic canister and 5 liter bottle;
- PVC pipe about 40 cm long;
- 1.5 liter containers for thighs - 2 pcs.;
- lots of fletching bottles.
Frame
Creation process:
- The work begins with the formation of the bird's frame. The side of the plastic canister is cut and moved to the side.
- The pipe is given the desired shape, after which it is screwed with self-tapping screws to the body of the bird.
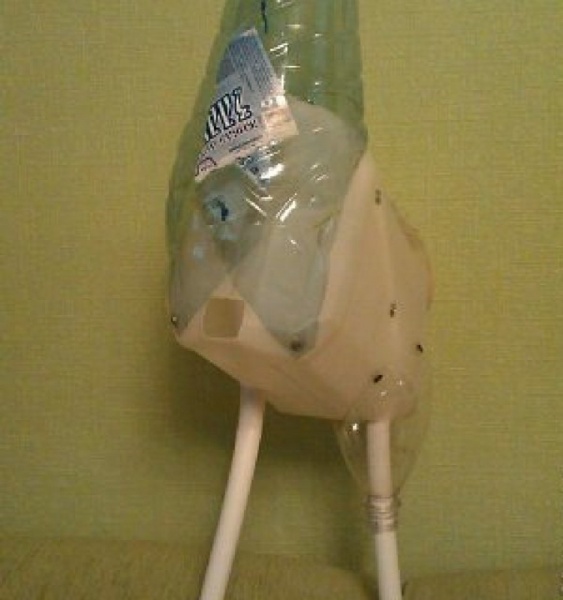
- The rooster's neck is made from a 5 liter plastic bottle rolled into a ball. Depending on the selected bird model, elements can be replaced with other parts. For example, another piece of plastic pipe is perfect for the neck of a flamingo.
- The rooster's legs have a thickening at the top, bags made from 1.5 liter bottles will serve as thighs. For other birds, the volume of containers is selected in proportion to their figure. The elements put together represent a similar frame:
Head
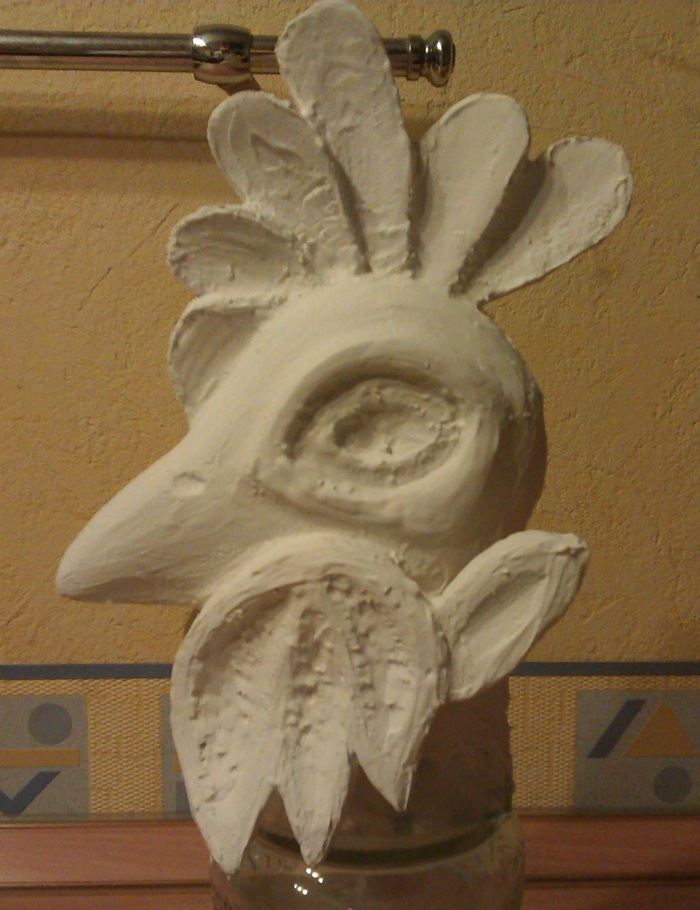
The rooster's head is cut out of foam plastic. If it is difficult to cut out a whole figure with a comb and beard, you can prepare all the elements separately and then connect them with glue. Sometimes this part is also formed from a plastic bottle. To ensure that the foam blank can be easily painted in the future, the following measures are carried out with it:
- carefully processed with sandpaper;
- covered with acrylic putty;
- after the composition has dried, sand it again to give a smooth surface;
- Apply a layer of PVA glue.
Elements of the bird's head are decorated at the discretion of the master. Eyes can be painted with paints or finished parts can be fixed. Various crests and scallops are cut out of plastic or foam. The beak is often made from a thick plastic container (usually a shampoo container).

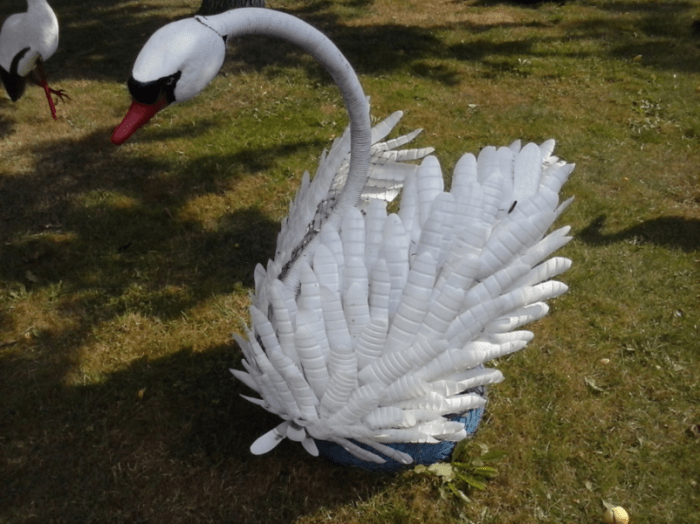
Plumage
The size of feathers varies not only among different birds, but also on the same figure:
- The back, sides and breast are usually decorated with medium-sized feathers.
- Smaller elements are cut out for the neck.
- The wings and tail are most often formed from long feathers.
Comment! Feather bottles are supported in the same color, so that after dyeing you get a uniform shade over the entire figure.
They begin to form the plumage from the thighs, fixing each subsequent row in such a way that the attachment point of the previous one is not visible. The work is carried out using wire, threading it into holes prepared with an awl, or with self-tapping screws.
After the legs, they move on to the rest of the body, leaving the back free, where the bird’s wings will be attached. In order for a rooster made from plastic bottles to stand firmly on its feet, it needs to have its paws made. The frame is made of rigid wire, which is subsequently fixed to a plastic pipe. Then the base is processed with a corrugated tube or twine.

The most difficult stage for many may be the formation of the wings and tail of a bird using plastic bottles. For these purposes, reinforcing mesh is usually used. The size of the base for the wings and tail is selected depending on the species characteristics of the selected bird. For example, peacock tail feathers can be mounted on an oval piece of linoleum. But the grid is a more common option. The elements are fixed with an overlap, each row covers the fastening of the previous parts.
The moment of complete assembly of all elements from plastic bottles can be carried out before or after applying paint. At the finish line they are painting. A bird with the same plumage throughout the body can be decorated after complete assembly. It is more convenient to paint the elements of the frame, tail and head separately, and then connect them using screws and wire.
Review of interesting ideas
The versatility of plastic bottles allows you to make crafts of varying degrees of complexity. The same bird can be presented in different variations, and its production is not always a labor-intensive process.
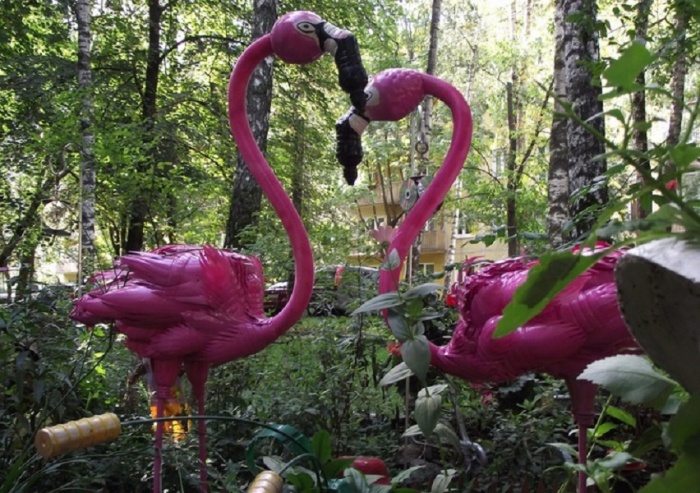
Bright pink handsome flamingos will help add exoticism to the area. Guided by the algorithm proposed above, you can make a bird in short terms thanks to the large plumage. A variety of options are shown in the photo:

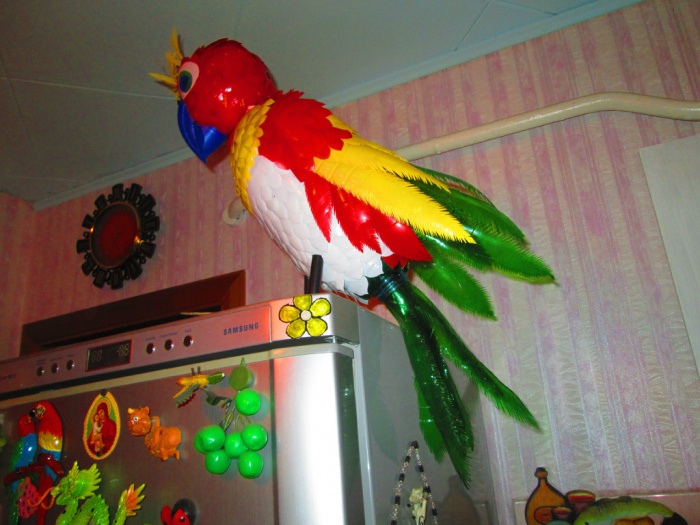
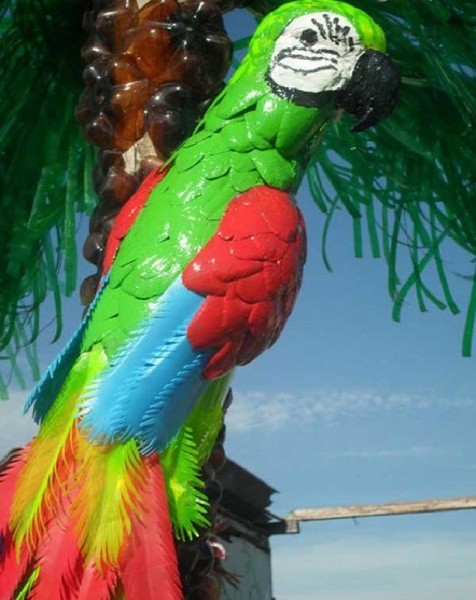
Another pretty bird of hot countries is the parrot. A lot here determines the originality of the coloring. The body made of plastic bottles can be trimmed with feathers or simply covered with paint. The complexity of feathers and tail is chosen at the discretion of the artist. Design methods are shown in the photo:

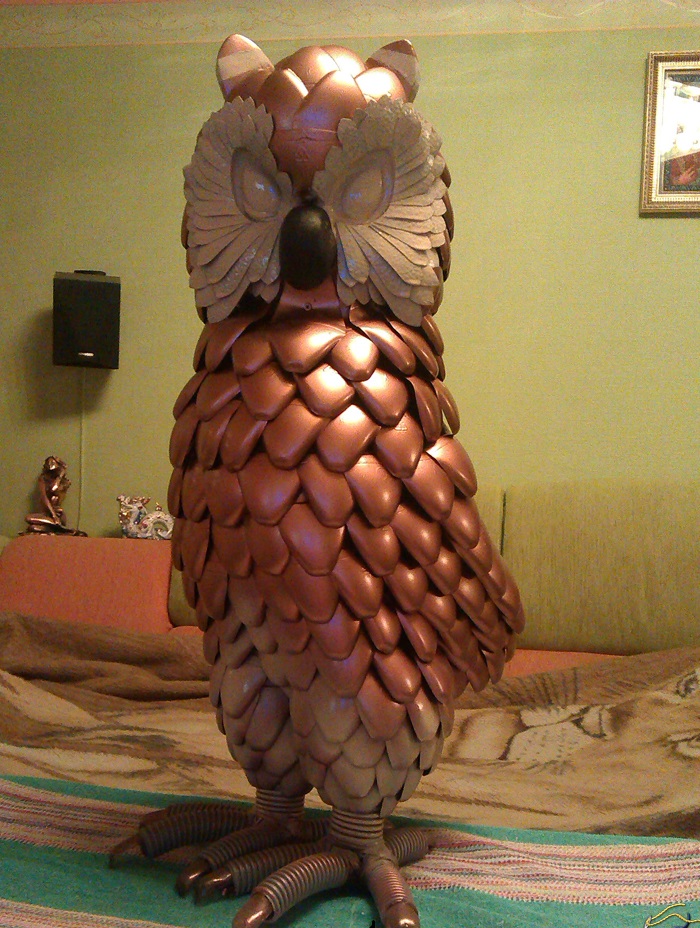
The owl or eagle owl, familiar to our regions, is another worthy garden decoration. An impressive beauty made from plastic bottles can take a lot of time.
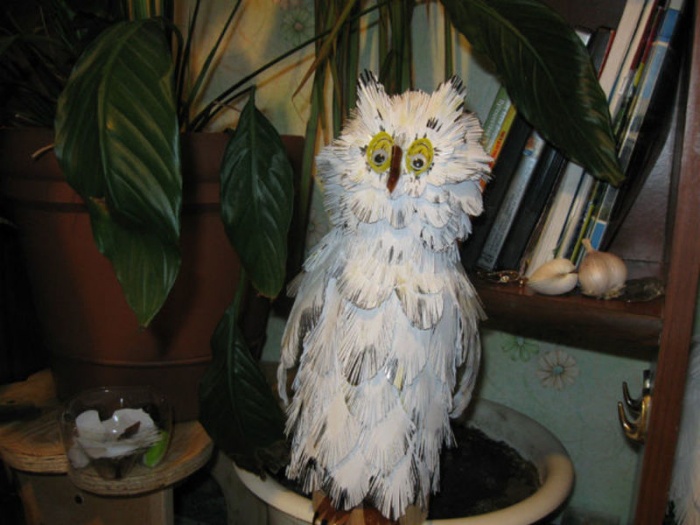
For busy people, there is a simplified version of the night bird.

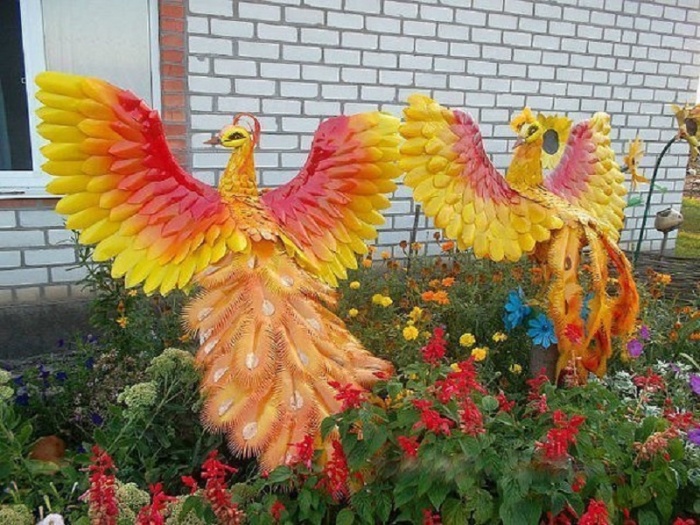
A peacock will help you get closer to the scenery of the royal court. The gorgeous tail of the bird will not leave anyone indifferent. It is up to the owner of the site to decide whether to make the peacock bright or white, to leave the tail folded or straightened. Or maybe you liked this firebird?
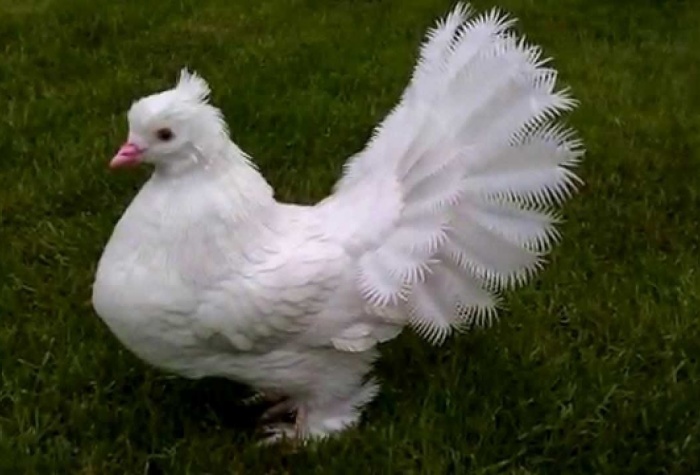
A chic dove will require perseverance and patience, for the production of which white plastic bottles will be useful. It is better to prepare the plumage on long winter evenings, when all work in the garden is suspended, so that by spring the area will be transformed with a new resident.

Which model of bird to choose is up to the craftsman to decide. The process of making any craft can be made easier by replacing jewelry-style parts with simpler elements made from plastic bottles.
As you know, plastic bottles come in different sizes, shapes and colors. This allows you to create a wide variety of crafts from them: both the simplest, such as vases, targets, blades, and quite voluminous and complex - figurines of animals, birds, even furniture and entire houses. So we came up with the idea to teach you how to create a fairy-tale character - the Firebird craft, a master class will be given in this article.
We must admit that this task is not an easy one. After all, the firebird is fairy tale character, he's fictional. You won't find anything like this in nature. She was only seen in pictures in children's books. This is how she is in our imagination.
Firebird made from plastic bottles: master class
But we are not used to retreating from our intended goal. In nature there is a bird very similar to this fairy-tale character. This is a peacock. We will take this as a basis. So, the lesson begins: how to make a firebird from plastic bottles.
As an example, we decided to take the process of making a white peacock. Let this serve as a framework or blueprint that will help you implement your idea. After all, the white peacock differs from the firebird only in color. All you have to do is color your bird of happiness so that it finally looks like a character from our childhood.
Take thick foam and cut out the base of the bird's body from it.

Cut off the neck and bottom from the painted bottle.

Cut the resulting cylinder into two parts.

We divide each part into two more equal ones. As a result, we get four parts of the same size. They need to be slightly rounded on the top side.


Let's start working on the tail. The basis for it is a sheet of linoleum. Sheet size: 1.2x1.4 m.

Now we begin to fill the space of the tail with feathers, row by row. To ensure that the feathers stick well to the linoleum, we make punctures with an awl and attach the feathers through these holes using wire.

Look how great the tail turned out.

The tail is attached to our foam base using nails, which are masked with white paint.

We are working on the wings. Cut a small cylinder from the bottle and cut it into two equal parts. Then these parts are cut into teeth and attached to the base with nails.

The process of working on the plumage continues until the entire base is covered with feathers.

Now we are working on the feathers of the crest. Cut out a piece from plastic that is shaped like a spoon.

Cut the upper round part into cloves and bend the leg in the middle.

Paint the ornament.

For the future beak, cut a triangle of the required size from the neck of the bottle.

Paint it with white paint and fold it in half.

Attach the beak to the head first from the bottom, then from the top.

Now we glue the prepared crest feathers to the head and draw beautiful eyes.

To make the paws we will need two bottles. We attach them to the peacock.

The final chord is to choose the best place in the garden for the bird. For stability, insert two tubes into the bottle legs and dig into the ground. 
Since this is still a white peacock and not a firebird, all you have to do is color it. As you remember, we have already covered the peacock with paint, it will serve as a base for us. Therefore, you can use spray paint on top. Or any other, to your taste. Here is an example of a coloring page firebirds one of the craftsmen.

Below is another idea - a DIY firebird pattern made from plastic bottles. This version of the bird of happiness was made by a needlewoman mother with her children.


Watch the video with detailed lessons below.
Auxiliary video-MK:
Elena Anikina
Children love to sculpt. This can be done from different materials: self-hardening mass, polymer clay, cold porcelain, clay or salt dough. But the simplest and most accessible material is plasticine. It is very convenient to practice on plasticine before starting to work with expensive materials. One of the advantages of plasticine is large number colors and brightness of color, as well as plasticity, suitable for children's hands. I suggest you get acquainted with the original technology using plasticine « Multilayer modeling» .
IN multi-layering there are two main principle: Contrast of structure and contrast of color. It is the latter property that can be successfully conveyed using plasticine, since it has bright color and a large number of colors, thanks to this the work turns out very bright and decorative.
Materials and tools:
Wax plasticine, it is softer;
Board for sculpting;
Stages of work completion:
Roll out a fairly long and thin sausage, form the middle pen:


Choose 3-4 pieces of plasticine in a contrasting color. Roll each into a ball and flatten one after the other to obtain multi-colored cakes. Place the tortillas on each other friend: it turns out a multi-colored “cake”:

Fold the “cake” in half. It turns out to be a “dumpling”:

Using a fishing line, cut the “Dumpling” in half


We get two different colors halves:


Cut colorful petals with fishing line and form feather around him middle:


Publications on the topic:
“Following the Firebirds’ Feather” is the name of a series of classes in artistic and aesthetic areas for older children. We are these.
You and I are adults, we remember our favorite fairy tales that our parents read to us. Everyone loves fairy tales without exception! Children have fun.
As part of the final stage of the individual mini-project "Peas" for a seven-year-old child, an applique was planned and completed.
Master class in trimming techniques on the topic “Wintering Birds” I really like to use unconventional techniques in my work, so this week.
For the holiday of March 8, our girls had to perform a dance magical birds. The question arose of how to prepare costumes for magical birds. Buy.
Master class on the application “Wintering Birds” using the “Paper Mosaic” technique. Author: Zhulanova Olesya Viktorovna - teacher of additional education.