How to knit a double bayonet knot. Twenty-four sea knots. See what a “Simple bayonet” is in other dictionaries
A simple half-bayonet, being the simplest of non-tightening knots, finds wide application V maritime affairs. It serves as the final element of many nodes. Wrap the running end of the cable around the object to which you want to tie the cable, then around the root end of the cable and pass it into the resulting loop. After this, attach the running end of the cable with a grip to the root end. A knot tied in this way reliably withstands strong traction. He may move towards the object, but he will never be drawn in. A simple half-bayonet is used to connect two cables with “other people’s” and “our” ends.Two identical half-bayonets make up a knot, which sailors call a simple bayonet. To distinguish a correctly tied bayonet (a.) from an incorrectly tied (b.) bayonet, two loops need to be brought closer together. If this results in a bleached knot, then it means that the simple bayonet was tied correctly. For such a bayonet, its running end, both after the first and after the second pegs, should extend equally above or below its end. Inverted, i.e. an incorrectly tied simple bayonet, the running end after the second bayonet goes in the opposite direction, not the same as after the first. When two loops of an inverted knotted bayonet are brought together, a cow knot is obtained instead of a bleached one. The main use of a simple bayonet in the navy is to secure mooring ends to mooring fixtures, to secure the guys of cargo booms to the butts and eyes, and to secure the cargo pendant to the load being lifted. The maximum number of half-bayonets in such a knot should not exceed three, since this is quite sufficient and the strength of the knot as a whole will not increase with a larger number of half-bayonets. Old English proverbs eloquently speak about the reliability of this mooring unit: “two half-bayonets saved the queen’s ship” and “three half-bayonets are more than enough for the royal yacht.”
For many centuries, the bed for sailors on ships was a canvas hanging bunk in the form of a hammock with a thin mattress made of crushed cork. In plan, it has the shape of a rectangle, the small sides of which have eight by eight eyelets for the so-called pendant ropes. These pendants are connected in rings, which in turn are suspended by the berth pins to special eyes in the beams or by the berth pins to special eyes in the beams or to rods made in the ship's cockpit for hanging the berths at night. During the day, the bunks, rolled up together with a pillow, blanket and sheet, were stored in so-called bunk nets along the side on the deck and served as a reliable parapet from cannonballs and shrapnel during the battle. In the evening, before lights out, at the command “beds down,” they were carried below deck and hung up. Tying a knot to hang a bunk is serious business. Here you need to use a knot that does not tighten, is easy to untie and holds securely. The most important thing is that it does not come undone on its own under the influence of the ship’s continuous rocking. Sailors used various knots to hang their bunks, but the bunk bayonet was considered the most reliable.
This knot differs from a simple bayonet by one additional hose around the object to which the cable is attached. It also serves mainly for fastening cables and railings when mooring using bollards, bits and bollards, but is used, unlike a simple bayonet, in cases where there is no need to quickly release the mooring lines. This knot is also convenient for attaching a cable to a hook, fire, eye, etc. Two hoses around the object make this knot more reliable during long stays; in any case, due to the additional hose, it will not fray as quickly as a simple bayonet.
In fact, this is also a type of simple bayonet. The difference from a simple bayonet with a hose is the additional third hose. It increases the strength of the knot if the cable experiences constant friction against the bollard or biting. Using this unit to attach the cable to the hook is a very reliable method.
If for a simple bayonet with two hoses the latter pass on the side of the attachment point of the root end, then with this unit they are placed one on each side. This gives the knot greater symmetry; when the direction of pull changes, the knot moves less along the object to which it is tied. To tie a bayonet with a bow, you first need to make one hose around the object with the running end, encircle it behind the root end and make a hose again, but in the other direction. This is followed by one or two half-bayonets.
One of the most important cases of using a knot in maritime affairs is tying an anchor rope to an anchor. Over the five thousand years of shipping, people could not have come up with a more reliable knot for this purpose than this one. Tested by centuries of experience in maritime practice, this knot is recognized by sailors of all countries as the most reliable for attaching a rope to the eye or to the anchor shackle. Fisherman's bayonet(or anchor knot) is to some extent similar to a simple bayonet with a hose. It differs from it in that the first of the two half-bayonets additionally passes inside the hose that clasps the object. When using this knot for an anchor, it is always necessary to grab the running end with a grip to the main one. In this case, even with very strong traction, the fishing bayonet does not tighten and holds securely. It can be safely used in all cases when working with cables when they are subject to strong traction.
Here the original combination of two good knots produces a reliable and simple knot. First, a bleached knot is tied around the object to which the cable is attached, and an ordinary bayonet is made at the root end of the cable, which, as is known, is also a modified bleached knot. To prevent the mast bayonet from becoming too tight, the first knot is not fully tightened.
When mooring ships to piers and moorings, a situation often arises when it is very difficult to enclose the running end of the cable around a pole or log. Sometimes you have to literally crawl under the pier in order to thread the end through a log or eye from the bow of a boat or boat. Using a reverse bayonet, you can wrap the cable around the required item once and at the same time tie a knot with two hoes around the object to which you attach the mooring line. To do this, the running end of the cable needs to be folded in half over a length of 2-3 meters and, looping it forward around the object, pull the loop towards you. Now the running end of the cable needs to be threaded into this loop, and the slack should be taken out at the root end and the knot should be finished with two half-pins. The reverse bayonet is convenient for use in cases where access to the object to which you want to attach the cable is difficult or inconvenient for tying a knot, for example, to a tow hook and some brands of cars.
Holding the synthetic mooring line on a pair of bollards is a simple matter. But what if, instead of a double bollard, you have a single bollard (or biting) at your disposal, and there is no light at the end of the mooring line? For this purpose, in maritime practice there are several original nodes in the network. Let us explain the principle of one of them, which can be classified as non-tightening knots. First, you need to make several hoses around the single bollard with the running end of the mooring cable. After this, fold the running end in half and in this form, in a loop, pass it under the tensioned root part of the cable, turn the loop 360 degrees and throw it on top of the bollard. This knot does not slip and holds securely. The cable can be released at any moment, even if the mooring line is under strong tension. To do this, you need to slightly select the running end passing under the root end and enlarge the loop, after which it will not be difficult to throw it off the bollard.
This unit is used to secure the cable to the towing hook or biting. They can delay or release the towing end. Thanks to the sequential application of several cable hoses on the bit, the towing end can be pulled from the bit, and when the tension of the tow is weakened, it can be selected again in the form of loops thrown over the top of the bit.
How to tie a bayonet knot: simple, double, sliding
Knots are an integral part of maritime, fishing and tourism, with their centuries-old history. It is important to know how to make a reliable tie so that it does not come undone at the wrong moment. To tie a strong knot, it is important to first become familiar with the main principles and knitting techniques. Today we will look at “bayonets” and their application.
Brief information:
According to their purpose, bayonet ties are non-tightening, and are most often used by fishermen, sailors, and climbers.
Despite the elementary design, such fastenings are quite strong, can withstand heavy loads, and are easy to untie.
Let's look at the most popular variations:
- Simple bayonet;
- Simple half bayonet;
- With hose;
- Double and triple;
- With run-out;
- Fishing or anchor;
- Wet half bayonet;
- Sliding.
Simple half bayonet
It is the basis of this “family”, but can also be used independently. The simple half-bayonet began its history in Europe about 100 years ago. This knot is the simplest of the non-tightening ones, and therefore easy to untie (when you need it, of course). Often it serves as the final element of many knots in maritime affairs, that is, to insure the main knot.
How to knit a simple half bayonet correctly
 Figure 2. Knitting pattern for a simple half-bayonet knot
 This type can also be used to connect two ropes.
Simple bayonet
A reliable option that is easy to remember and easy to knit, making it one of the most popular in fishing. It is often used by climbers when constructing overhead crossings, since it is simply tied and untied when the rope is under load. Also used for attaching a cable to a support, securing a safety net, when towing cars, loading works on ships.
A simple bayonet is formed by tying two half-bayonets. It is important to perform the second one correctly, otherwise the ligament will tighten.
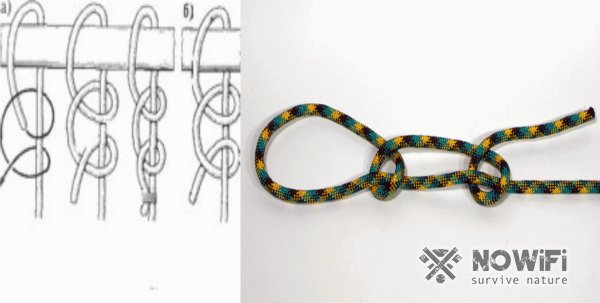 Figure 3. Diagram of the “simple bayonet” assembly
 Figure 3 a) shows correct location loops that form a bleached knot when brought together.
Figure 3 b) - when the loops were brought together, a cow knot was obtained, which tightens the loop, which is an incorrect execution of a simple bayonet.
To increase strength, you can add another half bayonet. There is no point in knitting more. This will not improve reliability, but will increase the binding and untying time.
To be secure, be sure to secure the knotted ends together with twine.
Performance
- Place a loop around the fulcrum.
- We pass the rope through the formed loop. It doesn't matter whether you pass the free end under or over the rope. All subsequent ones must be tied in the same way as the first.
- Make a loop around the rope.
- We pass the free end through the formed loop, similar to the first time.
- We secure it with a control knot or twine.
Bayonet with hose
This option is different from simple themes that an additional (double) turn is made around the support, which increases the reliability of the ligament and avoids chafing. Most often used when attaching mooring lines, but only if the ship sits for a long time.
 Figure 4. Knitting pattern for the “bayonet with hose” knot (1); photo of the “bayonet with hose” or double knot (2); photo of a triple knot (3)
 A bayonet with a hose can also be called a double one, respectively, a triple one is a knot with two hoses (Figure 4). It is clear that to knit a triple one, you need to make an additional double turn of the rope around the support circle, as shown in the picture.
Bayonet with drift
Such a bundle is several times stronger than a bayonet with two hooks. The advantage is that the cable does not slip at the point of fastening, thanks to the loops that wrap around the support on both sides of the root end (Figure 5). Also, thanks to this, there is an advantage when there is a sharp change in tension and direction of thrust.
 Figure 5. Scheme for knitting the “bayonet with runaway” knot
 How to properly tie a bayonet knot with a carryover
- We turn the rope around the support from back to front.
- Then we throw the tail over the main, again making a revolution around the support, but from front to back.
- We knit two half-bayonets and secure the ends with twine.
Fisherman's bayonet
This option is also called anchor; accordingly, it is used to attach the rope to the anchor bracket.
It is similar to a bayonet with a slag, but there is a slight difference. It lies in the fact that the first half-bayonet must pass inside the hose covering the object (Figure 6).
 Figure 6. Knitting pattern for the “fishing bayonet” knot
 How to knit a fishing bayonet correctly
- Thread the chassis into the anchor ring from behind;
- Pass it through the ring again in the same direction;
- Pass the chassis behind the main one, pull it through the formed loops;
- Pass the chassis first “behind” and then “in front” of the main one, then direct it into the loop - a half-bayonet is formed;
- Tighten the knot, pull the two rope ends together, and secure them with twine.
Wet half bayonet
It often happens that untying a wet rope becomes an impossible task, so you have to literally cut them down. To avoid this, sailors came up with a wet half-bayonet (Figure 7). The advantage of this option is that it can withstand strong traction and jerking, but at the same time it can easily come undone even when wet.
 Figure 7. Diagram of the “wet half-bayonet” knot
 How to knit
- Make a half bayonet with the running end around the support circle.
- Place the chassis on the other side of the support and make another half-bayonet in the direction opposite to the first.
- Using the chassis, form a small “eye” and, circling it from below around the root, place it between the ropes of the first and second hose.
- Tighten the knot.
Retractable bayonet
The retractable is used to attach a cable to a rod or other rope to reduce pressure (Figure 8). When using a retractable, the rope must be parallel to the rope being attached.
A simple bayonet is a loop made from two or three half-bayonets. Thanks to its special properties, the bayonet knot can be tied and untied, even if the rope is under load. After heavy loads, it also comes undone easily.
A typical bayonet of three half-bayonets.
They prefer to knit it mainly for attaching a rope to a support, although other options are possible.
A simple bayonet is a very reliable unit. It is easy to remember and knits quickly. It is these qualities that have made it one of the most used fishing knots in maritime affairs.
Extreme sports enthusiasts have also paid attention to it: this knot is often used as a tourist knot and in mountaineering - to fasten a rope to a support when tensioning a suspended crossing, since the rope has to be undone at the moment when it is very tense. Many other knots are not suitable for this, since they can only be untied when the rope is loosened.
The video below shows how easy and quick this knot is to knit:
How to knit a simple bayonet
Let's consider a situation where it is necessary to tie a simple bayonet on a vertical support.
This tying method will look like this:
- The running end of the rope is wound behind the support from left to right.
- The running end is thrown over the main end and inserted from below into the resulting loop - a so-called half-bayonet is obtained.
- The running end is moved to the right, its middle is taken in the right hand, and the end is again drawn to the left, thrown over the root and pushed from below into a new loop, forming a second half-bayonet, and at the same time forming a straight “simple bayonet” knot.
- For reliability, you can form a third half-bayonet, but usually two half-bayonets are enough.
- The running end is tied to the main control node. Now we can safely say that the rope is correctly and securely attached to the support.
Instead of a control knot, sometimes the running end of the rope is tied to the root end with a rope of smaller diameter. In this case, the half-bayonets that form a simple bayonet are not tightened at all - and the fasteners come undone without any problems even after heavy loads. An example of such fasteners is shown in the photo below:

Sailors often use this when they attach a cable to a support, but I have not seen such an option in tourism: usually tying a knot ends with the formation of a control knot with the running end of the rope.
Sometimes, when the supply of rope is large and therefore it is inconvenient to knit the bayonet with the entire bay, this knot is knitted with a double end. That is, the free end of the rope is folded in half in a convenient place and a simple bayonet is knitted as if instead of a double end there was a single one.
Basic mistakes
When knitting this knot, mistakes may be made. Let's look at the main ones.
Mistake #1. When knitting two half-bayonets at the root end of the rope, you get a cow knot instead of a bleached one (another name is “stirrup”).
This is a mistake: with a significant tension in the rope, the knot may become too tight, which means additional difficulties will arise when untying it.
Mistake #2. When knitting, instead of the maximum recommended three half pieces, four or more are knitted. The photo shows this error:

This is a mistake, since knitting more than three half-pins does not increase the reliability of the fastener, but only increases the time for tying and untying it.
Mistake #3. A control knot is not tied at the end of a simple bayonet, and the running end of the rope is not fixed to the main one in the previously recommended way.
This is a mistake, because without “control” or fixing the running end of the rope, the fastener can still come undone under variable loads.
Other bayonet options
In addition to a simple bayonet, there are other varieties of it that have certain differences and properties that allow them to be used in specific situations with maximum efficiency.
These include, for example:
- double and triple bayonet knot;
- fishing;
- bayonet with rim;
- wet half bayonet;
- back;
- bed;
- mast.
Let's look briefly at each of these options.
Double and triple bayonets
Also called a bayonet with a slag and a bayonet with two slags, respectively.
They differ from simple fastenings in that instead of one turn of the rope around the support, two or three are made. The photo below shows a bayonet with two hooks:

And here - with three:

Thanks to the additional turns, these two options are more reliable, since the impact on the half-bayonets in the knot will be minimal due to the friction force of the rope at the points of contact with the support, and in this case the rope frays more slowly.
Fisherman's bayonet
Also known as the “anchor knot”, because it has long been used to attach an anchor. He is double bayonet, in which the first half-bayonet is knitted by threading the running end into two loops draped over a support.
The fisherman's knot has the same advantages over a simple knot as the previous version. However, if, instead of the control knot, the running end of the rope is tied to the main one with a thinner rope, it has an additional advantage - it does not tighten at all, even under very heavy loads.
Bayonet with drift
Its knitting pattern is as follows: at the beginning, the running end is turned around the support, then it is thrown over the root and again circled around the support, but in the opposite direction, after which half bayonets are knitted, as in the case of a simple knot.
The advantages of this knot over a simple one are the same as those of a bayonet with a hose, with the only difference being that a bayonet with a hose slides a little less when the load changes direction, including due to the fact that the loops of the rope wrap around the support on both sides of the root end to which the load is applied.
Wet half bayonet
This option is an untied bayonet with a carryover, where instead of two half-bayonets, one is tied, with a double running end. Instead of a control knot in this case, you can insert the running end of the rope into the loop emerging from the half-bayonet, formed by the double end.

The beauty of this knot is how easy it is to untie.
This fastener, in comparison with a simple and a bayonet with a bayonet, can be easily and quickly untied even with a very high rope tension. To do this, simply remove the running end from the loop and pull it.
Reverse bayonet
This is nothing more than an “inverted” bayonet with a run-out.
The reverse bayonet is used mainly in maritime affairs, when difficulties arise when carrying the main end of the cable around the support to which it must be attached. Due to the peculiarities of knitting this knot, the support needs to be walked around only once, while when knitting a bayonet with a run-out, it would have to be walked around the support twice.
It has the same advantages over a simple knot as a bayonet with a carryover, but compared to the second, as was said earlier, with certain conditions the reverse option is more convenient for knitting.
Bed bayonet
This option was preferred to be tied for hanging bunks on ships, which is how it got its name.

The difference in knitting this knot from the simple version comes down to the fact that instead of the initial simple knot, a figure eight is knitted around the support.
Perhaps this option has some advantages over a simple bayonet, since it was very popular among sailors for a long time, but personally, when using this fastener in practice, I did not find any. The only drawbacks I found were primarily related to the more complex and lengthy knitting of the bed bayonet.
Mast bayonet
The mast bayonet consists of two “stirrup” knots: one is tied on the support, the second - on the root end of the rope. Actually, as was noted earlier, the stirrup at the root end of the rope is knitted with two half-bayonets, both in a simple bayonet and in some of its other variants.
The advantage of a mast bayonet over a simple one again lies in the additional lags (turns) of the rope around the support, due to which the rope frays more slowly. In addition, thanks to the stirrup thrown over the support, the impact on the half-bayonets tied at the root end of the rope will be less than in other knot options discussed earlier.
If you tie a control knot at the end, the mast bayonet will tighten and tightly clamp the support, preventing the rope from sliding in any direction. But in this case, it will be more difficult to untie the knot.
If, after forming the mast bayonet, the running end of the rope is tied to the main one, then the knot will not tighten even with very large loads on the rope, and after loosening the rope it can be easily untied.

A mast bayonet is a combination of a double bayonet and a stirrup.
There are other units, the name of which contains the word “bayonet”, but which in themselves are not “relatives” of a simple bayonet. Such units include, for example, a sliding bayonet and a flat bayonet. We will not consider them within the framework of today’s topic.
As you can see, there are many known bayonets, each of which has its own advantages and disadvantages. However, there is no point in memorizing all the options: for a tourist or a person interested in survival in the wild, it will be enough to remember two or three nodes from this category.
Personally, I would recommend only one option for memorization - a bayonet with a carryover. On the basis of this knot, if necessary, it is easy to tie a simple bayonet, and the fastening pattern on the support itself is the basis for the UIAA knot and the Prusik knot, which are used for descending and ascending a rope. If you know and are able to knit a bayonet with a bow, it will be easier to remember these knots.
Today, only the stands of maritime museums and the pages of ancient manuals can introduce you to the heights of rigging skills that are becoming a thing of the past. Technical progress in the Navy he minimized the need for all kinds of handicrafts on the rope. And it is no coincidence that rigging rooms in maritime universities and schools are closed, training programs for sailors in rigging are periodically reduced.
And yet the maritime knot is still alive: zealous guardians of the ancient craft can be found in many of our yacht clubs. These people, and most often they are excellent sailors, are capable of tying knots with a speed that is imperceptible to the eye, quickly and beautifully making braids, ogons, buttons, musings, braids...
Fulfilling the wishes of readers of “Boats and Yachts” who are just getting started with water sports and maritime affairs, on the tab of this issue we present pictures of the 24 most commonly used maritime knots. We hope that this publication will help you join the mystery of knitting beautiful, and most importantly, reliable knots that will not let you down in a critical situation. It is in the reliability and ease of untying—“recoil”—that the main advantage of the sea knot lies. But you should remember that each knot is good only in its “own place”: therefore, you need to not only learn how to knit the main knots, but also figure out when and where they should be used!
We mentioned yacht clubs. However, knowledge of maritime knots is necessary not only for yachtsmen. Sailing on any boat begins with a knot at the mooring end. Any boater has to tie a safety rope to the motor, anchor, accept the towing line, sling a heavy engine to remove it for repairs, etc. and so on.
When tying knots, they act as the so-called running ends of the cables. Those ends around which the running ends are wrapped are called root ends.
We turn to the consideration of the nodes shown on the tab between pages 48 and 49.
1, 2. STRAIGHT AND REEF KNOTS.
The two upper (running) ends should come out from the same side as the two lower ones, i.e. the knot should be symmetrical. If symmetry is not maintained, it will no longer be a straight knot, but a “woman’s” knot.
A straight knot is used in cases where you need to quickly tie two ends or secure a cable to an object. A tight straight knot is sometimes easier to cut than to untie.  hspace="5">In order for the knot to be easily distributed, it is made with a loop at one of the running ends. In this case, the result is no longer a straight one, but a reef knot. By pulling the end of the loop, it is easy to untie it. The loop is the only external difference between a reef knot and a straight one. It is easy to guess that this node began its
life from knitting reef lines on sails. It is not recommended to use a reef knot on springy and slippery synthetic cables - it may fail. For the same reason, they should not be used to tie ends of sharply different diameters.

The running end of this unit is wrapped twice around the main one, then the operation is repeated, but in the opposite direction. This knot is tightened less than a single knot. It is used when tying thin lines, vein-type threads, and yuzin from synthetic materials of small diameter (yuzin - special kind line for lining boat rigging). This node also has a second name - surgical.

Suitable for tying ends of different diameters. This unit is safe, reliable, and does not tighten under load. With its help you can, for example, extend the anchor end.
When starting to knit a flat knot, fold one end into a loop. A flat knot is distinguished by symmetry: it is tied correctly if the ends being tied are intertwined with one another in a strict sequence - they go “one after another.”
 .
.
Having placed the running end on the main one and forming a small loop, insert the running end into it from the other side - its closest part from the point of crossing: a loop is obtained in a loop. If you pull the ends of a knot that is not pulled, the loops will fall apart. If you insert something into the second loop, for example a pile, it will jam when the ends are pulled together.
The knot is widely used both in rigging and in maritime practice. It can be tightened if required on a duck or other item. You can “jam” the second loop without inserting a pile into it. To do this, holding the second loop, tighten the first one.
 6. SIMPLE BAYONET.
Most often used for mooring. The running end of the cable is pulled into the eyelet, carried around the pole, placed on the root end and brought up through the loop. Two correctly executed bayonets (and it is best to place the running end on the main one from above and always in the same direction) form a bleached knot around the main one (see 10). The knot gives easily, especially if the eye or object on which the mooring line is attached has a size larger than the diameter of the cable.
7. BAYONET WITH TWO SLUGS.
To prevent wear of the cable under high voltage, it is advisable, instead of a simple bayonet, to use a bayonet with two hoses, which are wound around the eye or stick. The knot does not tighten. It is not difficult to give it away, even when the cable is tightly packed.
8. BAYONET WITH BACK.
Having learned how to knit a bayonet with two hooks, it is easy to master a bayonet with a bow. This knot resembles a towing knot (see 24) and is also good for mooring.
9. FISHING BAYONET.
This is a kind of variant of a bayonet with two shlags. Used when mooring, but most often used to tie the end into the anchor shackle. Holds up excellent. It gives away easily if it is specifically pulled in with force in advance.
Two hoses are tied around the anchor shackle with some slack and their size is knocked out. Then the running end is passed under the hoses. The knot is completed with one or more bayonets and a safety bezel (they tie the running end to the main thin cable).

If it is necessary to securely fasten the cable to any object or to another cable (shrouds, stand, pole), use a tapping knot. The first hose of the running end is carried around the object or thrown over it so that the end passes over the main one. The second hose is launched nearby, but in the opposite direction. The knot is reliable if the thrust is distributed evenly to both ends. In order for it to work effectively with one-sided traction, the running end is secured with a bezel to the main one.

When it is necessary to distribute the load between the two ends of the cable or completely transfer it from one end to the other, they resort to a sliding bayonet. The knot begins to be tied with a hose around the working cable. A second hose is formed behind the first hose, covering the root end of the first hose. The third hose is made, slightly retreating from the first two, then the running end is passed around the rope being tied in the direction opposite to the position of the root end. This is done so that the third hose is well clamped when tightening the knot. The working part of the unit is the first two hoses. The likelihood of slipping is reduced if the hoses are made along the lay of the cable. The load on the auxiliary gear must coincide in direction with the direction of pull of the cable (sheet, halyard, mooring line). The disadvantage of a retractable bayonet is that it tightens under load.
A retractable bayonet is knitted on the spar, running the second hose not on top of the first, but parallel to it. The third hose is made in the same way as on a cable.

Taking a closer look at this knot, it is easy to notice that it is very similar to a bleached one. Its pattern is the same, but the hoses on one side are separated by an anchor spindle. Most often, a buoy rope knot is used to attach an end to an anchor - a buoy rope, the upper end of which is tied into a buoy - a float showing the place where the anchor lies at the bottom.

The cable is folded in half. The part of the double end at the point of inflection - the “back” - becomes the running one. The root ends running parallel and side by side are crossed, resulting in a small double loop. The “back” of the cable running gear is passed into it, pulled through and lowered down next to the large loop. The loop formed by the cable running gear must be of such a size that it can easily accommodate a large double loop. When this double loop is passed through the loop formed by the running end, the latter is raised to the point where the knot begins to form and is brought out over the small double loop. The knot is completed by tightening.
A double gazebo unit can replace a “gazebo,” i.e., a “boatswain’s board.” It is convenient because a large double loop is possible. form on any section of the cable, for example, in its middle, and let the ends through different blocks. When there is a load on any part of the double loop, the knot does not tighten.

Useful for tying together two cables of different diameters. It is reliable when pulled at one end, which distinguishes it favorably from other units used for the same purpose. In some cases, a direct knot is preferable.
The end of one of the connected cables is folded in half, the end of the other cable is inserted into the resulting loop, it is carried around the first double cable and directed under its own part that was just passed into the loop. They do the same thing when tying any end into a string or fire.
 15. WINDOWLET KNOT.
Preferable and more reliable than clew. Especially if you have to deal with slippery springy ends made of synthetic fibers. What distinguishes it from a clew is that the end of one of the cables is wrapped twice around the doubled end of the other cable.
16. SEAT UNIT. The loop of this knot does not tighten under load. One of several ways to tie a knot is to tie the running end into a small loop formed at the root end by simply bending it. When the running end is brought into the small loop, it is carried around the main one and again directed into the small loop. The size of the non-tightening large loop is determined according to the purpose of the knot.

One of the most popular units used for fastening objects raised to a height or towed (boards, logs, etc.). The noose is often used to fasten the ends of sails when it is necessary to secure sails folded on a spar.
When tying a knot, they wrap the running end around the object, wrap it around the root end and wrap it around itself several times. On a three-strand cable, this is done in the direction of the cable lay. For braided lines, the direction of twist does not matter.
To prevent a long object from “walking” when lifting or towing, closer to its end, at some distance from the noose, a hose is formed on the side of the direction of pull. Such a knot is called a noose with a hose.

The top knot, or more precisely, the triple top knot, is most often used for attaching standing rigging to the top of a temporary (emergency) mast.
Three loops are laid sequentially on the deck, one on top of the other. Then the loops are shifted so that the left part of the first (bottom) loop lies on top of the right part of the top one and both of them are in the center of the bottom loop. The parts of the side loops stretched to the sides and aligned seem to form two petals on the sides of the knot. All that remains is to raise and align the top one to the size of the side loops. The node is ready. The top of the mast will pass through its center. After tightening the knot, the stay and shrouds are tied into three loops with clew knots. For the backstay there is a long running end, which is connected to a short arbor. If the running ends are short, they are tied and a backstay is tied into the fourth loop formed. If a temporary mast is installed directly on the deck, then its spurs, like the top, can be strengthened - stretched - using a triple top knot.
 19. "EIGHT".
It is used as a tackle stopper in a bale or block. When forming a knot, the running end is placed on the main end, passed under it and, again brought up, directed into the loop that was obtained at the beginning of the work. Under load, the knot tightens.
 20. DOUBLE "EIGHT".
The volume is larger than single. It is obtained by running the running end a second time around the main end before directing it into the loop and tightening it.

Used for temporary unloading of any gear, transferring it to another fastening device or winch. The locking unit differs from the sliding bayonet, which is used for the same purpose, in that it does not tighten under load, but is less reliable.
When tying this knot, they try to run the running end parallel to the end under load and as close as possible to the direction of pull. The locking cable is carried around the working cable, they make several turns around the latter in the direction of the lay and the running end of the locking cable is grabbed to the working cable with a heel or held by hand. After this, the load can be carefully transferred to the locking cable and the running end of the working cable can be released.
 22. “CAT’S FEET.”
This knot is ideal for attaching a sling to a hook. Doesn't drag on; holds excellently if the load falls evenly on both parts.
The upper part of the sling is bent and lowered onto the root ends running parallel to the lower part. Each of the two loops formed is synchronously twisted outward one or more times around its own ends. The node is ready. All that remains is to put the loops of the sling on the hook.

It is similar in appearance to a bayonet with a bow, but differs from it in that the running end is passed through a loop under the main end on the boat canopy. It is released if the end of the loop is pulled.
The unit is convenient for attaching the towing end on boats that do not have cleats. The end is always at hand for the rower, which eliminates the need for unnecessary movement around the boat, which can lead to capsizing. If there is no eye or butt on the stem into which a painter or tug is passed, the boat knot should be tied on the can closest to the bow.

Having laid the cable on the hook, the running end is put over the main end and again directed to the hook. The operation is repeated several times if they want to ensure that the cable does not slip under load. Extra run-ins are very useful when dealing with synthetic ends.
The same unit is applicable when attaching the tow rope to the mast. In this case, however, the entire running end has to be carried around the main and mast. In the case of a biting, proceed in the same way as attaching a tugboat to the hook.
Carbine units Rastorguev Mikhail
BAYONET KNOT
BAYONET KNOT
The working end of the rope is wrapped around a tree or relief ledge. Bring it over the root end, go around the root end and thread it into the resulting loop (Fig. 8). The working end is again carried over the main one, goes around the main one and is threaded into the second formed loop (Fig. 9), etc. Usually 2-3 hoses are made. (“The Queen of England’s yacht is moored on two hoists…”) Then it is advisable to secure the working end to the main end. When the root end is loaded, the knot will not tighten, and it will remain possible to untie it without removing the load from the root end.
From the book Carabiner Knots author Rastorguev MikhailBACHMAN KNOT Although the Bachmann knot was described earlier, it belongs to carabiner knots and it was decided to repeat its description in this book. The long side of the carabiner is applied to the main rope. The cord is fastened into a carabiner, folded in half and wrapped 2-3 times
From the book Sea knots in everyday use by Jarman ColinAnchor knot, or Fisherman's bayonet The structure of the Fisherman's bayonet is very similar to the Enveloping Turn, but is more reliable. As you can see, the working end of the rope passes inside the enveloping turn and thus, when loaded, blocks the knot, preventing it from coming undone.
From the author's bookSpinning knot This knot is often used incorrectly. There must always be equal (or at least almost equal) loads on both sides in weight, otherwise the ends will begin to unwind and the knot will eventually come undone. For this reason, a tapping unit is not needed
From the author's bookTowing knot This knot, also called the Nameless knot, is extremely useful when towing, since it can be undone even under great pressure from the load. To tie this knot, make a Double Wrap around the load half mast (1), then
From the author's bookClew Knot and Sling Knot Clew KnotThe clew knot is used to connect two ropes together. It is also similar to the Sling Knot: in both cases, one rope has a small connecting loop at the end. Then, when there is no permanent loop,
From the author's bookDouble clew knot and Double Sling Knot Double Clew Knot For added safety, the Clew and Sling Knots (see previous page) can be quickly converted into double knots. This is done like this: you wrap the working end of the rope around
From the author's bookRope Bayonet Knot Used to attach one rope to another, such as a rope that is used to relieve pressure on another rope. This knot is safer if the load is attached so that the attaching rope
From the author's bookSliding Bayonet Knot on a Rigid Crossbar This form of this knot is slightly different from the basic one already described above, and is used for a more secure attachment to the crossbar, but not to another rope. In this case, the first turns do not intersect themselves:
From the author's bookSurgeon's Knot This knot can be described as a Reef Knot for slipping, elastic synthetic ropes because they serve the same purpose, but the Surgeon's Knot is safer to use. modern materials. There are two of it
From the author's bookFlat Knot, or Flat Bayonet Great for tying two ropes together, regardless of the type of material they are made of or their diameter. Often used in marine applications to add additional rope to a stop anchor. At the end of one of the ropes
From the author's bookFisherman's Knot-2 This modification of a simple Fisherman's Knot is especially suitable when using sliding synthetics. The first double turn is made in the same way as in a simple Fisherman's Knot: the working end passes under it. Next, the working end is wrapped several times around
From the author's bookCrossbar Knot This is something of a hybrid between the Punch Knot and the Constrictor Knot. It holds better than the Punch Knot in cases where there is a larger load on one side than the other, and it unties more easily than the Shrink Knot. To
From the author's bookStopper knot This knot can only be called a knot with a stretch, and in this case we can rather talk about a coupling than a binding. The locking knot is used for the most part when it is necessary to reduce the load on one cable by adding a second one. The turn is made
From the author's bookTop knot The top knot can be used to attach shrouds to masts or to erect a temporary flagpole, as well as for many other simple operations. Three loops are made and placed next to each other so that the lower left part of the outermost loop
From the author's bookHunter's Knot Typically used to tie two ropes together, the Hunter's Knot is great for both tight, non-elastic ropes and softer, slippery synthetic ropes. This is a rectangular knot that is made in the following way: two ropes
From the author's bookKnot “Bull-gorden” More reliable than the Half-Knot, the Bull-gorden allows you not to be afraid that the cable may unwind. Wind the cable as usual, but leave the end long. Wrap this end around the top of the skein, going from bottom to top. Then insert the end into